Mobius Maxi F1.5 2.7k

Oh, Cool! I only stumbled on it a few months ago.

Don't remember if it was here or the manual, first time I wanted to use webcam mode, read that the card needs to be removed for it to work, have always used it like that.
 
Don't remember if it was here or the manual, first time I wanted to use webcam mode, read that the card needs to be removed for it to work, have always used it like that.

doesn't need to be removed, you can change modes after connecting, if you connect without the card it just automatically goes to webcam mode when you connect
 
You'll only have a bigger piece of glass, problem is the lens cap's diameter.
That is why the solution needs to come by using a different approach.
Something like this approach is needed.
In this case we need an 18mm (approximately) slip on cpl filter adapter made something like this. It may need to be a different height to work in this application.

s-l1600.jpg


s-l1600.jpg


That way we can end up with something like this that bypasses the vignetting problem..

Ch73s36.jpg
 
OK, I see that I did misunderstand your post. You mentioned my name and shifted the subject to slding filters in the following sentence. Well, perhaps I shouldn't be replying to posts at 5am. :) Nevertheless, since you questioned the notion of a sliding CPL design being knocked out of position from G forces in favor of a hinged design held in place by "friction" I brought up the fact that even a hinged design is just as likely to flip into or out of place if one is driving on bumpy roads.

Your logic about the severity of bumpy roads, "bump acceleration in a car" or lateral "G" forces and the like is rather amusingly provincial. It is wrong to assume that everyone else in the world is going to experience the same genteel driving conditions that you experience in the UK. As I've explained many times I reside in a mountainous rural area where I live on and drive on bumpy dirt roads every day. Depending upon the weather conditions, temperature, time of year and road crew maintenance schedule, the road conditions vary from tarmac like smoothness to rutted washboards, pot holes, gravel swales and deep mud along with all kinds of other road surface hazards such as deep packed ridges of ice and frozen snow. Dash cam vibration, shock and road impact has been a primary concern that I've had to contend with ever since I first became involved with these cameras. And many people around the world live in urban areas with large sections of poorly maintained roads full of potholes at every turn.

Each year, early Spring, we experience a phenomenon called "Mud Season" where the frost is working its way out of the ground, snow and rain are often falling and the roads turn into a hellish mess that then freezes solid every night only to melt the next day (or not). You want some bumps and lateral G forces while driving, you won't find better! :smug: This is in part why I drive a 4x4 truck with knobby M&S tires! And this is also why everything related to using dash cams in my vehicle needs to be as solid and secure as possible.

View attachment 41855

A sliding design will have to slide freely, so is more likely to be displaced than a hinge design where friction plays more of a part, and we certainly don't have genteel roads, ours are some of the worst in Europe, I'd say a lot worse than your urban roads, as even our urban ones are full of potholes. However, yes, your country back roads, are far worse than our tarmac ones!

Having said that, any design is going to be for masses. I doubt any manufacturer this side of someone like Jeep is going to purposely manufacture a system to withstand roads like the one pictured. Dashcam manufacturers are likely to aim for the majority of the world market which will be tarmac'ed smooth surfaces. Any design to withstand the roads you've pictured, is going to be a specialist off road brand's area or a DIY fix. On that, your own lens cap design is definitely going to fair best.
 
You'll only have a bigger piece of glass, problem is the lens cap's diameter.

I think the problem is the lens cap's depth when fitted by the sounds it. The inner diameter is the same as the outer dimensions of the lens barrel which is already wider than the lens. However, what appears to be happening is the stand off between the lens and cpl caused by the depth of the cap is sufficient to allow the cap's width to intrude into the picture by virtue of it's apertures distance from the lens. As Dashmallow says, the answer will be to get the CPL much closer to the glass of the lens by mounting it externally around the cpl ring rather than internally by a lens cap stuck on the glass. That will also have the advantage of allowing the full width of the CPL glass to be used, reducing the risk of this happening again, instead of just the diameter represented by the lens cap.
 
That is why the solution needs to come by using a different approach.
Something like this approach is needed.
In this case we need an 18mm (approximately) slip on cpl filter adapter made something like this. It may need to be a different height to work in this application.

s-l1600.jpg


s-l1600.jpg


That way we can end up with something like this that bypasses the vignetting problem..

Ch73s36.jpg

3 posts in a row, sorry!

Just looking at the picture immediately above, I'd say the depth of the CPL ring there looks deeper then the material in the end of a Mobius lens cap, so it would probably also vignette.

The push fit CPL adaptor ring is a good idea (although it will probably take the paint off the lens barrel unless plastic). However the one posted has considerable depth to it. Add in the depth of the CPL ring, and it's going to have to be of considerably larger diameter to avoid the vignette. That said, if someone can find one, that's say an 18mm push (or whatever the external diameter of the Mobius lens barrel is) to 40 or 50 or even 60mm adaptor, it may do the trick, provided it will push on the lens barrel far enough to avoid intrusion.

Doesn't solve the easy night removal though.
 
The Maxi files are 1.3GB for 3 minutes at 60.1Mbps.

I have tried the next quality setting (2.7k Superfine 44Mbps) but the camera seems to lose detail through higher compression. Remember that at 2.7k the Maxi is using JPEG encoding rather than the more efficient AVC encoding, so bitrates and file sizes have to go up to maintain the same level of detail.
Is the encoding used a developer choice or is that built in based on the hardware used? While RC users might want longer battery life dashcam users do not really object when a camera uses a little more electricity if files of the same quality were smaller.
 
Is the encoding used a developer choice or is that built in based on the hardware used? While RC users might want longer battery life dashcam users do not really object when a camera uses a little more electricity if files of the same quality were smaller.
I was not referring to battery efficiency in relation to JPEG vs AVC. The Maxi chipset can only handle h264 (AVC) up to 1920x1080 resolution. However it can also process the higher 2704x1524 resolution (and interpolated 4k) using MJPEG, which is less efficient in terms of compression. That's why there is such a big jump in the bitrate from FHD to 2.7k.
 
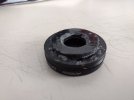
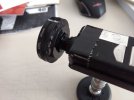
Here's a solution that works for me, made it in 20 minutes.

Adjusting the cpl filter is easy, look through the filter towards a led screen (that is ON....), turn the cpl filter as to a point where you can't see the screen anymore, it seems like the cpl glass gets black.

Then turn the top of the filter to the LEFT 45 degrees, mark the upper position, and you're done....! No need for "webcam-type-in-the-car-struggles"...

It ALWAYS works this way. Don't believe me? Take your polaroid sunglass and do the same towards the screen. Now compare, your sunglass is ALWAYS in ONE position (horizontal) on your nose.....(!) If you turn the top of your POLARIZED sunglass 45 degree to the RIGHT then you'll see the glass gets "black" as well. So, turning a polarized glass 45 degree left, should get you the most desirable position for your CPL filter. Try it in you car wearing your polarized sunglasses, look through the windscreen (on a sunny day..) turn your head vertically towards your shoulders, and see the glare appear and dissappear when turning back upwards.....

Take a flat rubber ring/washer of 20mm ID x 30mm OD and 3mm thick. Place the rubber over the lens, if it feels too loose, apply some thick tape and over-cut it in the hole, so that a small piece of the tape bends inward, tightening the lens fit more snug.

Then buy a phone lens adapter with 37mm screw mount and 37mm CPL filter, take out the metal holder out of the plastic ring, and there is your metallic 37mm cpl mount-base. Screw in your 37mm CPL filter, note the top marking you added, and you're good to go!

Use dual sided adhesive tape to mount your rubber ring to the round metallic mount (cutting out the hole of course), and your CPL filter is ready. Now a CPL filter is adjustible, and therefore there's a chance it may rattle while driving due to your car's vibrations. If it does, take a bicycle's defective innertube and cut 2 mm of it, and place it around the outer ring of the cpl holder, rattle gone.

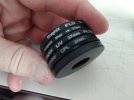
Great bonus: you can now easily experiment with other 37 mm filters as well, like UV, STAR and FLD filters, you know, for filmic effects!!

You can add another rubber ring if you think the fixture isn't stable enough.

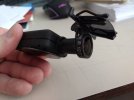
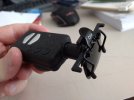
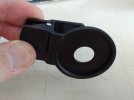
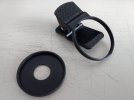
See pictures.

IMG_20180920_145600310.jpgIMG_20180920_145621210.jpgIMG_20180920_145356706.jpgIMG_20180920_145333785.jpgIMG_20180920_145725440.jpg

I've used the CPL holder before in another setup, took of that glue, so there's some residue there. You can use SUGRU (see picture) to further style/mold your mount in the shape you want, and make the holder more stable to the lens.

Apart from the glue residue from an earlier "job", that don't look shabby at all to me!

IMG_20180920_153113975.jpg

Nevertheless the solution with the SUN FLIPPIES (see picture) saves you a lot of work, because you ALREADY know the correct position for the glass, cause it's a sunglass..... top side is always, well, you know on top, also on your Mobius.

IMG_20180920_153846941.jpgIMG_20180920_153901075.jpg

But I also gotta be honest, I ALMOST NEVER use the CPLfilters...... :shame:
 
Last edited:
A sliding design will have to slide freely, so is more likely to be displaced than a hinge design where friction plays more of a part, and we certainly don't have genteel roads, ours are some of the worst in Europe, I'd say a lot worse than your urban roads, as even our urban ones are full of potholes. However, yes, your country back roads, are far worse than our tarmac ones!

Having said that, any design is going to be for masses. I doubt any manufacturer this side of someone like Jeep is going to purposely manufacture a system to withstand roads like the one pictured. Dashcam manufacturers are likely to aim for the majority of the world market which will be tarmac'ed smooth surfaces. Any design to withstand the roads you've pictured, is going to be a specialist off road brand's area or a DIY fix. On that, your own lens cap design is definitely going to fair best.

Somehow you've gone from minimizing the need for a securely mounted CPL for "all but the severest of bumps" to now stating that the UK has the worst roads in all of Europe. And previously you wanted ruggedized dash cameras, now you want a design for the masses.

Whatever road surfaces one generally drives on, be they major highways, parkways, suburban roads, residential side streets or bumpy mountain roads, if there is one thing I've learned in more than eight years of dash cam ownership involving dozens of dash cams and accessories it is that every aspect of the design must be absolutely solid and secure. Sooner or later something will loosen up, fall off, vibrate, begin to rattle, or whatever. Rough roads may hasten this along or make it worse but shock and vibration is present in any vehicle operating in any common and variable road conditions one is likely to encounter.

The need for all aspects of a dash cam and accessories to be bullet-proof secure and stable applies to the camera mounts themselves, attached filters, cables and indeed the camera itself and its internal components. There is no middle ground.

There is absolutely no distinction between a "design for the masses" and the requirement that a CPL filter of ANY design remain securely in place in ANY driving environment, no matter what.

Finally, I wonder why you bring up the manufacturer of Jeep automobiles (exclusively) in a discussion about dash cams and polarizing filters? As it happens people in my neck of the woods drive numerous different brands and types of vehicles, all of which are quite suitable for the challenging rural driving conditions I describe, however none of these car and truck brand options have anything whatsoever to do with how well dash cams or accessories will hold up to shocks and vibrations caused by the variations of road surfaces they drive on.
 
Last edited:
I ran on muddy roads like Daskmellow showed until the roads finally were paved. I remember going over the road and watching the mud suck in on itself where I went through a deep rut. I also remeber seeing a full size pickup (Ford if I recall correctly) that was buried in mud up to its frame in the middle of the (open year round) road. Once of the best machines I had was a 1981 2wd datsun pickup. It went through places it should have gotten stuck in. I can not say that I miss the bumpy dirt roads. I do however miss the lower volume of traffic going by the house back when the road was still dirt making it a less attractive route to the big city (probably well under 30k population at that time).

Those who have not driven on a dirt road that was freshly graded with lots of small rocks left over do not understand the term rough roads.
 
My friend lives in Romania with his lovely Romanian wife, he sold his car and ONLY travels by foot or train (and they ain't great either...)
 
Here's a solution that works for me, made it in 20 minutes.

Adjusting the cpl filter is easy, look through the filter towards a led screen (that is ON....), turn the cpl filter as to a point where you can't see the screen anymore, it seems like the cpl glass gets black.

Then turn the top of the filter to the LEFT 45 degrees, mark the upper position, and you're done....! No need for "webcam-type-in-the-car-struggles"...

It ALWAYS works this way. Don't believe me? Take your polaroid sunglass and do the same towards the screen. Now compare, your sunglass is ALWAYS in ONE position (horizontal) on your nose.....(!) If you turn the top of your POLARIZED sunglass 45 degree to the RIGHT then you'll see the glass gets "black" as well. So, turning a polarized glass 45 degree left, should get you the most desirable position for your CPL filter. Try it in you car wearing your polarized sunglasses, look through the windscreen (on a sunny day..) turn your head vertically towards your shoulders, and see the glare appear and dissappear when turning back upwards.....

Take a flat rubber ring/washer of 20mm ID x 30mm OD and 3mm thick. Place the rubber over the lens, if it feels too loose, apply some thick tape and over-cut it in the hole, so that a small piece of the tape bends inward, tightening the lens fit more snug.

Then buy a phone lens adapter with 37mm screw mount and 37mm CPL filter, take out the metal holder out of the plastic ring, and there is your metallic 37mm cpl mount-base. Screw in your 37mm CPL filter, note the top marking you added, and you're good to go!

Use dual sided adhesive tape to mount your rubber ring to the round metallic mount (cutting out the hole of course), and your CPL filter is ready. Now a CPL filter is adjustible, and therefore there's a chance it may rattle while driving due to your car's vibrations. If it does, take a bicycle's defective innertube and cut 2 mm of it, and place it around the outer ring of the cpl holder, rattle gone.

Great bonus: you can now easily experiment with other 37 mm filters as well, like UV, STAR and FLD filters, you know, for filmic effects!!

You can add another rubber ring if you think the fixture isn't stable enough.

See pictures.

View attachment 41889View attachment 41888View attachment 41890View attachment 41891View attachment 41887

I've used the CPL holder before in another setup, took of that glue, so there's some residue there. You can use SUGRU (see picture) to further style/mold your mount in the shape you want, and make the holder more stable to the lens.

Apart from the glue residue from an earlier "job", that don't look shabby at all to me!

View attachment 41892

Nevertheless the solution with the SUN FLIPPIES (see picture) saves you a lot of work, because you ALREADY know the correct position for the glass, cause it's a sunglass..... top side is always, well, you know on top, also on your Mobius.

View attachment 41894View attachment 41893

But I also gotta be honest, I ALMOST NEVER use the CPLfilters...... :shame:


OK, here's about 18 seconds into the clip the cpl comes off, you decide for yourself

 
surprisingly it looked better with it on, yes it's brighter with it off but all the lights are over blown which washes off some detail

My thoughts exactly and the vent holes don't glare in the windscreen with the CPL on while still seeing enough in case of an incident. It must have to do with the F1.4 lens that's letting way more light in than the original one. Daytime results (probably) tomorrow.
 
Yep given the low light performance is very good but not the best, I expected more noise with it on. That said, the road is quite well lit. The real test is a suburban side road / unlit country road / unlit motorway (freeway / autobahn).
 
Back
Top