DT MI
Well-Known Member
- Joined
- Oct 10, 2014
- Messages
- 6,754
- Reaction score
- 5,640
- Location
- Michigan
- Country
- United States
- Dash Cam
- More than my wife thinks I need.
While there are a number of DIY solutions for a CPL for the SG9665GC V1/V2 cameras not everyone wants to go that route and would prefer to just buy a ready made solution. The only available CPL for the early 'GC' is 3D printed and hand assembled - translate that to expensive (US$40 and up depending on seller) - and availability is/will be diminishing over time.
The VIOFO CPL on the other hand is available for around US$15. The problem is it won't fit on the V1 and V2 versions of the 'GC' because of differences in the lens housing design. Among the differences - the height of the lens housing, with the VIOFO cameras and the 'GC' V3 being taller than the V1/V2, and a notch to accommodate a tab integrated in the CPL.
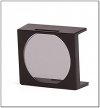
Here you can see the tab on the VIOFO CPL:
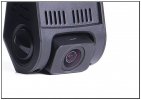
And here an image of the VIOFO A118 showing the notch for the CPL.
This link shows the SG9665GC V3 lens housing (with corresponding notch) and CPL attached.
https://dashcamtalk.com/forum/threads/differences-between-sg9665gc-v2-and-v3.25847/#post-303937
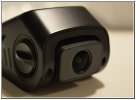
Finally, a picture of the 'GC' V1/V2 lens housing (no notch)
So the question now is how to easily fit the VIOFO CPL to the 'GC' V1/V2 (and possibly other A118/B40) cameras? It will be necessary to: 1) increase the height of the lens housing so the VIOFO CPL will fit and, 2) create a notch to accommodate the mounting tab on the CPL.
My solution - tape. Just about any tape (within reason) will work. In this example I used blue 'painters tape' because it will show up well in these pictures and (more importantly) it was within arms reach while I was figuring this out. Use your own judgement and a bit of common sense in your selection.
(Note: Some tapes I would not recommend. Electrical tape because the adhesive on most of them is really messy and doesn't tolerate heat very well. Clear package sealing tape because it's difficult to work with for this project - trust me, I tried.)
The process:
Step 1 - Layer on enough tape so the CPL fits snugly on the lens. I needed 4 layers of the painters tape on each side of the lens housing. Then slide the CPL over them and apply some pressure to mark the location of the tabs (one on each side). Make sure the CPL is properly centered.

Step 2 - Using a sharp cutting tool of your choice (I used a razor hobby knife) remove the tape where the tab will be to make a 'slot' for it to engage.
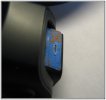
Step 3 - Mount the CPL so the tab engages the 'slot' in the tape.
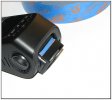
Step 4 - If you're a 'neat freak' trim the excess tape for a cleaner look.
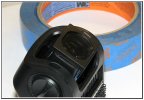
This approach may work for other A118/B40 cameras but is dependent on the lens and housing. Some have the lens protruding in front of the housing so accommodation will have to be made to create a gap between the CPL and camera lens. Others may not have enough clearance between the camera body and lens housing to allow room for the CPL.
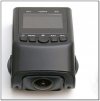
Have fun...
The VIOFO CPL on the other hand is available for around US$15. The problem is it won't fit on the V1 and V2 versions of the 'GC' because of differences in the lens housing design. Among the differences - the height of the lens housing, with the VIOFO cameras and the 'GC' V3 being taller than the V1/V2, and a notch to accommodate a tab integrated in the CPL.
Here you can see the tab on the VIOFO CPL:

And here an image of the VIOFO A118 showing the notch for the CPL.

This link shows the SG9665GC V3 lens housing (with corresponding notch) and CPL attached.
https://dashcamtalk.com/forum/threads/differences-between-sg9665gc-v2-and-v3.25847/#post-303937
Finally, a picture of the 'GC' V1/V2 lens housing (no notch)

So the question now is how to easily fit the VIOFO CPL to the 'GC' V1/V2 (and possibly other A118/B40) cameras? It will be necessary to: 1) increase the height of the lens housing so the VIOFO CPL will fit and, 2) create a notch to accommodate the mounting tab on the CPL.
My solution - tape. Just about any tape (within reason) will work. In this example I used blue 'painters tape' because it will show up well in these pictures and (more importantly) it was within arms reach while I was figuring this out.
(Note: Some tapes I would not recommend. Electrical tape because the adhesive on most of them is really messy and doesn't tolerate heat very well. Clear package sealing tape because it's difficult to work with for this project - trust me, I tried.)
The process:
Step 1 - Layer on enough tape so the CPL fits snugly on the lens. I needed 4 layers of the painters tape on each side of the lens housing. Then slide the CPL over them and apply some pressure to mark the location of the tabs (one on each side). Make sure the CPL is properly centered.

Step 2 - Using a sharp cutting tool of your choice (I used a razor hobby knife) remove the tape where the tab will be to make a 'slot' for it to engage.

Step 3 - Mount the CPL so the tab engages the 'slot' in the tape.

Step 4 - If you're a 'neat freak' trim the excess tape for a cleaner look.

This approach may work for other A118/B40 cameras but is dependent on the lens and housing. Some have the lens protruding in front of the housing so accommodation will have to be made to create a gap between the CPL and camera lens. Others may not have enough clearance between the camera body and lens housing to allow room for the CPL.

Have fun...
Last edited:
