Mobius Varifocal Zoom IR

Did you have your windshield polished or something, it appears to be invisible almost.

I did clean my windshield recently! :) I used #0000 steel wool and a product called "Invisible Glass" to clean it (the best glass cleaner!) I even used car polish on the glass.

The funny thing is that my windshield is so pockmarked from small grains of sand and grit hitting it over time driving around on the dirt roads where I live that it can almost be hard to see through the glass if the light hits it from an oblique angle like at sunset. It's so bad that I really need to get it replaced and there have been many times when the bad windshield can be seen affecting my dash cam videos. Somehow, careful cleaning and the car wax on the glass has improved things somewhat and the lighting conditions for the above screen shot were just perfect for a clear image and good exposure.
 
Last edited:
I did clean my windshield recently! :) I used #0000 steel wool and a product called "Invisible Glass" to clean it (the best glass cleaner!) I even used car polish on the glass.

The funny thing is that my windshield is so pockmarked from small grains of sand and grit hitting it over time driving around on the dirt road where I live that it can almost be hard to see through the glass if the light hits it from an oblique angle like at sunset. It's so bad that I really need to get it replaced and there have been many times when the bad windshield can be seen affecting my dash cam videos. Somehow, careful cleaning and the car wax on the glass has improved things somewhat and the lighting conditions for the above screen shot were just perfect for a clear image and good exposure.

I never tried #0000 SW. Invisible glass is well known for being a very desirable product, SAM's warehouse used to carry it and I bought it by the case. Don't know if they still carry it or not.
 
I never tried #0000 SW. Invisible glass is well known for being a very desirable product, SAM's warehouse used to carry it and I bought it by the case. Don't know if they still carry it or not.

There's a well known video with a zillion views on YouTube all about using superfine #0000 steel wool to clean your windshield. Steel wool works very well to remove tough water spots.
 
Last edited:
@Dashmellow I was wondering if you have tried anything with mounting/gluing a IR cut filter in your Varifocle lens or any other lens yet. I know you have a lot of things going on right now, actually I don't see how you get the time to do it all.
You posted a link to some aftermarket cut filters that I was thinking about ordering some, however a question (as usual) does the color make a difference, I see red and ones that sort of a aqua marine color. In all my research it was never posed as a question by anyone, therefore the question. I have a suspicion that the color might have something to do with the wave lengths of different bands of IR but really don't know.

I've ordered two of the IR cut filters I mentioned previously but they haven't arrived yet. In the meantime I'm considering using one from an old CCTV camera I dismantled but I haven't quite figured out how to install it using this IR varifocal lens. As it is rectangular and fairly thick it may need to go over the sensor (as it was mounted in the CCTV camera) rather that attached to the back of the lens.

The difference between the blue and the red filters is that they filter out slightly different portions of the near infra-red spectrum. I don't really know all that much about the blue ones to be honest with you but basically it has to do with the focus and reducing stray light. IR wavelengths focus on a slightly different plane than visible light and in certain instances IR images can look out of focus when a CCTV camera switches from daytime to nighttime. Anyway, the red filters are the ones you want for a dash cam.

Keep in mind that thin film coated dichroic filters like these IR-cut filters can appear to be different colors depending on what angle you view them from and how the light is hitting them. They can look greenish/bluish from one angle and red from another. Anyway, every IR cut filter I've ever seen in a dash camera, action camera looks basically red.

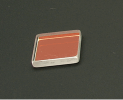
The one from the CCTV camera I dismantled looks very similar to this one:
ir_cut.png
 
I've ordered two of the IR cut filters I mentioned previously but they haven't arrived yet. In the meantime I'm considering using one from an old CCTV camera I dismantled but I haven't quite figured out how to install it using this IR varifocal lens. As it is rectangular and fairly thick it may need to go over the sensor (as it was mounted in the CCTV camera) rather that attached to the back of the lens.

The difference between the blue and the red filters is that they filter out slightly different portions of the near infra-red spectrum. I don't really know all that much about the blue ones to be honest with you but basically it has to do with the focus and reducing stray light. IR wavelengths focus on a slightly different plane than visible light and in certain instances IR images can look out of focus when a CCTV camera switches from daytime to nighttime. Anyway, the red filters are the ones you want for a dash cam.

Keep in mind that thin film coated dichroic filters like these IR-cut filters can appear to be different colors depending on what angle you view them from and how the light is hitting them. They can look greenish/bluish from one angle and red from another. Anyway, every IR cut filter I've ever seen in a dash camera, action camera looks basically red.

The one from the CCTV camera I dismantled looks very similar to this one:
View attachment 34718

@Dashmellow I found this web site interesting relative to optic adhesives. Maybe it will help you with the adhesives problem.

https://www.photonics.com/a52006/Choosing_the_Right_Epoxy_for_Optical_Applications
 
Anyone knows what kind of glue do manufacturers use to secure the m12 lens to prevent the focus from changing?
 
@Dashmellow I found this web site interesting relative to optic adhesives. Maybe it will help you with the adhesives problem.

https://www.photonics.com/a52006/Choosing_the_Right_Epoxy_for_Optical_Applications

Thanks for the link @Lola. Lots of interesting stuff to read and look at on that web site. Unfortunately, when it comes to these industrial adhesives it's impractical to use them if all you want to do is install an IR-cut filter on a couple of M12 lenses since they tend to be very expensive, you can't generally purchase small quantities and you need the proper equipment for curing the stuff, especially the optical adhesives. Even buying a UV flashlight and a small quantity of adhesive if available would cost way more than the lenses I want to mount the filters on.

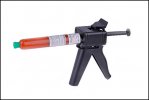
Edit: I did manage find some UV optical cement for only four dollars of the type that is often used for gluing smartphone screens after repairs but it turns out you need a special applicator gun, plus I would still need a suitable UV light source. I dunno, I might be able to get away without the applicator and there are some cheap UV flashlights on the market but I'll have to do some more research.

gluegun.jpg
 
Last edited:
Anyone knows what kind of glue do manufacturers use to secure the m12 lens to prevent the focus from changing?

A dab of silicon sealant will work. Holds good and easy to remove should you need to refocus again.
 
A dab of silicon sealant will work. Holds good and easy to remove should you need to refocus again.

I can see how silicone could work but the most commonly available type of silicone sealant releases quite a lot of acetic acid fumes before it cures (that's why it smells a bit like vinegar) and I fear it could damage a lens or sensor if one is not careful. There is a neutral cure silicone sealant that releases methanol on curing that might be an option.
 
Last edited:
I can see how silicone could work but the most commonly available type of silicone sealant releases quite a lot of acetic acid fumes before it cures (that's why it smells a bit like vinegar) and I fear it could damage a lens or sensor if one is not careful. There is a neutral cure silicone sealant releases methanol on curing that might be an option.

I've used it on my Mobius after the lock screw stripped. I just apply silicone on end of toothpick and have no problem. I can see if too much might affect lens and sensor.
 
I've used it on my Mobius after the lock screw stripped. I just apply silicone on end of toothpick and have no problem. I can see if too much might affect lens and sensor.

Yeah, using just a tiny amount makes sense and seems like it should work. Personally, I'm just super paranoid around delicate optical surfaces.

FWIW, I sometimes use a tiny piece of 3M VHB tape to hold lenses in place after focusing. It's very secure, neutral and easily removed.
 
Thanks for the link @Lola. Lots of interesting stuff to read and look at on that web site. Unfortunately, when it comes to these industrial adhesives it's impractical to use them if all you want to do is install an IR-cut filter on a couple of M12 lenses since they tend to be very expensive, you can't generally purchase small quantities and you need the proper equipment for curing the stuff, especially the optical adhesives. Even buying a UV flashlight and a small quantity of adhesive if available would cost way more than the lenses I want to mount the filters on.

Edit: I did manage find some UV optical cement for only four dollars of the type that is often used for gluing smartphone screens after repairs but it turns out you need a special applicator gun, plus I would still need a suitable UV light source. I dunno, I might be able to get away without the applicator and there are some cheap UV flashlights on the market but I'll have to do some more research.

View attachment 35334

Those optical adhesives vary so much between manufactures that it's insane. Best thing I can gather from research is to look for some of the small containers (one time use) and store the rest in the refrigerator, but even there you have to be careful that you can do that. Probably the best thing to do would be to pick a company that has readily available products and has been in the business for a long time, 3M for instance. Contact them with an explanation of what you want to do cheaply and request advice. Hmm, I think I'll do just that and see what they have to say.
Some things cure by UV light, heat, chemical reaction (usually 2 part adhesives), shelf life varies a lot! The longest I've read about are usually a few months to a year depending on ingredients and storage type, and that includes the date it was made.
It seems they do have the small guy over a barrel on doing this himself but there has to be a way or the Chinese wouldn't be doing it free of charge when one orders a lens!

I noticed that Amazon sells optical adhesives for fixing things like cell phones, tablets, whatever, but you have to be sure it is a compatible compound that will work with glass and metal.
 
@Dashmellow - Thanks for your hard work on this, I'm just getting to fitting my 12mm lens and am interested in your most current settings on the Mobius to correct for the lack of an IR cut filter. Just looking for a starting point as I start to tweak mine.
 
@Dashmellow - Thanks for your hard work on this, I'm just getting to fitting my 12mm lens and am interested in your most current settings on the Mobius to correct for the lack of an IR cut filter. Just looking for a starting point as I start to tweak mine.

You're very welcome! I'm pleased to see other members exploring this.

Since the end of November I removed the 2.8mm-12mm varifiocal lens from my Mobius and began experimenting with the 4mm ƒ/1.2 and 6mm ƒ/1.2 lenses that we've been talking about over in the threads about them. HERE & HERE. Perhaps you've been following them.

By mistake, Treeye forgot to install the IR-Cut filters on the lenses I ordered from them (they've since sent me replacements with the IR filters) and so I removed the varifocal and began experiementing with these non-IR corrected lenses on the Mobius. I continued my color correction tinkering and tweaking based on those lenses using my previous adjustments from the varifocal as a starting point. Eventually, I managed to arrive at a fairly accurate color balance without any IR-Cut filter (depending on the lighting-works best under neutral cloudy skies) . You can check out the results HERE.

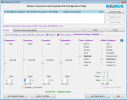
Anyway, before I left off with the Varifocal 2.8mm-12mm lens and went on to making adjustments with the new 4mm and 6mm lenses I made a screen shot of my last adjustments for the varifocal and attach it below.

Use these settings as a starting off place and see what happens. If you too make screen shots of your settings you can experiment to your hearts content and always be able to go back to where you left off. That's a good way too learn about RGB color correction or any of the other settings available with the Mobius GUI. Of course, you can also save each version as a profile but I prefer to do it this way. Also, note that the Mobius GUI will make a numerical notation of your last individual setting to the right of the new setting. So in the screen shot below you'll see where I've now changed the Exposure from -4 to -5 and I changed the Blue setting from 300 to 308.

10:13:17 .png
 
Last edited:
You're very welcome! I'm pleased to see other members exploring this.

Since the end of November I removed the 2.8mm-12mm varifiocal lens from my Mobius and began experimenting with the 4mm ƒ/1.2 and 6mm ƒ/1.2 lenses that we've been talking about over in the threads about them. HERE & HERE. Perhaps you've been following them.

By mistake, Treeye forgot to install the IR-Cut filters on the lenses I ordered from them (they've since sent me replacements with the IR filters) and so I removed the varifocal and began experiementing with these non-IR corrected lenses on the Mobius. I continued my color correction tinkering and tweaking based on those lenses using my previous adjustments from the varifocal as a starting point. Eventually, I managed to arrive at a fairly accurate color balance without any IR-Cut filter (depending on the lighting-works best under neutral cloudy skies) . You can check out the results HERE.

Anyway, before I left off with the Varifocal 2.8mm-12mm lens and went on to making adjustments with the new 4mm and 6mm lenses I made a screen shot of my last adjustments for the varifocal and attach it below.

Use these settings as a starting off place and see what happens. If you too make screen shots of your settings you can experiment to your hearts content and always be able to go back to where you left off. That's a good way too learn about RGB color correction or any of the other settings available with the Mobius GUI. Of course, you can also save each version as a profile but I prefer to do it this way. Also, note that the Mobius GUI will make a numerical notation of your last individual setting to the right of the new setting. So in the screen shot below you'll see where I've now changed the Exposure from -4 to -5 and I changed the Blue setting from 300 to 308.

View attachment 35566

Thanks much, very informative and detailed response, I really appreciate it! I've been tracking the other threads you pointed to as well, but asked the question about settings here as this is the only place I've seen you post them. I'm experimenting with a 12mm fixed lens. You mentioned that the settings above were the last for the varifocal - do you have the settings for your experiments with your 6mm? Maybe best to post in that thread to keep them "cleaner."

Thanks again!

I've basically been winging it with the color and exposure adjustments for the 4mm and 6mm lens and haven't kept screen shots or a record. I used the settings I arrived at for the 6mm as a point of reference to make further adjustments for the 4mm after swapping lenses. Giving you those numbers may just confuse the situation if they happen to be way off for your lens.

Each lens has a different inherent color profile regardless of its focal length. The settings you asked for that I used with my 6mm lens would not necessarily be of much help with your fixed 12mm lens.

My recommendation for now would be to use the color settings in my screen shot above as a starting place. That should get you somewhere in the ballpark. Then make additional adjustments based on the results you are getting with your 12mm lens.

Keep in mind that I said "color" settings. The sharpness, exposure, contrast and saturation settings correspond specifically to my 2.8-12mm ƒ/1.2 lens and to my personal preferences. With those settings, start from zero and adjust accordingly based on the apparent and perceived requirements for your 12mm lens. A good technique here would be to make fairly extreme contrast, exposure and saturation adjustments to start with and this will give you a better understanding of what these settings do. Don't be afraid to make mistakes, you can always start over.

Here are a few RGB color corrections tips:

Looking at the chart below you'll see the RGB color wheel.

Note that BLUE is directly opposite YELLOW.

Looking at the chart note that GREEN is directly opposite RED.

So, if the image appears too YELLOW, add more BLUE, its opposite color on the chart. (Think - "Minus BLUE equals YELLOW - minus YELLOW equals BLUE")

If the image is too RED, you can subtract RED or add some GREEN. Often it will need a combination of both which is where this gets tricky. You may have to again change the BLUE after making RED and GREEN changes.

The goal is to achieve "white balance" where all three additive colors of light - RED-GREEN-BLUE are in proper mathematical proportions as represented by the white circle on the chart.

Often a white or grey object in your image (such as the wall of a building) will be helpful in determining whether you are anywhere near white balance.

With enough trial and error you can get pretty close but without an IR-cut filter it will never be perfect and it will change when the ambient light changes. What looks perfect on a cloudy day will look different under yellow sunshine.
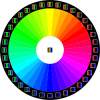
250px-RGB_color_wheel_10.svg.png

In the RGB color system red, green and blue color are expressed (and adjusted) as 8-bit numbers in decimal form (0 to 255) in what is known as a color triplet, as shown below. Unfortunately, the Mobius doesn't give you a graphical representation or color sliders with a dynamic color chip or real time image to look at so you are stuck with just entering numerical values and that can make this effort more challenging, especially if you are not familair with the concepts.

220px-RGB_sliders.svg.png
 
Last edited:
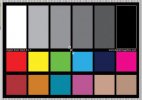
These may be of some help with color calibration.

View attachment 35575
https://www.bhphotovideo.com/c/product/1014557-REG/dgk_color_tools_dkk_set_of_2_dkk_poly_bag_2.html

For some reason most of these color cards, especially the larger ones, cost more than Mobius. :confused:

The "some reason" is that they are highly accurate professional calibration charts made to extremely exacting specifications with pigments that have highly specific reflectivities.

A 5 x 7 inch chart like in the above link would be essentially useless. For color calibrating a dash camera lens that has no IR-cut filter these color charts are not at all practical.
 
Last edited:
The "some reason" is that they are highly accurate professional calibration charts made to extremely exacting specifications with pigments that have highly specific reflectivities.

A 5 x 7 inch chart like in the above link would be essentially useless. For color calibrating a dash camera lens that has no IR-cut filter these color charts are not at all practical.

Ah, so we are paying for "certified colors". Makes sense, thanks for the clarification.

Why would the card not be practical? One would simply use it as a convenient scene that has the "standard colors". Basically, doing the following:
1) Record the card under your lighting conditions with the stock lens (that has IR filter).
2) Swap lens, then record again the same card, same lighting.
3) On the same computer with the same screen compare to original and adjust the camera setting until close.
 
Back
Top