SG9663DR Installations

I may have been over thinking in the post above?

Using a standard SG9663DR power cable, can I simply connect the red switched wire to a switched socket, while my Cellink Neo output is connected to the SG9663DR's constant current yellow wire??

So the SG9663DR will know to draw current from the red switched wire while the engine is on, while drawing current from the Cellink Neo via the constant current yellow wire when the vehicle is parked?

With this type of arrangement, I would have to split the SG9663DR's black wire to get a return to both the car's PbSO4 battery, as well as a return to the Cellink Neo's LiFePO4 battery?
 
The red wire is only a trigger, the power always comes from the yellow wire

Okay, thanks for that jokiin.

That means that my father in law must connect the 12 v cigarette plug's red wire to both the SG9663DR's red and yellow wires?


That also means that my Post #121 above connecting the car's fuse to the red switched ACC wire, while connecting Cellink Neo battery pack to yellow constant current wire doesn't really work, because the Cellink Neo will end up powering the dash cam via the yellow constant wire the whole time.
 
Last edited:
If the yellow wire can be switched to power from either source but red only powered from one source you might be able to have parking mode work with your setup, someone posted about a switching module recently that had similar functionality, I'll see if I can find the details
 
So the optional cigar plug adapter connects to the USB port on top instead of the wire bundle?
 
That means that my father in law must connect the 12 v cigarette plug's red wire to both the SG9663DR's red and yellow wires?
I haven't bothered to work it all out, but if the two sources both provide power to red and yellow via diodes (1 way flow of power) then does it sort the problem?

Might not be possible if it is not acceptable to connect the zero volts from each source together.
 
Here is the main unit in my glovebox. There is enough wire slack to reach the driver seat. I'm still thinking of how to mount it to the inside. Metal plate and magnet? Maybe a sideways door metal hinge so it can be angled up? Fun fact: quickly closing the glovebox does cause the accelerometer to trigger.
50100754927_74883552ec_c.jpg

The AV cable goes to the center stereo that has a display for dvd/gps/rear-camera. The AV cable was from amazon; the video comes out the white plug and the audio comes out to only one of the audio cables (used a simple splitter to get the audio to both speakers).

This is the rear camera. I don't think I could get the lens closer to the glass so the defrost lines show up in the video. After mounting, the camera had one side slightly higher so I stuffed some foam on that end to level it.
50099951113_625065cd4e_c.jpg


Here is the front camera and it's installed just below the factory blue tint. I'm going to try covering the dot-matrix area with black vinyl and see if that does anything to keep direct sunlight off the camera body.
50099951138_981e56b6dd_c.jpg
 
If the yellow wire can be switched to power from either source but red only powered from one source you might be able to have parking mode work with your setup, someone posted about a switching module recently that had similar functionality, I'll see if I can find the details

In summary, would I be right in saying that the power supply for the old 9665GC and new 9663DC's are totally different to the latest 9663DR's?
The old dashcams have a simple power supply to enable a 12 V cigarette plug.
The latest 9663DR's have a more sophisticated red switched Acc and yellow constant permanent wiring system to enable more sophisticated parking modes?
Hence there are no simple 12 V cigarette plug power supplies available for the 9663DR's in the accessories on your website.

Thus, to hardwire my forthcoming SG9663DR, from the fuse box, I must find a switched Acc fuse, and tap into that, and connect that to the SG9663DR's red switched Acc wire; that should be easy enough.
From the fuse box, I must also find a constant permanent fuse, and tap into that, and connect that to the SG9663DR's yellow constant permanent wire; that should be easy enough too.

Now, to power my dashcams when parking by the Cellink Neo LiFePO4 battery pack, I must connect the Cellink Neo's power output, and T this into the yellow constant permanent input wire of the SG9663DR?

Meanwhile, the SG9663DR's black return ground wire must be T-eed off so that it can connect to both the motor vehicle's fuse box ground wire, and the Cellink Neo's ground wire.

For my special set up to power the dashcam by both the fuse box itself while driving and a Cellink Neo battery pack while parking, the yellow constant wire from the fuse box, and the yellow constant wire from the Cellink Neo must pass through this Bunnings Deta architrave light switch below.
The switch will only allow either the car's fuse box constant yellow power or the Cellink Neo's yellow power to connect to the SG9663DR's yellow constant power, but both power sources can NOT connect simultaneously.

3.gif

6.jpg

5.jpg

20181025_153450.jpg
 
Last edited:
My rear dashcam fell off and it was due to a failure of the VHB tape on the clip side and not the glass side. I just pushed it back onto the tape and I hope it doesn't happen again.
 
If it does, replace the tape but make sure the mount is clean, also check to make sure you have the cable without any tension on it that might be pushing it out
 
If it does, replace the tape but make sure the mount is clean, also check to make sure you have the cable without any tension on it that might be pushing it out

Just curious- what would you recommend for cleaning plastic mounts? Would 70% rubbing alcohol be too strong? Don't want to melt the plastic chemically but the cleaner the better :)

Phil
 
Now, to power my dashcams when parking by the Cellink Neo LiFePO4 battery pack, I must connect the Cellink Neo's power output, and T this into the yellow constant permanent input wire of the SG9663DR?

For my special set up to power the dashcam by both the fuse box itself while driving and a Cellink Neo battery pack while parking, the yellow constant wire from the fuse box, and the yellow constant wire from the Cellink Neo must pass through this Bunnings Deta architrave light switch below.
i
I have read your other posts for how you would like to install. One post says you want the DR to record normally while not driving and have it run from the Cellink battery, after all that is one of the reasons for a external battery pack? I do not understand why you don't just connect the DR only to the Cellink? Why are you trying to connect it to both the car and Cellink. You only need it connected to the Cellink. When you are driving, the Cellink will have pass-though charging, running the DR and at the same time be charging the battery pack. If it does not have pass-through charging it still should be able to charge the Cellink and run the DR at the same time, that is what these external battery packs are designed to do? If you DO want to use the parking mode all you have to do is install on the DR's red wire a SPDT on/on switch and wire one side to constant power and the other side to Acc+ this will give the option of no parking mode and be able to switch it to have the normal parking option. I assume you drive at least every day or two. The dash cam will never shut down unless the DR's Hardwire detects low current. Why need it to run in the normal mode 24/7? Just setting parking to 3fps is quite enough to catch good footage but everyone has different needs so I understand.
Wire DR's Yellow to your Cellink 12v+
Wire DR's red to any constant 12v+ (it is a trip wire not a power wire. You can install a SPDT on/on switch and wire one side to constant power and the other side to Acc+ this will give the option of no parking mode and be able to switch it to have the normal parking option)
Wire DR's black to ground
Seems simple to me unless I am missing something.
Capture.JPG
 
My rear dashcam fell off and it was due to a failure of the VHB tape on the clip side and not the glass side. I just pushed it back onto the tape and I hope it doesn't happen again.
If it does, replace the tape but make sure the mount is clean, also check to make sure you have the cable without any tension on it that might be pushing it out
I suspect from some of the photos I have seen on installs that the camera cable is being bent to tight and this is putting tension on the mount over time. Just a little tension over time will have a big impact. Think about teeth and braces, teeth are pretty firmly set but with braces and a little tension over time they can be moved all over the place. Unfortunately for some depending on the angle of the glass there is no way to avoid this unless they flip the camera 90 down that will look very dumb. Maybe something like this will work? Mni USB Male to Mini USB Female cable extension. It will stick out straight but not have any tension placed on the camera. I don't know if this would work as I don't know if the connection is a standard mini USB.
 
Last edited:
you cant mix / extend with normal USB wires / adapters, most dashcams weather it is mini or micro USB plug use 10 pins, and USB for a computer are just 5 pin
 
you cant mix / extend with normal USB wires / adapters, most dashcams weather it is mini or micro USB plug use 10 pins, and USB for a computer are just 5 pin
Got ya'. I did not research much but I think one can find these minis in 10 pin? Or maybe Streetgurdian will come up with an adapter/link to fix this issue of the 90 hitting the glass or hitting anything else so tightly. I would have had the issue of a tight bend but I decided to notch the cable into my headliner so there is no tension. Easy for me to do and very little damage to the truck headliner but for some this will not be a good option.
yes tough to find but maybe....
Capture.JPG
 
Last edited:
I have read your other posts for how you would like to install. One post says you want the DR to record normally while not driving and have it run from the Cellink battery, after all that is one of the reasons for a external battery pack?

I do not understand why you don't just connect the DR only to the Cellink?
Why are you trying to connect it to both the car and Cellink. You only need it connected to the Cellink.
When you are driving, the Cellink will have pass-though charging, running the DR and at the same time be charging the battery pack. If it does not have pass-through charging it still should be able to charge the Cellink and run the DR at the same time, that is what these external battery packs are designed to do?

Thanks for your post.
I have tried to use the Cellink Neo the conventional way many times, but this is what really happens.

We're driving along, and the Cellink Neo powers the SG9665GC and SGZC12RC fine.
We park at the shopping centre, and once again, the Cellink Neo's power the old GC and RC fine, albeit full time FT recording while parking - all good.

Now, once we get home, myself or the wife often forgets to switch the Cellink Neo off, so the Cellink Neo continuously records parking in our safe garage overnight, and in the morning, the Cellink Neo is flat!

A second common scenario is that me and the wife do remember to switch the Cellink Neo off when we are parked in our safe garage at home.
However, when we drive off in the morning, we again forget to switch the Cellink Neo back on, hence no dashcam footage whatsoever.

The third consideration is that tiny and flimsy Cellink Neo Low/Off/High power switch; not only is it hard to locate, be we believe it is not robust enough to last long after repeated on/off operations daily.

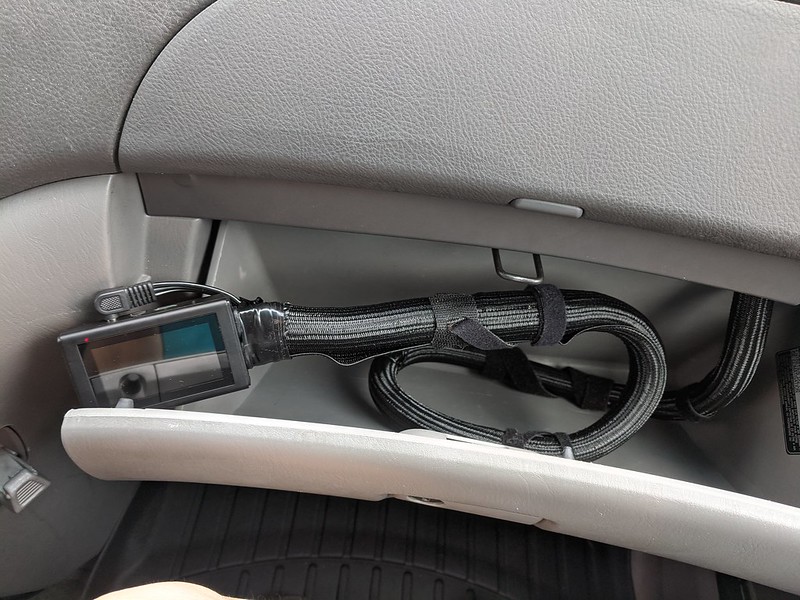
Hence my pair of GC and RC's are powered by both direct hard wiring to the fuse box and the Cellink Neo battery pack, with an architrave switch in between, which only allows one power source to be used at any one point in time.
We normally use the hard wired power source while driving, and use the Cellink Neo when parking in shopping centres etc.

2018-10-09 (7).png


If you DO want to use the parking mode all you have to do is install on the DR's red wire a SPDT on/on switch and wire one side to constant power and the other side to Acc+ this will give the option of no parking mode and be able to switch it to have the normal parking option. I assume you drive at least every day or two. The dash cam will never shut down unless the DR's Hardwire detects low current. Why need it to run in the normal mode 24/7? Just setting parking to 3fps is quite enough to catch good footage but everyone has different needs so I understand.
Wire DR's Yellow to your Cellink 12v+
Wire DR's red to any constant 12v+ (it is a trip wire not a power wire. You can install a SPDT on/on switch and wire one side to constant power and the other side to Acc+ this will give the option of no parking mode and be able to switch it to have the normal parking option)
Wire DR's black to ground
Seems simple to me unless I am missing something.

View attachment 52600

Thanks so much for your switch and Streetguardian 3 fps parking mode idea.
At least some one is thinking like me.

Several years ago when I set up, I was originally going to use this illuminated switch on this mounting block below; very similar to your photo above really.
However, later I dropped the idea, because I did not want to have the hassle of cutting a 25 mm by 15 mm rectangular slot through my central console etc.

Hence I used a home architrave switch on an architrave mounting block instead in Post #128 above. Attached by either Velcro or double sided mirror tape.

2 SCA_SPO3954185_hi-res.jpg

1 SCA_SPO3954299_hi-res.jpg


Because of the way my old GC and RC's are already set up, I will initially take a short cut, and simply add a 12 V cigarette plug to the DR's red switched and yellow constant power input wires.
From the cigarette plug's red wire, I will Tee off a yellow wire, and then I will connect both the cigarette plug's red wire and Teed off yellow wire to the DR's respective red and yellow power input wires.

Can you and/or jokiin confirm if this will work, and fool the DR into thinking that the car is continuously on?

The way I have set up, when I switch the engine off, all the dashcams will simply power off, unless I switch on the Cellink Neo battery pack.

RPPS-225.jpg

IMG_20200625_164741 - Copy.jpg


Do you know where I can find out more detailed information regarding the SG9663DR's numerous parking modes?
The website doesn't provide much details about the parking modes.
It only says " Parking Mode Hardwire Kit included".
Or the DR just records at 3 fps with no audio???

Because down the track, I can purchase a 2nd pair of DR's to replace my old GC and old RC already mounted on the front and rear windscreens respectively.
With two (2) pairs of DR's [I will have four (4) dashcams altogether with two on the rear side window fixed panes], I can then set up by using a two-way switch like you have described above.

Unlike SG9665GC + SGZC12RC + SG9663DR, two pairs of SG9663DR's will have much lower power consumption during parking, not only because there are only 2 dashcam units as opposed to 3 dashcam units, but also because of the DR's 3 fps parking mode uses much less power than 4 dashcams recording at 30 fps for much longer park recording times from my Cellink Neo.


Finally, I wonder if the DR mounted to the vertical rear side windows, is there a window glass "reflection" on playback?
Because if there is, I would like to immediately purchase a 2nd CPL filter with my order.
The DR comes standard with only one (1) CPL filter.

Can the SG9663DR even attach to the near vertical rear side windows in the first place?

modern-concept-car-window-blinds-with-blind-set-e90-3-series - Copy.jpg
 
Last edited:
not the way it's intended to be setup but both power wires together to your cig plug should be fine

mounting on vertical windows is no issue, cabling through the door is a bigger challenge

parking mode options are 1, 2, 5fps timelapse, or 30fps low bitrate (which also has audio), you won't be using any of these though while using it wired with cig plug

Ok, I'll order now.

With a more vertically raked rear side window, are there still interior reflections?
Should I immediately order a 2nd CPL at the same time?

1/2/5 fps are all timelapse recordings?
 
With a more vertically raked rear side window, are there still interior reflections?
generally not
Should I immediately order a 2nd CPL at the same time?
I'll include a second CPL filter, don't need to order it
1/2/5 fps are all timelapse recordings?
Correct
Ok, I'll order now.
Just hold off, I'll message you a discount code first

Also before you order did you work out what you need for camera cable lengths, is the 4m and 6m going to work for what you want?
 
Back
Top