Paul Iddon
Well-Known Member
- Joined
- Apr 5, 2016
- Messages
- 1,714
- Reaction score
- 1,340
- Location
- Preston
- Country
- United Kingdom
- Dash Cam
- Viofo A139 Pro 4K, A129 Pro Duo 4K, A229 Duo 2K, & NB 522GW
This is the latest dashcam from Viofo - the A139 3channel dashcam.
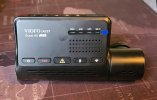
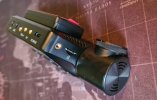
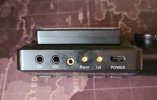
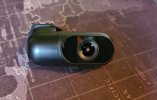
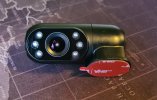
It's a different design shape compared to their usual wedge shaped design - it reminds me of one of those E-Vape contraptions - but it looks good!
The front camera has a Sony IMX335 Sensor, 140 degree, 6G/7G lens, the interior camera: Sony IMX291 Sensor, 170 degree 6G/7G lens. The rear camera: Sony IMX291 Sensor, 140 degree 6G/7G lens.
The sensor from Novatek is the NTK96687.
The first thing you'll notice is the size - and that the dashcam has no screen; it's settings are done in the Viofo mobile app.
Note too, on the second image, the location of the memory card slot - on this model it is on the right hand side located just above the rotating forward facing lens, included with this is the CPL, a welcome addition straight out of the box.
Across the top of the camera body are the following:
1. AV out 2. External Microphone Port 3. Screw Hole 4. Rear Camera Port 5. Interior Camera Port 6. Power In (USB-C).
On the left is the reset and microphone, and as mentioned, on the right, the microSD slot. The camera can take 512Gb cards.
Across the main body the usual buttons are there: Power On | OFF, Recording Start | Stop, Video Protect, Microphone On | OFF, and the Wi-Fi On | OFF button.
The camera mounts directly to the windscreen via the GPS enabled mount.
Included with the cam (in the box) are the following: Card Reader Adapter, Trim Removal Tool, Static (Windshield) Stickers, spare Front Mount +3M Sticker and spare Rear Mount +3M Sticker.
The rear camera cable is 6 metres long, and the internal IR camera cable is 1 metre long. They attach into the top of the main body. These cables are incredibly thin - nothing like the cables you normally have to send through the car to the back window, and as a consequence, they tuck away very easily.
Optional accessories include: A Bluetooth Control, a Hardwire Kit, External microphone and a Screw mounting bracket.
Time frame for each video file is 1 / 2 / 3 / 5 / 10 minutes. When there is insufficient space on the Micro SD card, loop recording will automatically overwrite the oldest files (one by one). Loop recording files are saved to SD card in the DCIM/MOVIE folder.
Feature set:
Resolution:
Front Camera + Rear camera: 2560 * 1440P 30fps / 60fps + 1920*1080P 30fps Front Camera + Interior camera: 2560 * 1440P 30fps / 60fps + 1920*1080P 30fps Front Camera + Interior camera + Rear camera: 2560 * 1440P 30fps / 60fps + 1920*1080P 30fps + 1920*1080P 30fps
Time Lapse: Record video from frames captured at specific time intervals to conserve memory and reduce the time it takes to review video. The default is off.
Exposure adjustments:
Adjusting the value of the EV (Exposure Value) properly can create better footage under different light sources. It ranges from -2.0 to +2.0. You can adjust the EV for the front, interior and rear camera separately. The default is set at 0.0.
WDR:
On / Off. The dynamic range is the ratio of the brightest portion of the image to the darkest portion of the image. WDR enables the camera to deliver video with a near perfect exposure in varying lighting situations.
G-Sensor:
The G-sensor measures shock forces and locks the video recorded at the time. The settings from “low to high” determine the amount of force needed to lock the file from being overwritten.
Bitrates:
You can set the bitrate for video. High bitrate may improve the quality and smoothness of the video, especially when recording fast motion or high contrast scenes. Using high bitrate mode may decrease the amount of recording time available on your memory card. Using a low bitrate will save space and record for longer time.
Wi-Fi:
Off / 2.4GHz / 5GHz. Obviously, you are better off choosing 5GHz Wi-Fi mode.
Boot Delay:
The camera will boot seconds later when powered on. The settings are off, 5 seconds and 10 seconds.
Parking Mode:
Auto Event Detection Including buffered parking mode, the camera will automatically record a video sequence (from 15 seconds before the event to 30 seconds after the event) while a moving object is detected during parking. It will stop recording without new movements. With Time Lapse recording, Time lapse records a video at low frames at 1 / 2 / 3 / 5 / 10 / 15 fps, It keeps recording continuously without audio recorded. In Low Bitrate Recording the camera records video in low bitrate for both front and rear. It keeps recording continuously in mini file size with audio recorded.
Parking G-sensor:
Adjusts the sensitivity of the motion detection so minor motion caused by wind or rain doesn't trigger a recording. The G-sensor detects significant or sudden movement (such as an impact or collision), it will trigger an event recording. The recommended setting is High sensitivity in parking mode recording.
The IR LED's operate the following ways: On means IR lights are always on, so the video color is black and white. Auto means the dash cam will decide to turn on/off infrared lights with different light condition. Off means the IR lights are all turned off. You can also short press power button to enable / disable the IR LED.
Onto a bit of video then:
What is in the box:
Video under cloudy daylight driving:
Video from night time driving with internal camera set to IR (black and white footage):
The camera uses the same front sensor as the A129+ camera - the difference is the A129+ gives a wider view:
I drove the same route in daylight with the WDR "Off" on the left video and "On" on the right video:
The following three show the front, interior (sorry!!!) and the rear camera in bright daylight:
All three cameras utilise Sony image sensors - the front camera is IMX335, the rear and interior are both IMX291. That will give some very decent quality videos as you will see form the ones above.
My overall impression is favourable. I like the style, I really like the cabling for the extra camera modules and when you launch the app, you'll find navigation is quick and easy, especially with 5Ghz enabled.
So far there is little to fault the latest release on - however, I should mention the following:
Mine is powered by the supplied 12v socket/plug, and I do not use collision detection or parking mode (my car doesn't like having power drawn by dash cameras). With this in mind, I do however give this release a big thumbs up.
*Please note - I do not work for ANY dashcam company and these conclusion, whether interpreted as good bad or indifferent are my own.
Thanks for reading - and if you would, why not subscribe to my YT channel (just makes it more fun for me!!!)
Paul.
Last edited:

