Hard wiring multiple DashCams for cheap?

darkgiant

Member
Joined
Aug 27, 2016
Messages
35
Reaction score
1
Country
United States
I originally posted another thread with this identical question, but due to my inactivity, it never gained much traction. As for the question:

I currently have three dash cams (one generic, a A118C, and a G1W). Each dash cam would go to one car (all three cars are Prius's, two Gen 3's, and one Gen 2). I would like to hard wire them all, I do not need parking mode, just something so I can have an extra cig. socket just for the dash cams.

For now, I came across the idea of using a fuse tap, along with a female cig. socket to make this work. Here are my current list of parts:
I am not familiar with car electronics by any means, so I did want to clarify here if I am still missing anything. I also want to make sure that my steps are safe, and cannot cause any electric damages/fires. This is my current idea of how I should approach this, is this pretty much it?:
  1. First, I simply use the red wire from the female socket, and crimp it to the fuse tap
  2. Plug that fuse tap to where the current cig. socket is in the fuse box
  3. I then use a crimp connection (that circle shaped thing), and crimp it to the black wire, and ground it to some bolt.
  4. Success?
I did have few questions from my above steps as well:
  • What kind of fuse do I use for the fuse tap? would for instance 2 or 3 AMP work just fine, and then use the existing 10 or 15 (or whatever is currently being used for the cig. socket) in the second slot? I am kind of confused here. I know there is usually a 15 AMP limit for certain things, so I do not want to override anything here.
  • I should be also plugging this into where a current cig. socket is being used, right? Or do I plug it into a different connection in the fuse box?
Apologies for the long post, and if this is something that should be easy to do, this is my very first time, and I just want to make sure I get things done right for all three cars.
 
I did have few questions from my above steps as well:
  • What kind of fuse do I use for the fuse tap? would for instance 2 or 3 AMP work just fine, and then use the existing 10 or 15 (or whatever is currently being used for the cig. socket) in the second slot? I am kind of confused here. I know there is usually a 15 AMP limit for certain things, so I do not want to override anything here.
  • I should be also plugging this into where a current cig. socket is being used, right? Or do I plug it into a different connection in the fuse box?

Use the same type of fuse as used in your fusebox, the fuse-tap comes with extra fuses. The type of fuse-tap will also depend on the type of fuse you car's fusebox houses. Use the the original fuse pulled out and a 3 - 5A fuse should be fine for the camera circuit.

You can tap any non-critical switched circuit. The OEM 12V socket fuse location is good as usually it's rated for a 15-20A draw.
 
If your cameras have a 12 / 5 volt PSU on the end of the wire, you could just take it apart and connect the 2 wires inside to your wires coming off the piggy back fuse and ground.
And then just warp the electronics in electrical tape, i have done that a few times in the past decades ( for other than dashcam stuff ) but it worked just fine.

Just be avare some times the + on the plug that go into the ciggerette plug on the PSU you take apart is the fuse, but if thats the case then you can usually unscrew the tip of the plug/ PSU to change that fuse.

That way you save the female cigarette lighter socket.

This one for instance look like a PSU that do not have the fuse on the + wire in the tip.
MiniUSB%20Cigarette%20Lighter%20Charger-450x450_0.jpg


This other ( 12 volt ) plug look like it might have the fuse on the + wire in the tip of the plug.
$_35.JPG


The tip of those plugs are the positive + wire and the 2 springs are the ground - wire, so if you take the psu apart you just need to connect the wires and off course make sure the little PCB inside cant short out on something.

This is sort of how a PSU like that look inside, in one end the connectors that connect to the contacts in your ciggerette socket, and in the other end a little PCB that is the PSU that change 12 volts to the 5 volts in the mini USB plug )
F20W7XJF6S98JM2.MEDIUM.jpg


In this picture both wires appear to be white, but you can just make out one go to the spring ( the fuse would then be on the other side of that spring and the end of the fuse is what stick out as the tip of the plug ) this is the positive + wire ( this picture appear to be something else than a PSU )
And the other white wire go to one of the springs on the side of the plug ( negative wire )
 
Use the same type of fuse as used in your fusebox, the fuse-tap comes with extra fuses. The type of fuse-tap will also depend on the type of fuse you car's fusebox houses. Use the the original fuse pulled out and a 3 - 5A fuse should be fine for the camera circuit.

You can tap any non-critical switched circuit. The OEM 12V socket fuse location is good as usually it's rated for a 15-20A draw.

Gotcha, thanks for the response. So just to make sure, my logic in installation is sound, correct? Would both two parts be suffice? Would you mind elaborating more on "The type of fuse-tap will also depend on the type of fuse you car's fusebox houses."? Also, I can go ahead and install the original fuse that I pull out from wherever I "tap" the fuse-tap along with a 3A fuse, correct? Does it matter where both fuses are placed (the fuse-tap shows two slots), but I am going to assume this doesn't really matter.

As for the OEM 12V socket fuse location, I assume you mean where the current fuse for the main cig. socket is located, right? Just want to make sure I am understanding the terminology :)
 
If your cameras have a 12 / 5 volt PSU on the end of the wire, you could just take it apart and connect the 2 wires inside to your wires coming off the piggy back fuse and ground.
And then just warp the electronics in electrical tape, i have done that a few times in the past decades ( for other than dashcam stuff ) but it worked just fine.

Just be avare some times the + on the plug that go into the ciggerette plug on the PSU you take apart is the fuse, but if thats the case then you can usually unscrew the tip of the plug/ PSU to change that fuse.

That way you save the female cigarette lighter socket.

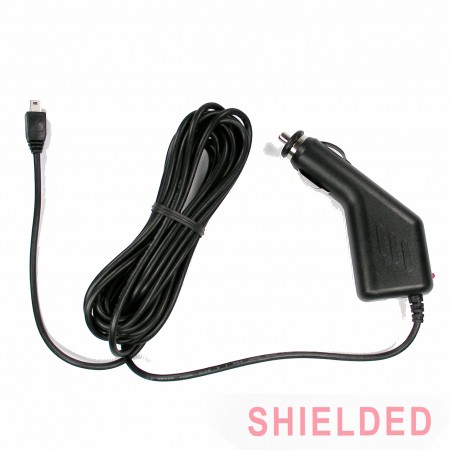
This one for instance look like a PSU that do not have the fuse on the + wire in the tip.
MiniUSB%20Cigarette%20Lighter%20Charger-450x450_0.jpg


This other ( 12 volt ) plug look like it might have the fuse on the + wire in the tip of the plug.
$_35.JPG


The tip of those plugs are the positive + wire and the 2 springs are the ground - wire, so if you take the psu apart you just need to connect the wires and off course make sure the little PCB inside cant short out on something.

This is sort of how a PSU like that look inside, in one end the connectors that connect to the contacts in your ciggerette socket, and in the other end a little PCB that is the PSU that change 12 volts to the 5 volts in the mini USB plug )
F20W7XJF6S98JM2.MEDIUM.jpg


In this picture both wires appear to be white, but you can just make out one go to the spring ( the fuse would then be on the other side of that spring and the end of the fuse is what stick out as the tip of the plug ) this is the positive + wire ( this picture appear to be something else than a PSU )
And the other white wire go to one of the springs on the side of the plug ( negative wire )

This looks like a much easier and cheaper, but I think I'd like to go with the socket idea, in the case I ever have to unplug the camera and what not, and having the charger usable in a different socket would be preferred. In terms of how safe this is, are there any risks for damages or electrical shorts?
 
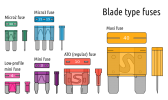
The blades of the fuse-tap depend on the type of fuse that's in your car's fusebox.

Electrical_fuses,_blade_type.svg.png


Assuming you have bough the correct one. If you use the 12V socket fuse, the original fuse that you'll pull out will go in the lower slot of the fuse-tap and the 3 or 5A fuse will go in the upper slot that in line with the wire going to the camera.

I'm referring to the fuse in the fuse box that corresponds with the 12V cigarette lighter female socket that comes wired from the manufacturer.

Here's how I installed the same additional 12V socket (posts 7-9) - https://dashcamtalk.com/forum/threa...-v2-dashcam-review-install.20888/#post-273724
 
The blades of the fuse-tap depend on the type of fuse that's in your car's fusebox.

View attachment 26721


Assuming you have bough the correct one. If you use the 12V socket fuse, the original fuse that you'll pull out will go in the lower slot of the fuse-tap and the 3 or 5A fuse will go in the upper slot that in line with the wire going to the camera.

I'm referring to the fuse in the fuse box that corresponds with the 12V cigarette lighter female socket that comes wired from the manufacturer.

Here's how I installed the same additional 12V socket (posts 7-9) - https://dashcamtalk.com/forum/threa...-v2-dashcam-review-install.20888/#post-273724

Ah I gotcha, I wasn't aware there was different sizes in fuses, this kind of blows my mind lol, a lot of the jargon here now makes sense. Some quick Googling, it looks like for my vehicles (some Prius's and one Tacoma) require a " Low Profile Mini Blade" fuse. I found a better deal on eBay: https://www.ebay.com/itm/322102607337 so I might get this, since it says it is intended for the MINI style.

It looks like I have everything I need now, unless their is anything else I should buy/be aware of before as I patiently wait for the parts to come in.

Random question based from your install, what is the black thing with the LED indicator on it? Is that something I should look into?
 
That's the power supply internals housed in a separate box opposed to being crammed in the male 12V socket. This one allows you to chop off the male socket and convert the power supply into a hardwire kit. Came with the SG9665GC.
 
That's the power supply internals housed in a separate box opposed to being crammed in the male 12V socket. This one allows you to chop off the male socket and convert the power supply into a hardwire kit. Came with the SG9665GC.

Ah okay, so in a nutshell, for one of the cameras, you used a regular female socket and plugged that into the standard charger, and for the other camera you basically used that box to instead having a cig. socket connection, the box is tapped into the fuse box, and the output wire is the normal USB-A wire, correct? It looks like I am starting really get this!

Thanks for all the help! :)
 
I did not chop off the socket and convert it into a hardwire kit. The box is part of the charger as seen in the pictures below.

gc22-png.25287


gc2-png.25321


The charger's 12V male socket is connected to the hardwired 12V female socket. There is no 2nd camera in this install.

If you want to power more than one camera per car, then the following is a better choice (posts 5 and 6) - https://dashcamtalk.com/forum/threa...ing-dashcam-review-install.21778/#post-286341

I am sincerely sorry, I misread the power supply part, when I glanced at the images, I thought I saw multiple sockets, my apologies. I do not intend to do a two camera install, but is the power supply something that I should look into, or is the standard charger supplied with the A118C, G1W suffice?
 
The supplied charger should suffice. The only difference is that the power supply components are housed separately on the SG's charger whereas with the charger that comes with the A118C has the power supply components built into the 12V male socket. Same function.
 
All the dashcams on our site do come with 12V cigarette socket adapters which work on just about any vehicle. However, cigarette adapters have some obvious downsides as they take up a cigarette slot in your vehicle (many vehicles only have one or two!) and they also leave your wires at least partially exposed. Leaving the wires out can be unsightly but also can draw attention to the fact that you have a dashcam in your vehicle, potentially alerting any thieves that there might be a valuable accessory plugged in. Hardwiring might also open up the possibility for parking mode recording as most cigarette outlets in vehicles are ignition switched meaning the camera will turn off when you turn off your car. For these reasons, many of our customers like to hardwire their dashcams. We have a number of different hardwiring options for both ignition (ACC) switched power and constant power for your dashcam.
 
So a long update indeed, but I finally got my parts yesterday (took way too long to finally get here), and wired up the camera to couple of my cars, and BOOM, it works! I used the 3 AMP fuse and original 15 AMP that was used for the cig. lighter.

My only issue now is for couple of my cars (2007, and 2009 Toyota Prius) the dash cam won't shut off when I turn the car off. I am using the same fuse location for where the front cig. lighter is, and that shuts off, but the dash cam does not. I am not sure if I have a faulty fuse tap, or if I have to try another fuse location?
 
The cigarette lighter socket in the Toyotas must be receiving constant power. Could be for a period of time set by the manufacturer or always powered, you could try a different fuse location.
 
Back
Top