I recently posted information regarding the use of piggy back fuse holders this proved that a lot of people are posting incorrect information I am a fully qualified marine electrical officer.
As my previous posts created more concern for some people I promised to post a easy to understand for people who are not technically qualified and get confused by the jargon used.
First I would like to point out that the instructions apply to all vehicles including those with can bus and keyless entry with pushbutton starting.
Tools used
A good quality universal crimper + 12 volt tester with earth lead + Japanese connectors with silicone covers, much better quality and neater than Scotch locks.
Tip when making the connections you will see that the wires on the hardwire kit can be quite thin. After you have stripped the cable to make a joint put the stripped wire on the insulated part by doubling back, when crimping make sure that the bare wire is opposite to the split in the connection piece for a very safe joint.
INSTRUCTIONS
1 Buy a suitable / manufacturer hardwire kit for the dashcam this is a very important thing do.
2 before you hardwire the system check every thing is working OK by temporarily setting the system up.
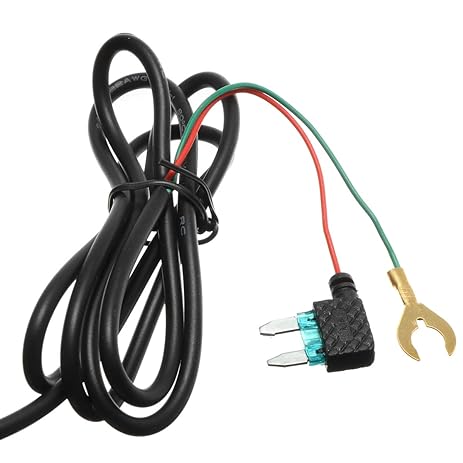
3 look at the hardwire kit you will see that it consists of 4 parts.
As follows.
The plug for the dashcam obviously.
Next you will see a box I won't go into technical details just that it is protection for you're dashcam.
Next you may have a glass fuse
( slow blow type ) under no circumstances cut this off. Make sure it is easily accessible at the end of the installation.
Next the hard part for some you will find 2 or 3 wires to connect up.
How to do it
First use a screwdriver type tester with a earth lead and crocodile clip. With the ignition key removed find the nearest fusebox inside the car and remove the cover.
Next connect the crocodile clip to a suitable earth ( pick a good one as you will connect the earth wire here ) just find a suitable screw or bolt for this purpose.
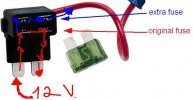
Next you will most likely find empty fuse locations if not you will have to use a piggy back connector on a fuse of around 10 - 15 amps. The main thing is that this is live with the ignition key removed ( permanent live ).
The piggy back connector can be used in an empty fuse location as well as a fused location to keep things easy check the correct fitting of the piggy back in both cases the red lead on the piggy back should not be live until a fuse is fitted check both fuse locations, in the case of tapping into an existing fuse the fuse needs to be replaced and the original use for this should be checked to see that it is still working the red wire should not have any power at this point.
Now the part that confuses there are three wires
1 BLACK this is the earth wire
2 RED this is the permanent live wire ( as just described )
3 WHITE - YELLOW or any other colour chosen by the manufacturer this can also be given different names i.e. pilot wire, control wire and ACC wire this is mainly due to it's use's in other parts of the world.
The simple explanation of this is that it is a live wire but only when it is switched on.
So for this we need to find a fuse that becomes live when the ignition key is inserted and turned to the first position without starting the vehicle ACC on ignition barrel.
Final check
Red permanent live
Black earth
White switched live.
I hope this will make things much easier for people to have the confidence to do this job, please note these hardwire kits are available on Amazon for satnav, spotlights and led daytime running lights. Basically all of these are to help anyone to do the job correctly. Before I sign off I recently purchased a new dual dashcam system to replace a single Nextbase dashcam, after a bit of searching I decided to buy a Mini 0906 in preference to an Aukey dual dashcam, however I did note that Aukey have a simple hardwire kit that simply plugs into the diagnostic socket I am quite sure this will be the future of dashcams. Something I was totally unaware of was the type and make of micro SD cards you use can have the warranty invalidated if used in a dashcam, as well as being unsuitable for this purpose. I have now purchased Lexar 32 GB high endurance SD card claimed to be one of the top ten for use in dashcams, guess what my old Nextbase dashcam has been reborn you are never to old to learn.
As my previous posts created more concern for some people I promised to post a easy to understand for people who are not technically qualified and get confused by the jargon used.
First I would like to point out that the instructions apply to all vehicles including those with can bus and keyless entry with pushbutton starting.
Tools used
A good quality universal crimper + 12 volt tester with earth lead + Japanese connectors with silicone covers, much better quality and neater than Scotch locks.
Tip when making the connections you will see that the wires on the hardwire kit can be quite thin. After you have stripped the cable to make a joint put the stripped wire on the insulated part by doubling back, when crimping make sure that the bare wire is opposite to the split in the connection piece for a very safe joint.
INSTRUCTIONS
1 Buy a suitable / manufacturer hardwire kit for the dashcam this is a very important thing do.
2 before you hardwire the system check every thing is working OK by temporarily setting the system up.
3 look at the hardwire kit you will see that it consists of 4 parts.
As follows.
The plug for the dashcam obviously.
Next you will see a box I won't go into technical details just that it is protection for you're dashcam.
Next you may have a glass fuse
( slow blow type ) under no circumstances cut this off. Make sure it is easily accessible at the end of the installation.
Next the hard part for some you will find 2 or 3 wires to connect up.
How to do it
First use a screwdriver type tester with a earth lead and crocodile clip. With the ignition key removed find the nearest fusebox inside the car and remove the cover.
Next connect the crocodile clip to a suitable earth ( pick a good one as you will connect the earth wire here ) just find a suitable screw or bolt for this purpose.
Next you will most likely find empty fuse locations if not you will have to use a piggy back connector on a fuse of around 10 - 15 amps. The main thing is that this is live with the ignition key removed ( permanent live ).
The piggy back connector can be used in an empty fuse location as well as a fused location to keep things easy check the correct fitting of the piggy back in both cases the red lead on the piggy back should not be live until a fuse is fitted check both fuse locations, in the case of tapping into an existing fuse the fuse needs to be replaced and the original use for this should be checked to see that it is still working the red wire should not have any power at this point.
Now the part that confuses there are three wires
1 BLACK this is the earth wire
2 RED this is the permanent live wire ( as just described )
3 WHITE - YELLOW or any other colour chosen by the manufacturer this can also be given different names i.e. pilot wire, control wire and ACC wire this is mainly due to it's use's in other parts of the world.
The simple explanation of this is that it is a live wire but only when it is switched on.
So for this we need to find a fuse that becomes live when the ignition key is inserted and turned to the first position without starting the vehicle ACC on ignition barrel.
Final check
Red permanent live
Black earth
White switched live.
I hope this will make things much easier for people to have the confidence to do this job, please note these hardwire kits are available on Amazon for satnav, spotlights and led daytime running lights. Basically all of these are to help anyone to do the job correctly. Before I sign off I recently purchased a new dual dashcam system to replace a single Nextbase dashcam, after a bit of searching I decided to buy a Mini 0906 in preference to an Aukey dual dashcam, however I did note that Aukey have a simple hardwire kit that simply plugs into the diagnostic socket I am quite sure this will be the future of dashcams. Something I was totally unaware of was the type and make of micro SD cards you use can have the warranty invalidated if used in a dashcam, as well as being unsuitable for this purpose. I have now purchased Lexar 32 GB high endurance SD card claimed to be one of the top ten for use in dashcams, guess what my old Nextbase dashcam has been reborn you are never to old to learn.
") If you have an old incandescant test light, it's time to retire it. Only LED test lights should be used and they are quite cheap enough. Cheap DMM's are accurate enough for almost all automotive use and are handy around the house too so that's what I recommend
If you have an old incandescant test light, it's time to retire it. Only LED test lights should be used and they are quite cheap enough. Cheap DMM's are accurate enough for almost all automotive use and are handy around the house too so that's what I recommend