You are using an out of date browser. It may not display this or other websites correctly.
You should upgrade or use an alternative browser.
You should upgrade or use an alternative browser.
Hatchback rear facing camera installation
- Thread starter jeuda
- Start date
russ331
Well-Known Member
- Joined
- Aug 10, 2013
- Messages
- 2,503
- Reaction score
- 2,522
- Location
- Kingston on Thames
- Country
- United Kingdom
- Dash Cam
- Mobius B (x2) & A119
Do you mean rear mounted to record vehicles behind you, or front mounted to record you & your passengers?
CheckYourLights
Well-Known Member
- Joined
- Dec 31, 2012
- Messages
- 2,840
- Reaction score
- 951
- Country
- United States
- Dash Cam
- Front&Rear-SH800/ Front 2nd Vico-Opia 2
I am reading this as you are trying to install a rear facing camera in a Honda Fit. I'm not really sure what you are asking though.I am looking forward to install a rear facing camera for my honda fit. Anyone attempted that? Would appreciate if you can share.
I had to Google a Fit to get a look, but does not seem like a big deal. I have seen DashCams installed in peoples pickup trucks which is completely flat rear glass. In this case you just want to sit the front of the camera almost against the glass with they did with no issue.
In a Firebird or Camaro which has a curved rear hatch glass area you want to get it high up in the middle and away from the glass so you do not shoot the sky when the hatch is closed. I am assuming a car like a Corvette where only the curved rear glass opens is the same way, but I don't know exactly how a Fit works.
The aiming may be a little trial and error depending on how your hatch area works a remote aim camera like the WF1 makes it easy though.
kps
Member
- Joined
- Feb 18, 2013
- Messages
- 42
- Reaction score
- 21
- Location
- Waterloo, Ontario
- Country
- Canada
- Dash Cam
- F500LHD (front), Innovv C2 (rear)
I have one on order to install one in mine (GD3). I'd like to put it beside the brake light, but haven't decided where to run power yet.I am looking forward to install a rear facing camera for my honda fit. Anyone attempted that? Would appreciate if you can share.
jeuda
Member
- Joined
- Jun 18, 2013
- Messages
- 34
- Reaction score
- 4
- Location
- Singapore
- Country
- Singapore
- Dash Cam
- 70mai Pro w GPS(front), 70mai Pro (rear)
Do you mean rear mounted to record vehicles behind you, or front mounted to record you & your passengers?
Yes, to rear mount and record vehicles behind the car.
jeuda
Member
- Joined
- Jun 18, 2013
- Messages
- 34
- Reaction score
- 4
- Location
- Singapore
- Country
- Singapore
- Dash Cam
- 70mai Pro w GPS(front), 70mai Pro (rear)
I have one on order to install one in mine (GD3). I'd like to put it beside the brake light, but haven't decided where to run power yet.
Drawing power is one major consideration. And glass panel that we are mounting on is constantly being slammed when you closed the boot.
russ331
Well-Known Member
- Joined
- Aug 10, 2013
- Messages
- 2,503
- Reaction score
- 2,522
- Location
- Kingston on Thames
- Country
- United Kingdom
- Dash Cam
- Mobius B (x2) & A119
Yes, to rear mount and record vehicles behind the car.
I suggest the smallest possible camera, to minimise the obstruction of your view through the rear screen. The Mobius fits the requirement nicely...

Review... http://www.techmoan.com/blog/2013/7...e-do-it-all-mount-anywhere-1080p-micro-c.html
The sweep of the rear wiper will partly dictate the mounting location... no point mounting it where the rear screen will be permanently dirty.
If possible, the camera should not be mounted on the hatchback door, but on the doorframe or within the rear light assembly, e.g...
http://dashcamtalk.com/forum/threads/mobius-diy-built-in-into-rear-centre-brake-light.2372/
The rear centre brake light is doubtless part of the Fit's hatchback door, so not a good location with the shocks to the camera from repeated hatchback door-slamming.
Last edited by a moderator:
GJHS
Well-Known Member
- Joined
- Nov 21, 2013
- Messages
- 2,108
- Reaction score
- 1,367
- Country
- United States
- Dash Cam
- Mobius A & C, SJ4000, M10, Mini 0806, Innovv C3,4, Xiaomi Yi
Here's one idea http://dashcamtalk.com/forum/threads/mobius-mounting-solutions.2654/page-4#post-42845
The acrylic could help to absorb any shock from closing the hatch. Best would be a roof mount, yet it seems difficult in that car
The acrylic could help to absorb any shock from closing the hatch. Best would be a roof mount, yet it seems difficult in that car
Last edited by a moderator:
jeuda
Member
- Joined
- Jun 18, 2013
- Messages
- 34
- Reaction score
- 4
- Location
- Singapore
- Country
- Singapore
- Dash Cam
- 70mai Pro w GPS(front), 70mai Pro (rear)
I have one on order to install one in mine (GD3). I'd like to put it beside the brake light, but haven't decided where to run power yet.

Looking where I can mount the Mobius with being affected the hatchback door slamming would be on the ceiling itself.
GJHS
Well-Known Member
- Joined
- Nov 21, 2013
- Messages
- 2,108
- Reaction score
- 1,367
- Country
- United States
- Dash Cam
- Mobius A & C, SJ4000, M10, Mini 0806, Innovv C3,4, Xiaomi Yi
You are advised to only buy your Mobius from a developer-verified source. The following web stores have been verified by the developer as selling the real Mobius camera, replacement parts and accessories with a commitment to customer satisfaction, both before and after a sale, if any problems are found when the hardware is put into service and not caused by user abuse, crash damage, etc. If parts are not listed on their sites, use their web site email contact link to request what you need. They will respond promptly with information of how to buy them. They all use direct PayPal payment. The China eBay sellers work directly with the developer and will usually have the lowest delivered prices. The other re-sellers may offer quicker delivery depending on your location.
Direct Sellers:
China: eletoponline365; digitalele889
Re-sellers:
China: Banggood; HobbyKing (Hong Kong)
U.S.: novotm (MA); Massive RC (FL); SPYTEC (NY); ReadyMadeRC (OH)
Europe: Webbex (U.K.); JooVuu (U.K.); Mobius-Cam.com (NL); Revotech (CZ)
Prices can vary from one vendor to the other and depends on what is included in different accessory packages. The cost from the China eBay outlets will be nominally about $70 US with free shipping.
Non-verified sellers may be selling fake imitation cameras at seemingly bargain prices, and you should be wary of buying from them.
kps
Member
- Joined
- Feb 18, 2013
- Messages
- 42
- Reaction score
- 21
- Location
- Waterloo, Ontario
- Country
- Canada
- Dash Cam
- F500LHD (front), Innovv C2 (rear)
Looking where I can mount the Mobius with being affected the hatchback door slamming would be on the ceiling itself.
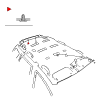
There is a pair of plastic clips holding on the headliner to either side of the brake light. I may try tapping the hole on the right, as that area is covered by the rear wiper. In that case I would likely run the USB cable down the D pillar and put the 5V supply behind the taillight access panel.
kps
Member
- Joined
- Feb 18, 2013
- Messages
- 42
- Reaction score
- 21
- Location
- Waterloo, Ontario
- Country
- Canada
- Dash Cam
- F500LHD (front), Innovv C2 (rear)
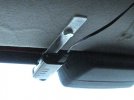
Part 1.
As I considered above, I tapped the hole to bolt on a metal strip to hold the camera. 5/16″ (or 8mm for metric folks) works. There's enough depth for a 3/4″ (20mm) bolt, which is what I happened to have on hand, but 1/2″ would be fine. What goes on the other end of course depends on your camera. Distance from the hole to the glass is approximately 5″.
(Note: the headliner damage is from transporting large objects in the past, not this installation, but if you are fastidious about your car you might want to seek professional help.)
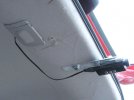
⁓ The yellow scrawl shows the approximate path of the USB power cable. Removing the screw indicated by the green arrow → permits the back edge of the D pillar plastic to be pulled away enough to route the cable; in that area, follow the path of the existing wiring down to the taillight area.
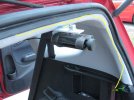
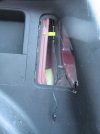
Next: running accessory power to the taillight area.
As I considered above, I tapped the hole to bolt on a metal strip to hold the camera. 5/16″ (or 8mm for metric folks) works. There's enough depth for a 3/4″ (20mm) bolt, which is what I happened to have on hand, but 1/2″ would be fine. What goes on the other end of course depends on your camera. Distance from the hole to the glass is approximately 5″.
(Note: the headliner damage is from transporting large objects in the past, not this installation, but if you are fastidious about your car you might want to seek professional help.)


⁓ The yellow scrawl shows the approximate path of the USB power cable. Removing the screw indicated by the green arrow → permits the back edge of the D pillar plastic to be pulled away enough to route the cable; in that area, follow the path of the existing wiring down to the taillight area.


Next: running accessory power to the taillight area.
kps
Member
- Joined
- Feb 18, 2013
- Messages
- 42
- Reaction score
- 21
- Location
- Waterloo, Ontario
- Country
- Canada
- Dash Cam
- F500LHD (front), Innovv C2 (rear)
Part 2
I ran the 12V under the side plastic, after pulling the two marked ↑ clips, starting by pushing it under at the right and then reaching down the taillight access to it.
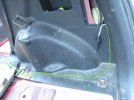
Then under the carpet (which is held on by velcro), down to avoid the seat hinges, and then forward at the hump to the center console. For that last part I used a fish tape; the carpet could be pulled up further, but it would be more work to get it back in place.
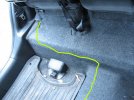
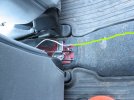
One reason for running it that way is that I also wanted to add a 12V socket at the back of the console for rear passengers.
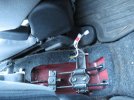
The cable is spliced in alongside the 12V socket at the front.
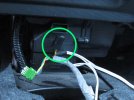
There might be a Part 3.
I ran the 12V under the side plastic, after pulling the two marked ↑ clips, starting by pushing it under at the right and then reaching down the taillight access to it.

Then under the carpet (which is held on by velcro), down to avoid the seat hinges, and then forward at the hump to the center console. For that last part I used a fish tape; the carpet could be pulled up further, but it would be more work to get it back in place.


One reason for running it that way is that I also wanted to add a 12V socket at the back of the console for rear passengers.

The cable is spliced in alongside the 12V socket at the front.

There might be a Part 3.
kps
Member
- Joined
- Feb 18, 2013
- Messages
- 42
- Reaction score
- 21
- Location
- Waterloo, Ontario
- Country
- Canada
- Dash Cam
- F500LHD (front), Innovv C2 (rear)
| Thread starter | Similar threads | Forum | Replies | Date |
|---|---|---|---|---|
|
|
Rear Camera Polarizer | DIY Projects | 7 | |
| C | No place for rear camera on 2007 Honda CR-V | DIY Projects | 46 | |
| T | Fixing external rear view camera | DIY Projects | 4 | |
|
|
For A118 - DIY magnet mount for rear window / Mazda 3 Hatchback | DIY Projects | 18 | |
| K | Mobius rearcam in a rented hatchback | DIY Projects | 0 |

