How to replace the adhesive on A119 with a darker one

How much it matters for you having a dark adhesive?

  • I like the camera to be better seen with grey adhesive!

    Votes: 0 0.0%
  • I do not care about more or less stealth!

    Votes: 0 0.0%

  • Total voters
    18

Cainor

New Member
Joined
Oct 22, 2016
Messages
26
Reaction score
9
Country
Romania
Hi all,

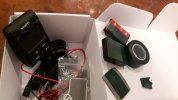
Not sure if this exact replacement has been made, but it works for me... thus I hope it will help you too. See photos below...

I've used Bison Double Adhesive for CAR as the rest of the black products are not so good in heat, though for A119 weight they might just work too.

How to do it, might take 30-45 min.

Replace, Cut, Install Steps:
1. The 3M grey sticker can be easly removed by finger. Just slowly pull it out.
2. Clean the exposed surface with a degreaser, alchool will do.
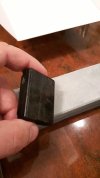
3. Put two Bison tapes on top next to each other carefuly, one would have to be cut in half. Use a cuter to get clean edges.
4. If you want to overkill you could put sone minute traces of sandpaper residue on top. Just tiny ammouts so you will have tape to tape contact and also tape to residue dust to tape (*see image).
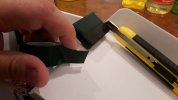
5. Put a second layer of Bison on top of the previous one in reverse order. Carefuly use a cutter on the A119 edges to cut the excess Bison tape directly on its green plastic. You need two layers of Bison because the band is thin and the A119 edges are high.
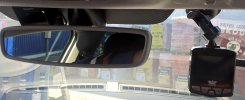
6. Install in car, be quite careful as it will stick hard from the first try, use a simple poor tape to leave yourself a level mark guide on the window tgaht you can easly remove after.
7. When you stick it on the window don't rush to press also come from top side to buttom side slowly, so you don't trap air bubbles due to the VIOFO higher edges on the sides.
8. If air bubbles remain, use a medical syringe with needle to pull it out careffuly by inserting the needle close to the window. Over time the Bison will expell any remaining bubble, just press it from time to time.

Notes:
- Bison tape to Bison tape sticks quite well.
- Bison to 3M does not have good sticking power.
- Bison is rubbery and can be pulled/cleaned out but with a harder action than for 3M.
- 3M to 3M do not stick well.
- Bison takes 24H too fully set and get maximum stick force.
- See attached images for the process
 

Attachments

  • 20161013_091419.jpg
    20161013_091419.jpg
    925.5 KB · Views: 91
  • 20161013_091820.jpg
    20161013_091820.jpg
    140.6 KB · Views: 79
  • 20161013_092554.jpg
    20161013_092554.jpg
    872.3 KB · Views: 81
  • 20161018_133138.jpg
    20161018_133138.jpg
    241.9 KB · Views: 85
Last edited:
Starting from latest batch the tape is black. But I observed it is thinner compared to the gray tape. I hope to be at least same quality as gray.
Also I observed when sticking to the windshield if in the middle the tape remain some air, the mount became visible no matter the color of tape.

enjoy,
Mtz
 
Bison its stronger than grey 3M
Yes its thiner thats why I used two - Bison on Bison (after I tested them)
Use medical syringe to extract any air bubbles.
One solution to avoid any bubbles might be to leave some space to the edge of the plastic. Not cut too close to edge.

Read instruction steps. Pana la urma ce nu ti-a iesit?... si cand ai incercat? eu am redus 70% din marimea lor.
 
Last edited:
The air was from another mounts, not A119.

enjoy,
Mtz
 
I bought this https://www.ebay.co.uk/itm/191908674306 and cut out the right size piece and just stuck it the existing adhesive pad on the mount!
Lazy yes but now twice the vibration damping!

As you can see,there is enough left for two more mounts!

dog.jpg

Yes, I have a dog!
 
  • Like
Reactions: Mtz
Starting from latest batch the tape is black. But I observed it is thinner compared to the gray tape. I hope to be at least same quality as gray.
Also I observed when sticking to the windshield if in the middle the tape remain some air, the mount became visible no matter the color of tape.
I have this problem also with my A119S. Instead of having a nice, discreet dark unit I've got a highly reflective shiny patch where the air bubble is shrieking, "Look! Look! There's something here!"

If the black tape is thinner then that would explain why air bubbles are more prevalent with it, because its surface is not equally high as the plastic surround that hits the glass first. In any event, I came to the forum to find out how to remove the GPS unit from the windscreen without destroying it, since there's enough grip left to defeat my attempts thus far.
 
I have this problem.... In any event, I came to the forum to find out how to remove the GPS unit from the windscreen without destroying it, since there's enough grip left to defeat my attempts thus far.

If I recall correctly at one stage a piece of string was supplied in the kit which you pulled with both hands while it slid under the GPS.

You could use strong dental floss which I found doesn't break very easily.
Of course you may have residue left on the glass perhaps isopropyl might get it off.
 
If I recall correctly at one stage a piece of string was supplied in the kit which you pulled with both hands while it slid under the GPS.

You could use strong dental floss which I found doesn't break very easily.
Of course you may have residue left on the glass perhaps isopropyl might get it off.
A piece of string was included but I stopped after a while because I was getting nowhere and I was afraid I'd break it. I read somewhere of using a blow dryer to heat the glue but I worry that might damage either the GPS unit or the windscreen.
 
Use something like a credit card and move the card up down and pushing it step by step to the center of the mount.

enjoy,
Mtz
 
you can use the string with a sawing motion to remove it. i've also used a plastic spudger to remove various things including dashcams from the glass. most times any remaining 3m tape can be removed by rolling it from the edge with your finger.

you won't damage the glass with just a hair dryer (esp if you keep it on the low setting) though it might be possible to distort the plastic casing on the mount itself if you're working inside the car. if you do try a hair dryer, it's best to heat up the glass from the outside for 30-45 seconds at a time, then hop in and start working on removing it.
 
I love the fact the 3M tape is so good it has become a problem removing it. Sounds like @viofo learnt what works best.
 
Man, go with the card and you will not regret. Wires methods are not good for all situations. You can scratch the camera or the mount with wires.

enjoy,
Mtz
 
  • Like
Reactions: gse
The best method I've found for removing a 3M VHB tape mount from a windscreen is a thin putty knife. Gently inserting it under a corner of the mount allows you to apply some leverage to pry the mount up and off as you continue to work the putty knife further under the camera or mount you wish to remove. This always proves easier and quicker than string and it also provides a flat strong support for carefully prying the mount off the glass once you get it inserted far enough under the object to be removed. Scratches or damage will not be an issue as long as you are careful and use common sense.

In some ways this is similar to @Mtz's credit card method but having a handle on the putty knife gives you more control and leverage.
 
Last edited:
The best method I've found for removing a 3M VHB tape mount from a windscreen is a thin putty knife. Gently inserting it under a corner of the mount allows you to apply some leverage to pry the mount up and off as you continue to work the putty knife further under the camera or mount you wish to remove. This always proves easier and quicker than string and it also provides a flat strong support for carefully prying the mount off the glass once you get it inserted far enough under the object to be removed. Scratches or damage will not be an issue as long as you are careful and use common sense.

In some ways this is similar to @Mtz's credit card method but having a handle on the putty knife gives you more control and leverage.
I finally got mine off with a $1 plastic putty knife/scraper thingy. Now I have to figure out how to remount it without getting an air bubble this time. ;)
 
To be sure you will not have air bubbles you need to stick first the dual tape on the windshield but this is more complicated.
After mounting it on the windshield as better you can you need to mount the camera by using it powered on, trying to get the perfect position before sticking it to the adhesive tape.

enjoy,
Mtz
 
I finally got mine off with a $1 plastic putty knife/scraper thingy. Now I have to figure out how to remount it without getting an air bubble this time. ;)

I find that if I use good pressure when I install VHB tape I rarely have trouble with air bubbles.

For positioning the camera in the correct spot so you don't need to move the tape again I use a technique similar to @Mtz. I power on the camera using the screen to aim it until it is positioned exactly as I want it with the protective paper still applied. While still holding the camera in place with one hand I apply some painter's masking tape to the glass along one vertical edge of the mount and one horizontal edge to mark the spot. Then I attach the mounting plate, tape or camera permanently using the masking tape as a guide. Remove the masking tape once you get everything pressed onto the glass and you're all set with a perfect installation!
 
Thread starter Similar threads Forum Replies Date
xs2ahmed A119 3
akebono A119 1
A A119 3
t.c. A119 12
G A119 4
Back
Top