LK-7900 AC25->AC27 update turned camera into brick

Found another SDcard, the original 8GB Lukas card supplied with the camera, put the AC29 update files on it and updated to AC29 no problem.

I will have another go at copying this card, and if I succeed I will make it available to you.

Thanks!! I asked both green-sum and Mi Jin about the magic card and both repeatedly ignored the question. My camera is in today's mail back to Korea at the cost of another $45. They're insisting on returning it for replacement/repair. I guess I'll have it back by Christmas...

As for the card, I think it's going to take a little more TLC than just dd. I don't know of any way of copying a device that's any lower level. I wish we had an extra one to take apart and reverse...
 
Hi again,

Good news!

Since I last tried to copy the Lukas unbricker, I have changed my Linux system to a new Deb distro. When I plugged the card in to the new system it mounted and read OK!!!!!

There are two visible files, dm3xx.dat and a config.bin.

(When you run the unbricker it installs AC23, as that was current when the card was created).

I am convinced that there are more files on this card as there are two partitions. I can only "see" one.

So I have taken an image dump of the card. It is 4 GB large. If you point me at a file store where I can upload it, you are welcome to create your own copy of the unbricker.

Use the Linux dd command to write your new SD card with the provided image.

Here are the instructions, if you create a new unbricker sd card.:-

1. Switch the power of the black box Off

2. Insert the SD unbricker card

3. While pressing M button of black box, turn the power of the black box ON, Keep the M button pressed for about 10 seconds then release.

4. After a-couple-of-minute-long processing, black box will say to format the SD card. Ignore the message and turn the black box off.

5. Try to update the unbricked AC23 to AC29 as normal.

6. If it bricks goto 1

I accept NO responsibility for your system or your sanity if you get the dd command the wrong way round, use the wrong drive, or any other ****up!

I cannot promise the unbricker will work for you either!

cheers

Patrick
 
No promises needed. Unbricking is all I can ask for! Can you put it in a private place in your ~/public_html on your machine? I can wget it from there.

Thanks!!
 
Awesome, thank you! Sadly I've already mailed mine back to Korea, but I will definitely keep this on file for when I get it back and invariably break it again in my excitement to upgrade the firmware...
 
Almost exactly a month after my failed upgrade, my replacement 7900 arrived today.
 
@ cdlu better late than never I hope the camera works fine and that you have no further issues with it. Keep us up to date regards Ipol
 
Thank You S00ooo very very much.
I owe you several beers for posting this unbrick image.

I bricked my LK7900 on day 0, within the first hour of opening the box.
I was ready to send it back to Korea, but before I did that, I thought I'd dismantle it to see if there was anything interesting inside.

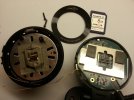
It is a very well built camera indeed. To dismantle, apply a gentle heat via hot air blower to the shiny black bezel which surrounds the front lens assembly and bears the manufacturer's logo. This is made from aluminium, so take care not to bend it. Inserting a scalpel blade behind it is enough to remove it cleanly when it is warmed up. Behind the bezel are two cross head screws. After removing the screws, the body of the camera can be unclipped and separated. Take care when unclipping the two halves as the connectors inside look very delicate.

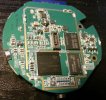
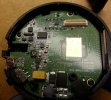
There are two circular PCBs, and the front camera module, all interconnected using surface mount connectors. They have paid good attention to EMC shielding requirements, and enclosed the high frequency components within a metal can. This can easily be removed to expose the CPU, RAM and Nand Flash. The GPS antenna is in the foot which is mounted onto the windscreen.
It is based on a custom version of the Texas Instruments DM368 chip. The customisation is probably just a cut-down version which has no ethernet controler.

Access to the internal debug serial port can be achieved by moving two surface mount resistors which are located behind the micro USB connector. R94 -> R92 and R93 -> R91 This re-routes the internal serial port to the micro-usb connector, and disconnects the internal USB function. An external serial cable can be plugged in, and used to view the debugging console. BEWARE the voltage of the serial port is 3.3V, so don't connect this directly to a PC RS232 port.
Alternatively, as I have done, you can just solder fine wires onto the two not-fitted resistor pads and a 0V connection. I used a 3.3V serial to USB adaptor. The baud rate of the serial diagnostic port is 115200.

From the diagnostic serial port, there is access to the internal linux command line. There is no password, just type root at the login prompt and log in.

It's worth noting that the attached files showing the output of the linux boot process have been captured with the camera module disconnected from the processor boards, hence the reason for the error messages near the end of the output.

Happy hacking...
 

Attachments

  • 248.jpg
    248.jpg
    563.4 KB · Views: 26
  • 249.jpg
    249.jpg
    561 KB · Views: 25
  • Reflash_And_Linux_Boot_Process.txt
    28.6 KB · Views: 17
  • Normal_Linux_Boot_Process.txt
    9.6 KB · Views: 12
  • 250.jpg
    250.jpg
    569.3 KB · Views: 22
From the diagnostic serial port, there is access to the internal linux command line. There is no password, just type root at the login prompt and log in.

Well now isn't that interesting. The USB port on the camera doesn't seem to have any greatly useful purpose... perhaps it could be used to simply log in and reconfigure the camera to add features? If it's simply an embedded Linux system, having an open source firmware start floating around should be possible and a whole lot of features could be added.
 
Finally!! Many brickings later... I have been able to program the AC31 firmware onto my LK7900.
This has been like mission impossible.

Using the normal method of putting the firmware files onto the SD Card, and letting the LK7900 update it's self does not work for me at all. This always gets stuck in a boot loop, then finally bricks its self. I've lost count of the number of attempts I've made, following the instructions 'to the letter'. Each time, I've had to recover using the "Magic" card image.

By studying the layout of the "Magic" bootable SD card, and reading the documentation for the microcontroller, I've been able to produce a couple of utilities to allow any supplied firmware version to be converted into a bootable SD card.
The bootable SD card will always work irrespective of nand flash memory state, and is more than likely the same process that is used for initial programming in the factory.

Producing the bootable SD card image is a two stage process. There's a utility to split the firmware out of the supplied firmware package files. A second utility allows the individual firmware components to be reassembled to make a bootable SD card image.

The only component which is needed in order to make a bootable SD card, but which is not contained within the fimware packages supplied by Lukas, is the SDBoot UBL. I have included this component in the zip attachment.
The only other issue is that the size of each firmware component has a hard coded maximum value within the SDBoot binary. The AC31 firmware has a RootFS size that exceeds this limit, so I have had to hack some of the machine code within SDBoot in order to increase the maximum RootFS size. Some further explanation is included within the zip attachment.

Other than that, this firmware upgrade seems to have gone relatively smoothly. Mission accomplished.

Edit:
Sorry I forgot to attach the test pattern file, also needed by SDBoot to verify the integrity of the SD card. This is now attached.
Also, a thing to note regarding writing the card image to the SD card. When SDBoot copies the data from the card to the nand, it will read beyond the card image created by these utilities. In order to avoid having junk after the end of the RootFS, it is advisable to wipe the first 100MB or so of the SDCard before writing the image. Having a bit of junk after the end of the RootFS probably will have no effect, but it is nice to keep things clean.

Edit 2:
These utilities have now been superseded by an updated version. See post on 2014-01-14
 

Attachments

  • LukasFirmwareTools_20140104.zip
    4 KB · Views: 9
  • UBLSDBoot.zip
    29.8 KB · Views: 10
  • AC23_TestPatterns.zip
    539 bytes · Views: 7
Last edited:
Finally!! Many brickings later... I have been able to program the AC31 firmware onto my LK7900.
This has been like mission impossible.

Using the normal method of putting the firmware files onto the SD Card, and letting the LK7900 update it's self does not work for me at all. This always gets stuck in a boot loop, then finally bricks its self. I've lost count of the number of attempts I've made, following the instructions 'to the letter'. Each time, I've had to recover using the "Magic" card image.

By studying the layout of the "Magic" bootable SD card, and reading the documentation for the microcontroller, I've been able to produce a couple of utilities to allow any supplied firmware version to be converted into a bootable SD card.
The bootable SD card will always work irrespective of nand flash memory state, and is more than likely the same process that is used for initial programming in the factory.

Producing the bootable SD card image is a two stage process. There's a utility to split the firmware out of the supplied firmware package files. A second utility allows the individual firmware components to be reassembled to make a bootable SD card image.

The only component which is needed in order to make a bootable SD card, but which is not contained within the fimware packages supplied by Lukas, is the SDBoot UBL. I have included this component in the zip attachment.
The only other issue is that the size of each firmware component has a hard coded maximum value within the SDBoot binary. The AC31 firmware has a RootFS size that exceeds this limit, so I have had to hack some of the machine code within SDBoot in order to increase the maximum RootFS size. Some further explanation is included within the zip attachment.

Other than that, this firmware upgrade seems to have gone relatively smoothly. Mission accomplished.
Craig Shelley, where it is possible to get input file containing memory test patterns (TESTPATTERN_FILE) for creating SD image? Thanks!!
 
Last edited:
Hi sweetthunder, I've just edited my original post, and attached the file containing the test patterns.
 
One other thing that's worth noting if you have access via the debug port. Low level access via the UBoot bootloader command prompt can be achieved if the kernel cannot be loaded. That can easily be arranged from the using the flash_eraseall command after linux has booted.
After wiping the kernel partition and rebooting, UBoot complains that it cannot load the kernel, and falls back to the command prompt.
The UBoot command prompt has a comprehensive set of utilities for manipulating the flash memory, much more than can be achieved currently from within linux. I noticed that it allows data to be extracted from the nand flash and sent in HEX format over the serial line. Quite useful are the commands to do a low level wipe of the device. Help is also available by using the help command.

MTD Layout:

dev: size erasesize name
mtd0: 003c0000 00020000 "bootloader"
mtd1: 00260000 00020000 "params"
mtd2: 00300000 00020000 "kernel"
mtd3: 02800000 00020000 "filesystem"
mtd4: 01000000 00020000 "data1"
mtd5: 02000000 00020000 "data2"
 
Created an image using a utility CreateSDBoot, firmware files used AC31 (firmup, firmware). Recorded the image to SD. When trying to update (button "M" - 10 sec) - AC25.
Normal way to update - brick. Use original 8GB SD. Restoring using the previously created image (AC31) - again get AC25. Please tell me what I'm doing wrong, where does the AC25?
 
Last edited:
My camera also displays AC25 on boot, which is a little strange because I know the UBL, UBoot, kernel, rootfs and rootfs are the correct versions for AC31.
I believe the displaying of the firmware version is done by either UBL or UBoot. Unfortunately I have now installed my LK7900 within my car, and removed the debug port connections so I can only speculate about the cause. It could be that the built in firmware update process writes the firmware version from the header of the firmware package to some address somewhere.
The easiest thing to do is a dump of the nand after a successful update. Unfortunately I'm unable to do this because every attempt to update the firmware using conventional means fails for me.

I suppose the first thing is to identify which firmware component is responsible for displaying the firmware version. To do this, build a hybrid bootable sdcard image by mixing components from older Firmware versions (older than AC25) with components from the latest firmware.
Once we know what firmware component is responsible, we can look a bit closer to find out where it pulls this information from.

At the end of the day, I believe this problem only causes an incorrect firmware version to be displayed on boot. I believe it doesn't affect the operation of the device.
It would be nice to have it fixed though.

Made three versions of the image -
1. UBL of AC23, UBOOT, KERNEL, ROOTFS of AC31
1. UBOOT of AC23, UBL, KERNEL, ROOTFS of AC31
1. OBL, UBOOT of AC23, KERNEL, ROOTFS of AC31

For the purity of experimentation, rolled up AC23 using "Magic" SD. Result - AC25 with all three images.

Addressed to the official representative in Russia LUKAS. Talked about the fact that there are problems with the usual update. Said that this had never encountered, but promised to seek help from a Korean friend.
 
Last edited:
I find the results quite mysterious. I'm sure we'll eventually figure out what is going on.

Despite the wrong number being displayed at power on, does your LK7900 function ok using this Firmware loading method?
 
DVR after updating this firmware is not functioning. Displays only the number AC25. Then only helps correct firmware version.
 
Back
Top