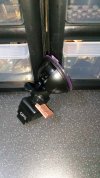
with the issues surrounding the mount not being a solid fixture for the camera i needed to solve the problem without buying another expensive dashcam so...
in my possession i already had some FURNITURE ALIGNMENT LEVELLER WEDGES from previous flat-packs n such like and can be bought very cheaply anyhow on EBAY.
https://www.ebay.co.uk/itm/141652469499
i set about fixing the mount to the windscreen using the sticky pad part first then a small amount of superglue was placed on the ball of the GPS unit and connected to the mount adjusting set angle needed. left overnight to set properly(you don't need to do this but it will help later to nullify any movement with the fix).
the wedges break of into little segments and they have a slight angle to each one. use a segment and place between the GPS unit and plastic nut on either side or the front and back. use a segment that is a very tight fit on one side and you may need a different size segment on the other side due to the GPS part angled for dashcam viewpoint.
get the handy person about the house and cut off two end pieces(the edges) of each segment part that you will be using to slot into place. push into place using the narrower end first into the widest part of mount gap until tightly snug then ditto other side. this is why i glued first so as not to move the GPS mount part while fixing these in place.
leave as is or as i did add a drop of superglue to hold in place. next day i had a neat & tidy rock solid mount for the dashcam, happy days...

