Hi everyone,
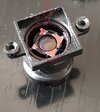
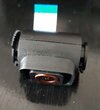
is it possible to buy somwhere this plastic/glass part which is inside lens? It is square part with red coting.
Or can I buy whole lens part?
My A118 is still functional but this part is broken.
Thank you for your help.
Yes, you should be able to buy the parts and materials you need to fix this if you are handy with DIY.
To add to what Nigel already explained, you will need to buy a replacement filter but it is actually called an IR-CUT filter not an IR filter because its purpose is to eliminate (CUT) part of the near infrared spectrum in order to obtain the normal color balance from the sensor in the camera. Basically, you need to know the proper name (IR CUT) for the filter if you want to search for what you need on the internet.
Secondly, you need to purchase some UV (ultra-violet)
curing glue for attaching the new filter to your lens holder. You need to know the proper terms to seach for that as well - UV light Curing Cement or UV Curing Glue or UV Light curing glue pen, otherwise you may not find what you need so easily.
You can find both of these items on eBay.
So, do a general search using the terms, "
IR Cut Filter" and "
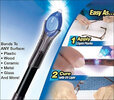
UV Light curing glue pen"
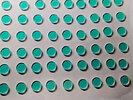
You will find filters that look like those in this photo. Be aware that IR-cut filters are "
dichroic" because they filter specific wavelengths of light. For that reason IR CUT filters can look GREEN from one angle and RED from another depending on the way the light is hitting them. This is normal and even if they look green in the photos, they are still what you are looking for. Round filters will work just fine for your project. Just make sure to measure the size you need to cover the hole in your lens holder before ordering. The 9.5mm filters that seem to be widely available will probably work. 650nm (nanometer) filters will work fine for this purpose. The 9.5mm diameter filters might even fit precisely in the hole behind the rear element of your lens and if you are very careful when applying the glue you should be fine. They will look like this:

The UV glue pens are handy because they come with a small UV flashlight for curing the cement and they can apply glue with precision, so that would be my recommendation even though UV cement comes in bottles as well. UV cement is inert and will not fog or damage the filter or your lens. This is in fact what was used at the factory when they installed your original filter.
 Instructions:
1. You will need to carefully remove what is left of the old broken IR-CUT filter. Use a hairdryer to soften the exisitng glue. Be careful not to apply too much heat so that you don't damage anything. Once you get the broken glass off, use a bit of isopropyl alcohol to clean up the surface before attaching the new filter. Also, if you don't want to have to remove and refocus your lens, make sure you clean the rear lens surface carefully before covering it with the new filter.
2. The new filter has a delicate surface that is easily damaged. Finger prints will be very difficult to remove and cleaning the filter risks scratching it. DO NOT HANDLE IT WITH BARE HANDS! WEAR RUBBER SURGICAL TYPE GLOVES WHEN HANDLING THE NEW FILTER AND PERFORMING YOUR REPAIR!
3. Position the new filter in place. Holding the filter in place apply a TINY glob of glue along the edge the filter. Be careful not to get any glue on the surface. While still holding the filter in place use the UV flashlight for about 5-10 seconds to cure the cement. Once the filter is secured in the proper position with one glob of cured glue you can now carefully apply a small amount of cement to three other places around the edge of the filter and then cure the cement.
4. Your repair should now be complete. 


