Trouble wiring VIOFO A119v3. Actually, trouble selecting fuse slot.

Mio NoVue

Member
Joined
Jul 19, 2018
Messages
122
Reaction score
17
Country
United Kingdom
I must admit I'm no expert in the way of the multimeter. I had to hop on YouTube to see which ports to connect the red & black probes so that should give you an idea. I can copy someone who knows what they're doing but that doesn't mean I know what I'm doing.

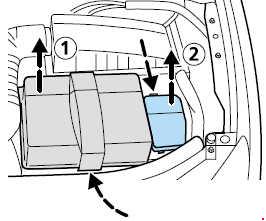
So I worked on the advice given that an empty port/slot is better than an occupied one. I set about testing them & first one was a permanent live as it threw up 12v straight away so that ticked that box.

Tested the others & I think all bar one read 0.00 (the other being 12v like the first).

So I then inserted the key, turned the ignition on & went back to test the slots that were showing 0.00v expecting them to now read 12v.

They didn't. They read 0.03v.

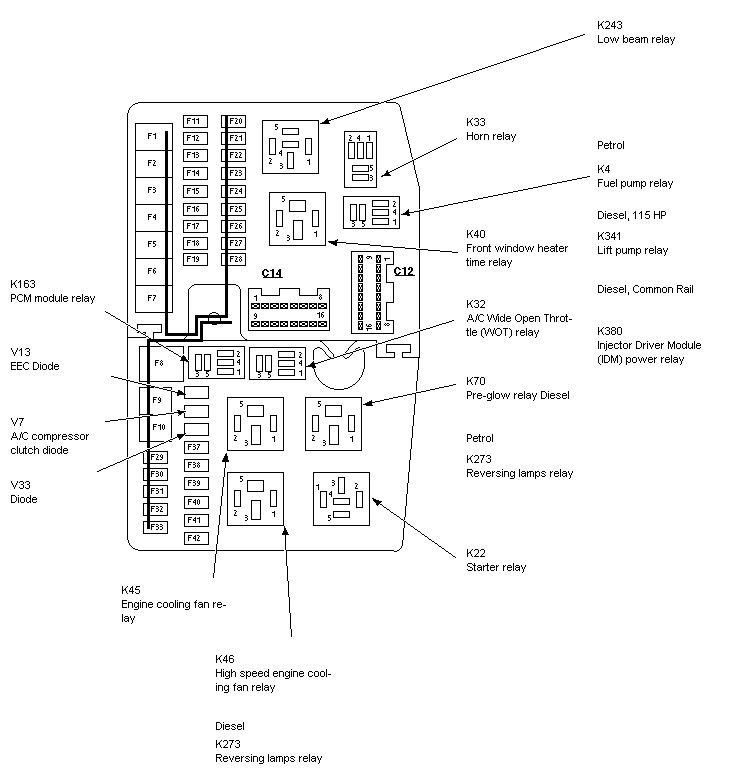
I could go and use one of the other slots that will be ignition-live like the cigarette lighter fuse for ease but the issue is I have other things I want to hardwire in like I asked here.

I want to be wiring in a charger cable for my phone - so basically it will be a 12v female socket hardwired to the fuse box with a fast charger adapter connected to the 12v female socket & then a USB cable running behind the dash & out in the bottom right corner of the windscreen to charge my phone in its holder for when I'm on a long drive & needing Google Maps or when I get in the car & my phone is low on juice.

Then there's also the Mio Mivue 618 cam I'd take from the front & put in the rear which would need hardwiring in.

If I couldn't do all 3 then the priority would be the VIOFO A119v3 up front, which is what this thread here was started for. After that would come the phone charger & lastly would be the Mio dash cam in the rear. I put this last as depending on the release of a VIOFO A229 Pro, I would then switch out the A119v3 for a 2-bird-1-stone cam setup.


If after reading this you're wondering where my question is - then it's about the 0.03v. If it's not permanent live, as it read 0.00v then why does it read only 0.03v when the ignition is on?
 
it's about the 0.03v. If it's not permanent live, as it read 0.00v then why does it read only 0.03v when the ignition is on?
You probably put the black probe in the wrong place - it needs to be touching the GND, normally any bare metal on the car will do, but a proper GND/Earth point is best. The red probe goes to the fuse socket, and it has to be to the correct end of the fuse socket, unless you have a fuse in the socket in which case either end will do.
 
You probably put the black probe in the wrong place - it needs to be touching the GND, normally any bare metal on the car will do, but a proper GND/Earth point is best.
@Nigel I tried the bolt that the existing dash cam ground wire is connected to. I tried the metal beam that runs behind the glovebox. I tried a bolt over to the left of behind the glovebox.

Now I'm not even going to pretend to know what I'm talking about when it comes to electronics as that was always one topic that bamboozled me.

But in my mind, if the black probe (being put to the wrong spot) was the problem, then wouldn't this be the problem for all slots/ports and not just certain ones? Like I said, some ports threw up 12v no problem. Others didn't.

The red probe goes to the fuse socket, and it has to be to the correct end of the fuse socket, unless you have a fuse in the socket in which case either end will do.
Just to erase doubt, I wasn't waving the probe at the socket. I saw where either terminal of the fuse would insert & that's exactly where I put the probe.
For example - slot that worked (showed up 12v), one socket would return the 12v reading whereas the other would be 0.00 so at least I knew which was the positive.

But on the ones that read 0.03 ... one socket would show 0.00, the other would return 0.03.

And it isn't as though the probe wasn't in properly - I'd re-adjust and re-adjust but couldn't get it any higher than 0.03 in certain slots.


Hope that helps clear things up.

Fuse Diagram.
 
Hope that helps clear things up.
Yes, much clearer now, not sure it helps answer the question though!

@Nigel I tried the bolt that the existing dash cam ground wire is connected to.
That should be good, keep using it, the issue will be at the fuse end.

But on the ones that read 0.03 ... one socket would show 0.00, the other would return 0.03.
There may be a relay between the 12V and the fuse, which was turned off when you tested.


Am I right in thinking that you already have a fuse tap with the connection you want for the existing dashcam, and you are trying to install a 2nd fuse tap for an extra device? If so then why not use the same fuse tap to power both your devices? There is no issue crimping the wires for two or three devices onto the same fuse tap, just calculate the total load and choose a reasonably rated fuse.
 
This may be a question best posted on a dedicated car forum.

There is a dedicated dashcam thread on the Honda forum I frequent and it shows where owners have successfully powered from.
 
There may be a relay between the 12V and the fuse, which was turned off when you tested.
I wouldn't know.

I know I tried F92 as that was empty which the diagram says trailer.
I'd need to go out & tally which are empty vs the diagram to be able to say which ones I tried.

Probably best I print the diagram off & at the very least mark up which is for sure perm-live.
Am I right in thinking that you already have a fuse tap with the connection you want for the existing dashcam, and you are trying to install a 2nd fuse tap for an extra device?
You are right.
I currently have my Mio dashcam fuse tapped in to the cigarette lighter/12v socket & the negative off to the bolt I mentioned.
Although to be totally precise, I actually have the dashcam using its own 12v male cable. It's a 12v female that is wired as I just mentioned.

Reason being - when I used one of those general dashcam hard wire kits you can buy off Amazon/eBay (and I've tried a couple) they didn't like the winter. I'd start the car up & the dash cam would often freeze. I would then have to remove the cable from the camera, let the camera power down & then re-insert the cable to the dash cam (all while car still running) and THEN it would power up properly.

Since I've switched to using its own power cable inserted in to a 12v female socket, there's literally been ZERO problem.

If so then why not use the same fuse tap to power both your devices? There is no issue crimping the wires for two or three devices onto the same fuse tap, just calculate the total load and choose a reasonably rated fuse.
There's a big problem here - knowledge.

I simply don't have the required knowledge to do what you say.

I don't know what power each thing uses. I don't know why some have say a 20fuse, others a 10fuse, others a 5fuse. As a result of all this, I don't know what to use where really.

What I do know is how to follow a guide, specifically a video guide. So when I look it up on YouTube & I see someone connecting things up simply, then I can follow that.

I also have basic understanding that it's best to use empty slots. Beyond this I understand it's best to use things that wont cause a problem if things go wrong (12v socket, wipers etc) and that it's not a good idea using things that are important (air bag, headlights). I get that much.

So with my limited know-how, I was going to do the VIOFO first - fuse tap in to a suitable perm-live, switched-live & then off to that bolt.
Then I was going to do the mobile phone charger (12v female socket) in to a different switched live & again off to that bolt, or a different bolt.
Then the Mio dashcam for the rear (if I can route it) which will require another switched live fuse & another bolt (not interested in parking mode for the rear).

This may be a question best posted on a dedicated car forum.

There is a dedicated dashcam thread on the Honda forum I frequent and it shows where owners have successfully powered from.
The perks of having an old car - forums are fairly dead.

Another thing I've found lately is that forums in general appear to be dead.

Back when I had my last car in 2008, forums were very very active. Your post could drop off page 1 within hours in certain forums of a message board. These days you're lucky to get a reply that week.

Everyone seems to be on Facebook groups these days, which is crap in my opinion. I don't like the way they operate. From what I see, the attitude of members is frequently off & also 'threads' are very needle-in-haystack.
 
I also have basic understanding that it's best to use empty slots.
It is good to use them if they work, but it is quite possible that they are not connected to anything, maybe the Ford Trailer Kit needs installing before any power arrives at the trailer fuse ... I have no idea how Ford have wired your car. Something is happening when you turn the ignition on since you get the 0.03V, but that doesn't mean it is connected to power.

If you have a 20A fuse that is working then use that. Put a 2A fuse for the fuse tap output so that you can't take too much extra power and connect as many things as you want, 2A is 10% extra which is probably safe enough. If you end up blowing that fuse because you take more than 2A then maybe upgrade to a 5A, but only if it is a fuse that you don't expect to be using the full 20A, so for example a trailer fuse is fine if you don't use it for towing, and even then you are not likely to take 20A for a trailer, possibly for a caravan with electric kettle! For the Accessory fuse, you know what you are plugging in, if you never use anything that takes more than 5A then there is no need to worry.

If you don't know what you are doing, explain what you are about to do and wait for someone to say OK or NO...
 
If you don't know what you are doing, explain what you are about to do and wait for someone to say OK or NO...
I'd been waiting since April 4th & then April 5th ;)

It is good to use them if they work, but it is quite possible that they are not connected to anything, maybe the Ford Trailer Kit needs installing before any power arrives at the trailer fuse ... I have no idea how Ford have wired your car. Something is happening when you turn the ignition on since you get the 0.03V, but that doesn't mean it is connected to power.

If you have a 20A fuse that is working then use that. Put a 2A fuse for the fuse tap output so that you can't take too much extra power and connect as many things as you want, 2A is 10% extra which is probably safe enough. If you end up blowing that fuse because you take more than 2A then maybe upgrade to a 5A, but only if it is a fuse that you don't expect to be using the full 20A, so for example a trailer fuse is fine if you don't use it for towing, and even then you are not likely to take 20A for a trailer, possibly for a caravan with electric kettle! For the Accessory fuse, you know what you are plugging in, if you never use anything that takes more than 5A then there is no need to worry.
Anyway, thanks for the response & info.
I think what I'll do is print off the fuse diagram & just get to testing. See what is perm live, mark it up & mark up which section of each socket is the positive so then I'm a little further on with what I'm working with.

The VIOFO is a definite - that has to go in, the others not so much. As I say, I'm not overly comfortably chucking various devices on the one fuse so I'm hoping there's enough perm-live & switched-live in there to tick the boxes of the 3 devices as pretty much I just need 3 switched lives & 1 perm live to do the job. I know you say I can load up on one (so wouldn't need 3 switched lives) but if I can find individual fuses to do the job then I'm happy with that.


Which fuses would you stay away from?

Airbag I'd say no-go
Headlights/just exterior lights in general - no go.

Anything else really that I shouldn't use? I would've thought horn would be fine for what it is. Things like wipers being fine.
 
If you don't know what you are doing, explain what you are about to do and wait for someone to say OK or NO...
@Nigel Ok, let's go :)......

So I understand that it's best practice to put the + leg of the fuse tap (one furthest from tail?) in to what shows up as the positive slot in the fuse box. Some seem to say it doesn't matter & I guess it'll work, but if you want to do it by the book then yeah, that.

SO....what does it mean when both slots show up a 12v reading (well, they were like 12.5, 12.6, 12.7 to be precise).

Some slots had only one showing up as positive, some slots had both.

Here's what I found:

20220722_153123.jpg

Red X - perm live readings
You'll note fuse 68. This can be moved up or down. Up means the cigarette socket is switched live (how I have it), down means it's perm live - so there's basically 3 slots in the 1.
Although having said that, funny how the bottom slot & the middle slot throw up readings with the key out for perm live yet the top one returns nothing. So if I have it in the top 2 slots, and the bottom one being perm live, not sure how it works as a switched live thing ... but it clearly does as I can assure you when I put something in the 12v socket near the handbrake, nothing powers up unless the ignition is on.

Green X - switched live. Only powered up when ignition was on. Again you'll note that some slots have top & bottom throwing up readings such as, well most of them. Fuse 76, 77, 78 for example, but others only had 1 slot showing a reading such as fuse 69 (which would be out of action due to the fuse tap in 68) and fuse 90.

Blue lines - empty slots.


Which fuses would you stay away from?
Keep away from the wipers, they put some nasty electronic noise on their wires!
Also I would keep away from the alarm system in case it is rather sensitive.
Lights are OK as long as you use the proper fuse rating.

I'm not overly comfortably chucking various devices on the one fuse
If they are high current devices then yes, but if they are only dashcam type devices, so probably using 1A in total, then there isn't a problem, other than making a good connection that is not going to fall apart and expose live wires. You should make sure that the fuse used does not exceed the rating of any of the wires connected to it, just in case of a short circuit, then it is all safe.
 
So I understand that it's best practice to put the + leg of the fuse tap (one furthest from tail?) in to what shows up as the positive slot in the fuse box. Some seem to say it doesn't matter & I guess it'll work, but if you want to do it by the book then yeah, that.
I'm going to say that it doesn't matter, unless you want to draw more than 10% extra power, so more than 2A from a 20A original fuse, in which case you should draw the power through both fuses, not bypass the original.

SO....what does it mean when both slots show up a 12v reading (well, they were like 12.5, 12.6, 12.7 to be precise).
If they don't have a fuse fitted then that is wrong, however Ford do not always stick to conventional circuit design!
I suggest you avoid those fuses, then we don't need to work out what is going on!

You'll note fuse 68. This can be moved up or down. Up means the cigarette socket is switched live (how I have it), down means it's perm live - so there's basically 3 slots in the 1.
Thanks for that, I know of a Ford that I would like changed!

Some of these fuses may be on a timer, so only actually turn off after you lock the car, or x minutes after you turn the ignition off.
 
If they don't have a fuse fitted then that is wrong, however Ford do not always stick to conventional circuit design!
I suggest you avoid those fuses, then we don't need to work out what is going on!
Ahh right this may be where I've accidentally not drawn you a complete picture.

To be clear - for the slots I marked up blue, there is NO fuse in those locations. For EVERYTHING else, there is a fuse.

When I tested, I put the positive probe on the fuse, or rather the bit of metal that's exposed on the top of the fuse.

I don't know if this makes a difference, whether I was supposed to remove the fuse or what. I thought I'd save a job by leaving them inserted.

So yeah, basically you'll see that all the ones marked up blue either show no reading whatsoever, ignition on & off OR they show up a reading but only in one of the points of the slot.

HOWEVER

When testing those slots with fuses already inserted & touching the tops of the fuse, some threw up a 12v reading on one of the points (e.g. fuses 60, 61 (perm), 67 (switch) and some fuses threw up results when probing each metal point on the fuse (e.g. fuses 70, 71, 72 (perm), 80, 82, 83 (switch).

Does this make any more sense or is it equally as baffling?

I was hoping it'd be A-ok to use these because going off the photo I uploaded, there's plenty to go at.

But if it's not ok to use then that's a load ruled out.

Also would you stay away from any rating? Some small ones in there like 7.5s.

Thanks for that, I know of a Ford that I would like changed!

Some of these fuses may be on a timer, so only actually turn off after you lock the car, or x minutes after you turn the ignition off.
Ahh that rings a bell. When I bought a car the 12v socket was perm-live which I don't like. At the time that's how I was powering my dashcam temporarily until I got round to hardwiring it, so I was having to plug/unplug every time which was annoying.

When trying to look in to how to sort it, some of the feedback mentioned a timer of sorts. I forget the duration as it didn't matter to me - I wasn't hanging around waiting on it. Then I got told just move it up.

Move it up? What you on about you madman? In to the fuse above it? How's that possible.

Then I had a look & it made sense :)
 
Do any of those fuses only become live in IGN pos 2 ?

I've often found they are the fuses that provide the most reliable power.

Sometimes, you twist the key and as soon as the dashcam detects IGN pos 1 (sometimes called ACC) power it starts to boot, then, when the starter cranks, it temporarily cuts the power.
Anything I marked with a green X is only live when the ignition is on. Again, with igniton being on I am talking about the dash clocks lighting up, the radio coming on, the internal fan blowing.

HOWEVER

Some of them return a 12v reading when probing only 1 of the metal points on the top of the fuse (e.g. fuse 67, fuse 90) and others return a 12v reading on EACH of the 2 metal points on the top of the fuse - hence the double green X as shown on fuses such as fuse 80, 82, 83.

Turn the ignition OFF and ALL the fuses marked with a green X then return a reading of 0.00v on each of the two metal points on the tip of the fuse.

Hope that makes it clearer?

Just couldn't understand why some returned 12v readings on both

e.g. Fuse 80 - reverse lights
Fuse 82 - A/C, cruise control
Fuse 83 - Heated seats (this would actually be a good one to use since my drivers seat is broken and my passenger can just stay cold :D)

whereas other fuses only returned a 12v reading on one of the metal contacts

e.g. Fuse 67 - Alarm
Fuse 90 - Rear wiper motor
 
When testing those slots with fuses already inserted & touching the tops of the fuse, some threw up a 12v reading on one of the points (e.g. fuses 60, 61 (perm), 67 (switch) and some fuses threw up results when probing each metal point on the fuse (e.g. fuses 70, 71, 72 (perm), 80, 82, 83 (switch).

Does this make any more sense or is it equally as baffling?
The fuse should connect the two ends of the fuse holder together, so if there is 12v on one end of the fuse, there should also be 12v on the other end, unless the fuse has blown, which presumably they haven't. There isn't any exception to that, maybe you didn't get a good contact?

Also would you stay away from any rating? Some small ones in there like 7.5s.
I would avoid the 7.5A ones if possible, especially if you are connecting multiple things. Preferably 15A or 20A.
If you do use a 7.5A then make sure your camera power runs through both fuses, so that you can't exceed the 7.5A in total including the original circuit. The smaller fuses are more likely to be powered through a relay or something that could be damaged by too much power.
 
The fuse should connect the two ends of the fuse holder together, so if there is 12v on one end of the fuse, there should also be 12v on the other end, unless the fuse has blown, which presumably they haven't. There isn't any exception to that, maybe you didn't get a good contact?

Oh don't be telling me I need to remove every fuse to test properly :( That's the last thing I wanted to hear. lol.

As for not getting a good enough contact. It's possible of course but I would have to say surely doubtful - reason being I didn't just jab at it once & say that'll do. I actually went at the contacts assuming I would get a bad contact because the metal point is so fine - so I would put the probe to it. If it gave a 12v reading I would X it on my sheet, if it didn't give a reading then I would move the probe over it a little while to see if I'd just missed it. After a bit of this I would then accept it gave no reading.

I guess the only real way is to try one of the fuses that reads as a double X & see what it reads as once it's removed.

Thanks for the explanation as to why it should be reading on both though with how I tested. Makes sense now.
I would avoid the 7.5A ones if possible, especially if you are connecting multiple things. Preferably 15A or 20A.
Are we talking about how I said I'd be wiring or how you suggested?

I fully trust what you said is accurate - that I should be able to load multiple out of 1 fuse. I can say now though I wont be doing that. I'm just simply not comfortable doing that. I will be looking for everything to have its own fuse tap. If this means that one of the 3 devices wont fit for room (such as fuse tapping 12v socket blocks off the fuse next to it) then the rear cam will have to give - reason being the potential for the upcoming A229Pro whenever it lands.

If you do use a 7.5A then make sure your camera power runs through both fuses, so that you can't exceed the 7.5A in total including the original circuit. The smaller fuses are more likely to be powered through a relay or something that could be damaged by too much power.
Ok refresh me again then.

Is that when the positive leg of the fuse tap (furthest from the tail) goes in to the positive point of the fuse slot?
Or is it when the negative (closest to tail) on the fuse tap goes in to the positive fuse slot?
 
Oh don't be telling me I need to remove every fuse to test properly :( That's the last thing I wanted to hear. lol.
When you pull the first one, you will probably find that you had a poor connection, and you can assume it is the same for all the others, so you don't really need to pull all the others!

As for not getting a good enough contact. It's possible of course but I would have to say surely doubtful
I don't have another explanation, so for now I will have to go with that one.

Thanks for the explanation as to why it should be reading on both though with how I tested. Makes sense now.
It should all make sense, if something isn't making sense then it is best to ask, because it is possible to cause a lot of damage! We don't often hear of damage, so don't worry, but it is best to check.

I fully trust what you said is accurate - that I should be able to load multiple out of 1 fuse. I can say now though I wont be doing that.
Personally, I prefer a single tap, but I do have experience on how to connect wires with crimps and solder. So either do it the way you feel comfortable with, or sort the issues that are making you uncomfortable.

One option is to connect an eg 4 way 12V accessory socket to the fuse tap, then you have 4 connections off one fuse tap which should all work fine. There is no reason to feel uncomfortable about that.

Ok refresh me again then.

Is that when the positive leg of the fuse tap (furthest from the tail) goes in to the positive point of the fuse slot?
Or is it when the negative (closest to tail) on the fuse tap goes in to the positive fuse slot?
Well, it depends on the internal construction of the fuse tap, it would be possible to construct them either way around, so my answer is to use your multi meter set to continuity test, insert both fuses into the fuse tap, you should find that a continuity test between the tail and either pin of the tap will show a connection, if you then remove the original (bottom) fuse, one of the pins will no longer show continuity, that is the one that should be connected to the supply side of the fuse socket. You then can't take more power than the original fuse rating, even if use both original and new circuits, because the new circuit is actually part of the original. If you put it the other way around then they become separate circuits and the maximum power becomes the total of both fuses, potentially overloading the supply wiring and components.

Hope that doesn't confuse, but you seem to be following so far...
 
Does your car ignition perform like most do, as per my above post ?

Most cars have 3 positions, ignition position 1 and ignition position 2, with ignition position 3 being the spring loaded position that cranks the starter.
 
When you pull the first one, you will probably find that you had a poor connection, and you can assume it is the same for all the others, so you don't really need to pull all the others!


I don't have another explanation, so for now I will have to go with that one.

Well I've just been out with what you said in mind but I got the same results.
However,
I tested a few fuses - got the same results, then I pulled those fuses & this is where the difference was which tied in with exactly what you told me.

In that once they were pulled, only one location gave out a 12v reading instead of the previous two locations (I'm talking about the fuses that gave out a 2 location reading - those that gave a reading on only 1 of the metal points on the top of the fuse continued to do so).

So you were spot on with the reasoning behind why both metal contacts on the top of the fuse would show a 12v reading although the suggestion that on the fuses where I only got a reading on one of the metal points doesn't seem to be the case as I just couldn't get a reading on both this morning.

Unless the metal point is that tiny or that recessed or whatever that my probe couldn't touch it on those fuses? In which case your suggestion would then still apply?

But I think through what you've said we've now found out to be able to free up enough fuse slots. Hopefully.

The only thing is is that you said about avoiding the 7.5 fuses and there appears to be an awful lot of them in my fuse box. Sods law.
It should all make sense, if something isn't making sense then it is best to ask, because it is possible to cause a lot of damage! We don't often hear of damage, so don't worry, but it is best to check.


Personally, I prefer a single tap, but I do have experience on how to connect wires with crimps and solder. So either do it the way you feel comfortable with, or sort the issues that are making you uncomfortable.

One option is to connect an eg 4 way 12V accessory socket to the fuse tap, then you have 4 connections off one fuse tap which should all work fine. There is no reason to feel uncomfortable about that.

I wonder if you're talking about the same thing my brother mentioned to me?

Before posting here I asked him about this problem. He's a trainee HGV mechanic but he also has a cowboy "it'll do" approach to things and I don't like "it'll do", I like "it WILL do...because that's the WAY to do it".

Anyway, he suggested to use one of these. If you don't want to click the link then the listing is basically "6 Ways 12V -32V Blade Fuse Box & Distribution Bar Bus Boat Car Kit Marine Holder".

I thought he was just coming out with his cowboy methods again. Maybe he still is. I just wondered if this might've actually been what you're talking about & maybe he wasn't being a cowboy after all?


Anyway, now I'm able to determine each fuse has only 1 point where it really does return a 12v reading, I need to locate suitable fuses & go from there.


Though I still don't get why the 7.5A fuses should be avoided as you said earlier - things like the dashcam should only be using about 1A total. So that'd be 6.5A left? Or is that not how it works? And I don't mean that in a sarcastic manner - that should just illustrate how little I know about electronics that's all so some of my questions will seem stupid.
So as 2 of my devices are dash cams so that'd be 2x 1A each. The other device is only a phone charger.

To be specific, it's this Anker phone charger.

And I wouldn't have thought it'd use considerably more than a dash cam?

Although having read on it says:

Input: 12V / 24V ⎓ 4A USB-C ; Output: 5V ⎓ 3A / 9V ⎓ 2A ; USB-A Output: 5V ⎓ 2.4A (max.)
If you can make sense of that?

So are we talking about 4A? 3A? 2A? or 2.4A?

I'd be using the USB-C PD slot if that makes a difference?

Does your car ignition perform like most do, as per my above post ?

Most cars have 3 positions, ignition position 1 and ignition position 2, with ignition position 3 being the spring loaded position that cranks the starter.
You know what, I've never paid that much attention to it. I just either start it or turn the ignition on. I'd say yeah it has 3 positions as I'm sure if i turn it slightly then no lights come on, turn it again then lights come on, things power up but the car doesn't start, turn it again & the car starts.
 
Thanks for confirmation.

In which case my first statement applies ....... if you can find a fuse that only becomes active in ignition position 2 and is dead in ignition position 1 you may have a better experience with power supply as most ignition 2 fuses stay active during the starter crank.

In my experience a lot of ignition position 1 fuses lose power during starter cranking and can easily confuse a dashcam.

I've got power ...... no I haven't = they often try to start then shut down
 
Back
Top