CPL filter help!

MCMasterJ

New Member
Joined
May 15, 2021
Messages
2
Reaction score
0
Location
New Jersey
Country
United States
Hey everyone!

So I have a VIOFO A129 Duo dash camera in my Jeep Grand Cherokee and I noticed when I would rewatch my videos from the front camera that the dashboard would reflect to the windshield and it would show up on the video from the camera.

So to try and remedy this issue I got myself a CPL filter from VIOFO. Now I’ve heard that when people got their CPL filter that it usually wasn’t aligned correctly from the factory. So I assumed the same thing would have happened to mine. Now another thing that I also heard was a way to check if the CPL filter was properly aligned. The method to check if it was aligned or not was to turn the filter 45° while holding it up to a computer screen and if you were to look through the filter and it turned black or green blocking out the computer screen then it’s aligned properly.

Well I did this test to my CPL filter and got the computer screen to black out at 45° but when I put the CPL filter onto the camera itself it doesn't seem to have made any difference and the reflection is still prominent on the video. Any thoughts on this would help me greatly. Thanks!
 
Adjust it back to the original setting, they are normally correct from the factory!
 
Best to use a TV screen, then it should go black at 90 degrees. You can also check against polarised sunglasses which should definitely be black at 90 degrees.
 
you will need to turn the little CPL glass in the holder, with a screen camera / wifi able camera, i just do it live in the car with a piece of paper on the dashboard so i have a strong reflection to work off.
It is a bit tedious this way.
What i do is hold the CPL filter in its bracket in front of the lens and then turn it a little to see where the sweet spot is by looking at camera screen or phone APP if wifi are a option, then to turn the CPL glass in the holder a little and try again to see if i have hit the sweet spot.

Of course a white piece of paper reflecting you will never make it go away completely but you can see when its as faint as possible.
 
I use linear polarising filters on my cameras. 3 have film (optical polarising sheet) & the front camera a 30.5mm linear polarising filter.

Whether it is linear or circular, line up the filter vertically and leave it at that, otherwise you will have to adjust the filter event time you turn a corner.

A easy example, if you have polarising sunglasses tilt you head left and right while wearing them and the polarising effect changes.

If the camera's polarising filter is set virtually it is best for the sun in the middle of the day, but the sun in the morning and afternoon it will not be as effective depending which of four sides of a city block you are circling waiting to pick up your better half from personal shopping due to lack of parking!
 
If the camera's polarising filter is set virtually it is best for the sun in the middle of the day, but the sun in the morning and afternoon it will not be as effective depending which of four sides of a city block you are circling waiting to pick up your better half from personal shopping due to lack of parking!
Actually, vertical is always best for removing windscreen and road surface reflections, time of day makes no difference.
 
Actually, vertical is always best for removing windscreen and road surface reflections, time of day makes no difference.

Alright guys so this is what I did. I took the CPL filter out from the camera and did the test up against a TV instead of a computer this time and adjusted it so that it turns black at 90° and not 45°. When I did the test and got the TV to go black at 90° funny enough I didn’t notice that I just adjusted it BACK to what it originally was before I started messing with it. Basically I just rotated the lens back to what it was from the factory without even noticing until now. So Nigel you were right, I assumed that the filter wasn’t aligned properly because I have read so many reviews saying that it was wrong right from the start, I didn’t bother to test it before rotating it.

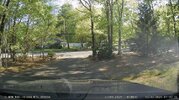
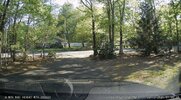
So as it sits (now at 90°) I did a test to see if any change was made while the filter was on the camera and the result was that there was a LITTLE change but nothing major. I knew that the CPL wouldn’t eliminate what I was trying to but only reduce it. Managed to take some pictures of the difference. It’s not much but it’ll do, if you think there’s a way to get this window glare reduced even more please tell me!

(CPL filter lens rotated at 45° angle)
17899666-34DD-43FC-AA52-36841A73752E.jpeg

(CPL filter lens rotated at 90° angle)
15E5E753-6AB8-4917-BDE9-F619288D5CFA.jpeg

You can see the changes if you look to the right of each picture. Also notice that there is a 6 minute difference between each photo. I was trying to get the best comparison with each without much of a time difference so that the sun was in the same spot. (More or less)
 
I have B&W Kaesemann linear and circular polarising filters for photography. You will not get rid of all reflections.

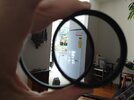
An interesting issue. If both filters are facing forward and they are 90° to each other they will black out.

If the circular polarising filter is back the front (not a rotational issue) the filters will not go black no matter how much you rotate them in relation to each other.
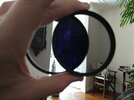
113354273228063026.jpg

The circular polarising filter back the front, not a rotational issue.
857707222562158527.jpg
 
When it is correct, it should be most effective in the centre, not at the side as appears to be the case. I wonder if you haven’t got the camera quite level? In which case it might want a small adjustment.
 
Basically I just rotated the lens back to what it was from the factory without even noticing until now. So Nigel you were right, I assumed that the filter wasn’t aligned properly because I have read so many reviews saying that it was wrong right from the start, I didn’t bother to test it before rotating it.
in the very first production there was a bunch of them that weren't adjusted correctly, this was a few years ago, unfortunately that gets repeated so often that people think it's still happening and go adjusting them before they've even used them and set them incorrectly as a result, it's one of those things that people really need to stop repeating as though it's factual
 
Kind of like all the people telling me that running a cam overnight without a HWK would destroy my car battery quickly, cause the stock market to crash, and make the sky fall on everyone :eek: OK I exaggerated a little, but the HWK part is what everyone was saying until I and others tried it, and discovered that reality was different than the oft-repeated 'wives tales' which everyone believed simply because everyone was saying it

The best way to adjust a dashcam CPL is to place a piece of white paper on the dash directly under the cam, then view the images as you turn the CPL. When you see the paper's reflection the least, that is where the CPL is going to work best :cool: It's tougher viewing the images if there's no screen or wifi app, but it can be done with patience and persistence. Trying against a computer screen or TV isn't necessarily going to get you the results you need as those screens may not be oriented as you think , but this kind of actual "as it is being used' testing always works. It gives you actual results, not rumored results, and it is not depending on someone else building it or marking it properly. It simply cannot go wrong.

Phil
 
The best way to adjust a dashcam CPL is to place a piece of white paper on the dash directly under the cam, then view the images as you turn the CPL. When you see the paper's reflection the least, that is where the CPL is going to work best :cool: It's tougher viewing the images if there's no screen or wifi app, but it can be done with patience and persistence. Trying against a computer screen or TV isn't necessarily going to get you the results you need as those screens may not be oriented as you think , but this kind of actual "as it is being used' testing always works. It gives you actual results, not rumored results, and it is not depending on someone else building it or marking it properly. It simply cannot go wrong.
Yep, I've been saying that for years as well (https://dashcamtalk.com/forum/threa...nt-how-to-adjust-diy.15022/page-2#post-197505).

You don't even have to put the filter (CPL or linear) on the camera - just hold it up to your eye (for CPLs make sure you have the 'front' facing forward) and rotate it. When the reflection fades to the point where it's least visible the orientation is correct.
 
I have bought a CPL filter with my camera package and thought I would double-check fitting as there are no instructions/guidance included.

The frame has one edge with a rounded bulge in it - I assume that is the top?

When I look at the edge of the lens itself it appears to be made up of two pieces of material - Is this correct?

And the lens edge(s) has a small black line across - is this to double-check the lens hasn't moved in the frame? I assume this mark is at the bottom poistion?

TIA
 
the mark is irrelevant to the alignment, you'll see the opening on one side is longer than the other, mount it with the longer opening facing up
 
Back
Top