roniux
New Member
- Joined
- Jul 30, 2013
- Messages
- 7
- Reaction score
- 7
- Location
- Guatemala
- Country
- Guatemala
- Dash Cam
- DOD LS430W
Well, I come back again, with my finals tests, and now I can say my DOD LS430W finally is fixed, after a few weeks waiting the parts and patience:
Tools to use:
- Screwdriver
- Glue of Ethyl Cyanoacrylate, Hidroquinone
- M12 x 0.5mm Right hand thread die
- Tin and tin solder
- Solder paste flux
- Plastic angled flathead pry
- Desolderin brid solder remover
- Pocket knife
- Loctite threadlocker 242 medium strength
- Whetstone
- Cotton swab
- LED flashlight
- Lens cleaning solution (I use Vivitar lens cleaning solution that contains 78% distilled water, 20% methyl alcohol, 2% detergent, but any solution works fine)
New parts
- ABS Lens holder M12 x 0.5mm (18 mm screw distance, 19 x 10 x 13 mm)
1.- Extract the MicroSD card, open the camera removing the 8 screws in the top side of the camera with the srewdriver followed with the plastic angled flathead pry try to open starting in the top holes and crossing all the camera to release the tabs, because they are fastened with pressure tabs.
2.- After that you opened the first part of the camera, now you need to removing the two screws from the led board and remove the speaker fastened with a black tape.
3.- Now remove the four screws of the DOD LS430W Main board, and release the data cable from the LCD screen, be careful of the LCD is loose now.
4.- Desolder the 2 point of tin in the back side of the main board of the big metal case using the desoldering brid solder remover and the tin solder to extract the tin, after that yo need to remove the two screws, be careful the lens is loose now.

5.- With the pocket knife you need to cut the holder of the lens and extract it, now you need to do a new thread with the M12 x 0.5mm thread die, be careful not to cross-thread


6.- Now prepare the new lens holder to put in the mainboard, first screw the lens holder to the mainboard using the screws and the screwdriver, this is only to see if the lens holder settle well on the main board, if not, disassembly the holder from the main board, now you need to use the whetstone to grind down any part that you saw that does not allow to settle the lens holder over the main board, after that you need to reassembly the both parts. Followed solder with tin the metalic rear cover, assembly the main board with the LCD cable and put the mainboard and the LCD into the back case camera, screw them.

7.- The follow step is assembly the lens in the lens holder: Clean with the cotton swab the CMOS sensor, one side with a drop of the lens cleaning solution and the other side dry of the cotton swab, to dry the CMOS sensor, now turn on the DOD LS430W, check the LCD turn on too and connect the HDMI cable to your TV, wait a few seconds to appear the image on the TV, use the flashlight to project light into the CMOS sensor, continues cleaning the sensor until all dirt and any minimal contamination dissapear in the image projected in the TV, continues using the flashlight to project light into the CMOS sensor, use many cotton swabs you need, be careful to not scratch the sensor, clean the lens too from any contaminant at both ends, now is time to assembly the lens, use a very little tiny Loctite threadlocker 242 medium strength drop into the lens thread, be careful only use a very little tiny drop, turnign the lens clockwise until the image looks completely clear and you feel that the lens is entering into the lens holder adjusted slightly. Now you can turn the lens right or left to adjust the image. I recommend using typographical characters of different sizes, with no smaller distances of five feet away centered in the image projected into TV.


8.- Use the glue of ethyl cyanoacrylate, hidroquinone to seal the lens holder into the mainboard forming a 360° seal, remember you need to use a tiny drops waiting for it to harden, then you continue adding more drops to thicken the seal.

9.- Finish, reassembly all the parts
10.- Test the camera, if you see that the video still blurry you need to disassembly the front case of the camera and turn the lens, but in this case turn right or left like a 1/4° or less each time, test it again.
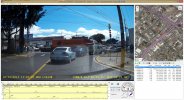
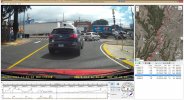
Summary: The principal issue is that the lens don't settle completely into the main board, and the other thing is that the lens is out of focus into the lens holder, two facts that lead to a blurry video. You can see now the images from the video
Before
and
After
to see the differences.
Other thing that improves the video is the firmware, specifically the version Firmware update for LS430W 2013-11-03 EN posted in Facebook https://www.facebook.com/HDigitalEYE/posts/454176568020538
Tools to use:
- Screwdriver
- Glue of Ethyl Cyanoacrylate, Hidroquinone
- M12 x 0.5mm Right hand thread die
- Tin and tin solder
- Solder paste flux
- Plastic angled flathead pry
- Desolderin brid solder remover
- Pocket knife
- Loctite threadlocker 242 medium strength
- Whetstone
- Cotton swab
- LED flashlight
- Lens cleaning solution (I use Vivitar lens cleaning solution that contains 78% distilled water, 20% methyl alcohol, 2% detergent, but any solution works fine)
New parts
- ABS Lens holder M12 x 0.5mm (18 mm screw distance, 19 x 10 x 13 mm)
1.- Extract the MicroSD card, open the camera removing the 8 screws in the top side of the camera with the srewdriver followed with the plastic angled flathead pry try to open starting in the top holes and crossing all the camera to release the tabs, because they are fastened with pressure tabs.
2.- After that you opened the first part of the camera, now you need to removing the two screws from the led board and remove the speaker fastened with a black tape.
3.- Now remove the four screws of the DOD LS430W Main board, and release the data cable from the LCD screen, be careful of the LCD is loose now.
4.- Desolder the 2 point of tin in the back side of the main board of the big metal case using the desoldering brid solder remover and the tin solder to extract the tin, after that yo need to remove the two screws, be careful the lens is loose now.

5.- With the pocket knife you need to cut the holder of the lens and extract it, now you need to do a new thread with the M12 x 0.5mm thread die, be careful not to cross-thread


6.- Now prepare the new lens holder to put in the mainboard, first screw the lens holder to the mainboard using the screws and the screwdriver, this is only to see if the lens holder settle well on the main board, if not, disassembly the holder from the main board, now you need to use the whetstone to grind down any part that you saw that does not allow to settle the lens holder over the main board, after that you need to reassembly the both parts. Followed solder with tin the metalic rear cover, assembly the main board with the LCD cable and put the mainboard and the LCD into the back case camera, screw them.

7.- The follow step is assembly the lens in the lens holder: Clean with the cotton swab the CMOS sensor, one side with a drop of the lens cleaning solution and the other side dry of the cotton swab, to dry the CMOS sensor, now turn on the DOD LS430W, check the LCD turn on too and connect the HDMI cable to your TV, wait a few seconds to appear the image on the TV, use the flashlight to project light into the CMOS sensor, continues cleaning the sensor until all dirt and any minimal contamination dissapear in the image projected in the TV, continues using the flashlight to project light into the CMOS sensor, use many cotton swabs you need, be careful to not scratch the sensor, clean the lens too from any contaminant at both ends, now is time to assembly the lens, use a very little tiny Loctite threadlocker 242 medium strength drop into the lens thread, be careful only use a very little tiny drop, turnign the lens clockwise until the image looks completely clear and you feel that the lens is entering into the lens holder adjusted slightly. Now you can turn the lens right or left to adjust the image. I recommend using typographical characters of different sizes, with no smaller distances of five feet away centered in the image projected into TV.


8.- Use the glue of ethyl cyanoacrylate, hidroquinone to seal the lens holder into the mainboard forming a 360° seal, remember you need to use a tiny drops waiting for it to harden, then you continue adding more drops to thicken the seal.

9.- Finish, reassembly all the parts
10.- Test the camera, if you see that the video still blurry you need to disassembly the front case of the camera and turn the lens, but in this case turn right or left like a 1/4° or less each time, test it again.
Summary: The principal issue is that the lens don't settle completely into the main board, and the other thing is that the lens is out of focus into the lens holder, two facts that lead to a blurry video. You can see now the images from the video
Before

and
After

to see the differences.
Other thing that improves the video is the firmware, specifically the version Firmware update for LS430W 2013-11-03 EN posted in Facebook https://www.facebook.com/HDigitalEYE/posts/454176568020538
Last edited:
