Mobius remote Mode button

horaceCJ

Active Member
Joined
Mar 15, 2013
Messages
197
Reaction score
210
Country
Romania
Dash Cam
Mobius A/B/C / 808 #16D
Motivation: A lot of dashcam videos that I saw recently have one or more of the following: file lock beep, actual sound of a button press (to lock file), slight video shake caused by a button press.
Extra motivation 1: Mobius lock button (Mode button) is in the middle of the other two and it's not very straight-forward to press it.
Extra motivation 2: My car's rearview mirror and the Mobius under it are pretty far away from driver's seat and I need to lean forward to reach the camera.
Forecast: Soon we will see a dashcam video entitled: Accident I caused while trying to lock a clip in my dashcam. (If it's not already somewhere on YT.)

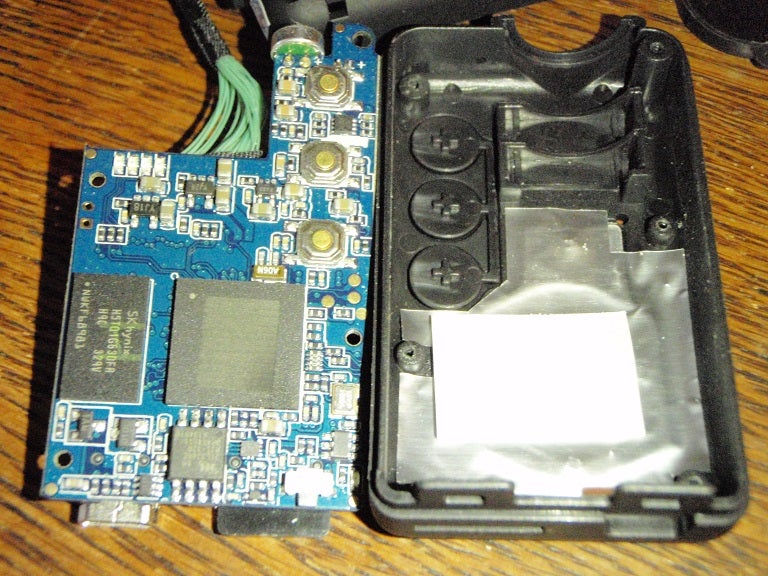
So I had the ideea to build a "remote control" (fancy word for what I actually did), @Isoprop pointed me the right direction for soldering the wires. I guess the following pictures are better than words:

01 mode button.jpg 02 cablu.jpg 03 ansamblu.jpg
04 in car remote.jpg 05 in car cuplaj.jpg 06 in car mobius.jpg
Tools and materials:
- old smartphone headset (Glofiish) for the button and the thin wires that I soldered on the circuit board
- network cable from which I used a pair of wires (~2 meters) in order to place the button on the back of the car's audio remote control placed on the steering column (the perfect spot for me)
- soldering iron
- Mobius :)
- availability

In order to get the wires out of the camera I choose to enlarge the mini USB hole and to scratch a little bit the case to get the wires from the buttons side to the other. I picked this sollution because there's very little space between the circuit board and the case on the buttons side (plus the heat sink and related stuff).

If anybody needs additional information please let me know.
 
Nice job! Love the placement of the button right behind the steering wheel. It's not easy to hit that middle button and drive. I actually turned the camera off one time trying.
 
Very nice and useful. Good point about trying to reach it during driving, especially where a lot of us place it.
 
So, am I to understand that one could use this method to activate any of the three buttons on the Mobius? I've mentioned elsewhere on this forum that I've been experimenting with using the Mobius for wildlife observation and have considered various techniques. For example, you can buy long runs of bus-powered USB cable (as much as 82 feet) that will provide power and therefore the ability to start and stop the Mobius from a distance. There is another method where you can buy Cat5 and Cat6 adapters designed for making very long runs as much as 150 feet that end with USB connectors. (I have no idea how well this might work but it has interesting potential and has got me thinking). On the other hand, I have a radio controlled system I use on Nikon DSLRs that allows me to trigger the camera (and strobe units) from hundreds of feet away. In theory, if this method was used on the Mobius power switch instead of the mode switch and adapted to the radio receiver, it would allow for remote control of the Mobius without running any cables.
 
Last edited:
So, am I to understand that one could use this method to activate any of the three buttons on the Mobius? I've mentioned elsewhere on this forum that I've been experimenting with using the Mobius for wildlife observation and have considered various techniques. For example, you can buy long runs of bus-powered USB cable (as much as 82 feet) that will provide power and therefore the ability to start and stop the Mobius from a distance. There is another method where you can buy Cat5 and Cat6 adapters designed for making very long runs as much as 150 feet that end with USB connectors. (I have no idea how well this might work but it has interesting potential and has got me thinking). On the other hand, I have a radio controlled system I use on Nikon DSLRs that allow me to trigger the camera ( and strobe units) from hundreds of feet away. In theory, if this method where used on the Mobius power switch instead of the mode switch and adapted to the radio receiver, it would allow for remote control of the Mobius without running any cables.
Simple buttons like those used in the Mobius do nothing more than connect two or more electronic components together for a short time. They generate a so-called interrupt. You can use the same method to make the contact with any of the three buttons, but remember you need a momentary contact and not a permanent contact. A contact of about 500ms is the max. you should use to simulate the short press of a button.
 
Simple buttons like those used in the Mobius do nothing more than connect two or more electronic components together for a short time. They generate a so-called interrupt. You can use the same method to make the contact with any of the three buttons, but remember you need a momentary contact and not a permanent contact. A contact of about 500ms is the max. you should use to simulate the short press of a button.

Thanks Isoprop! Yes, I believe my remote trigger is momentary contact but I need to put a MM on it to check. Do you have any thoughts about these Cat5/Cat6 USB adapters and bus powered USB cables?
 
Thanks Isoprop! Yes, I believe my remote trigger is momentary contact but I need to put a MM on it to check. Do you have any thoughts about these Cat5 Cat6 USB adapters?
I use cat5 USB adapters to communicate with USB devices at a distance but, from my experience, they are far from being reliable and the cat5 cable length is limited. They also don't usually support USB 2.
I haven't tried with cat6. My office and household wiring is all cat5e. I'm not a fan of these adapters.

This is very helpful feedback. Thank you.
 
Thinking about this a little further I might be able to make use of the Cat5 adapters. The fact that they are not USB 2.0 shouldn't be a problem for me because I'm not really in need of higher data rates. Primarily, I just need to transmit power and this would allow an inexpensive method for runs as much as 150 feet. Certainly they are cheap enough (11.27 USD per pair) to experiment with. Still, the wireless trigger seems more fun to implement and potentially more useful.
 
Based on horaceCJ's ideas here and the rest of the discussion, it is clear that you could make a small remote control with three momentary switches that would allow you to control all the button activated functions of the Mobius from a distance. The could be very useful in many applications. Combined with a small external LCD monitor it could be pretty cool!
 
I got lucky with the Mode button, the others look that would require more finesse in soldering. But the most elegant sollution would be to use the USB data connection to emulate buttons press. The remote module could be inline with the power connection or a cable split could be made to provide more flexibility. However, I don't know if current hardware could achieve this.

PS: I heard a rumor about a WiFi module for Mobius... the "source" had in the past good information about other products/features from the Mobius manufacturer (Mobius itself, #16v3, #16 watch etc.).
 
I recognised the problems in hitting the middle button. I simply degreased it and put a dab of Unibond Repair Extreme glue on it (a clear, flexible glue that is also similar to Evo-Stik "Serious Glue" - good stuff!).

I positioned the camera upside down until the glue set then snipped off the "tail" of excess glue with some nail clippers. The result is a rubbery, sharp edged "button" of glue that is easy to feel without hardly looking.

I've already used it several times and very pleased with how well it works. My camera is inverted behind the interior mirror.

PS. I used a small dab of the same glue to "silence" my rattling buttons from inside the casing. A tiny amount on the stem that links the 3 buttons stopped a buzzing I got with certain vibrations/revs of the engine. The buzzing was picked up by the camera's internal mic and could only be heard on playback.
 
PS. I used a small dab of the same glue to "silence" my rattling buttons from inside the casing. A tiny amount on the stem that links the 3 buttons stopped a buzzing I got with certain vibrations/revs of the engine. The buzzing was picked up by the camera's internal mic and could only be heard on playback.
I had the buzzing sound also, but it was caused by the battery wires which were placed near the microphone and used to vibrate on bad roads. I rearranged them some time ago (before opening the buttons side), so I'm sure that this was the buzzing's source in my case.
 
But the most elegant sollution would be to use the USB data connection to emulate buttons press. The remote module could be inline with the power connection or a cable split could be made to provide more flexibility. However, I don't know if current hardware could achieve this.

I like the idea of a USB-connected remote button box.

It's a major PITA to feel for the buttons when it's on the dashboard; much less know what color LED is lit.
 
"Bad" news for my future Mobius, there are now more "things" around the mode button which will make soldering more difficult without proper tools:
a6447466-82-open%20case.jpg


Tom Frank;27344785 said:
No, it's stamped as V6.3 circuit board, dated 10/31/2013. The developer may make revisions from time to time for reasons that don't change functionality. I really don't recall anything about this version that changes any user functionality.
The one I currently have is stamped "2013-07-16".
 
Few months ago I improved my mod using connectors from 20cm Male to Female Jumper Cable For Arduino, but I forgot to update this thread.
On each side of the USB plug I made 2 little holes and I glued to the plug 2 female plugs in which I connected the wires from the mode button. One of the plugs covers one of the screws, but if you need to take the board out it shouldn't be to difficult to unglue it.
11 new connectors.jpg 12 new connectors.jpg 13 mobius in car.jpg
Next, I needed also an angled USB mini plug which I wasn't able to procure from local shops or my preffered sites (I didn't insist too much). So I took a normal cable and started to cut the plastic at about 5 mm from the edge. I found out that on the larger side (the top side in the picture bellow) there is a metal plate which I bend at 90 degrees to obtain my desired angled connector. The wires of the USB cables were not cut at all, just the first layer of plastic protection.
On the sides of the USB plug I glued 2 pins from the male plugs (just the metallic pins) and the wires were bended alongside the USB cable and protected using some black electrical tape. Then the pins must be alligned with the female connectors, but they are pretty easy to bend, so this shouldn't be a problem.
14 mobius plug.jpg
An option could be to connect the pins to 2 wires of the USB cable, but for me it was more convenient to use the wires that came in the package and link them further to the button under the wheel.

For me the sollution is reliable enough as I don't take out the Mobius very often from the car (maybe 10-15 times in 3 months, mostly to play with new FW/settings). Also in the future I plan to use a lens extension for the front camera too and the wires will be like this:
15 mobius 2.jpg
I hope I was clear enough, but if anybody has any questions feel free to ask.
 
Few months ago I improved my mod using connectors from 20cm Male to Female Jumper Cable For Arduino, but I forgot to update this thread.
On each side of the USB plug I made 2 little holes and I glued to the plug 2 female plugs in which I connected the wires from the mode button. One of the plugs covers one of the screws, but if you need to take the board out it shouldn't be to difficult to unglue it.
View attachment 10831 View attachment 10832 View attachment 10833
Next, I needed also an angled USB mini plug which I wasn't able to procure from local shops or my preffered sites (I didn't insist too much). So I took a normal cable and started to cut the plastic at about 5 mm from the edge. I found out that on the larger side (the top side in the picture bellow) there is a metal plate which I bend at 90 degrees to obtain my desired angled connector. The wires of the USB cables were not cut at all, just the first layer of plastic protection.
On the sides of the USB plug I glued 2 pins from the male plugs (just the metallic pins) and the wires were bended alongside the USB cable and protected using some black electrical tape. Then the pins must be alligned with the female connectors, but they are pretty easy to bend, so this shouldn't be a problem.
View attachment 10834
An option could be to connect the pins to 2 wires of the USB cable, but for me it was more convenient to use the wires that came in the package and link them further to the button under the wheel.

For me the sollution is reliable enough as I don't take out the Mobius very often from the car (maybe 10-15 times in 3 months, mostly to play with new FW/settings). Also in the future I plan to use a lens extension for the front camera too and the wires will be like this:
View attachment 10835
I hope I was clear enough, but if anybody has any questions feel free to ask.

this is actually awesome and might be something I pursue.

Both my mobius' are out of close reach. To make matters worse, it is hard for me to tell if they are even on... I wonder if this can go a step further and have a light to show if it is on/off/recording...
 
Last edited by a moderator:
I recognised the problems in hitting the middle button. I simply degreased it and put a dab of Unibond Repair Extreme glue on it (a clear, flexible glue that is also similar to Evo-Stik "Serious Glue" - good stuff!).
I have also extended the Mode button, but with a drop of Epoxy glue. Works like a charm. :D

Mobius_Extended_Button.jpg


You are most welcome. :)
 
Last edited by a moderator:
Back
Top