RavenManiac's Mini 0806 Programmable Timer Project

RavenManiac

Active Member
Joined
Jun 18, 2015
Messages
899
Reaction score
184
Location
Williamsburg, Virginia
Country
United States
Dash Cam
Viofo A129 Duo, mini 0806 (RIP)
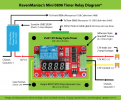
Thanks to inspiration from erkme73, I've decided to try building my own programmable timer for my mini 0806—which will eventually become a dual (front and rear) setup when time and money permit. As many of you know, the secret to any good project is a good plan. So, with the help of erkme73, Nigel, jokiin and others on this forum, here's what I intend to do.
12V-Timer.png

Inspiration for this project came from erkme73's post, which you'll find here: https://dashcamtalk.com/forum/threads/diy-programmable-delay-shutdown-circuit.12845/

BTW, the broken arrows in the red and black wires indicate where I intend to install quick disconnects. This is so I can easily remove the entire timer should it ever fail or need servicing. Once the timer is removed, I'll be able to simply connect the remaining 12V+ ACC wires and the cameras will continue to function normally through the ignition switch and without the timer.

-------------------------------------------------
Disclaimer: Please note that the instructions posted in this thread are for hobby purposes only. Aftermarket modifications to your vehicle could result in equipment damage, injury, or even death and should only be performed by a licensed mechanic or other qualified person. RavenManiac and DashCamTalk will assume no liability for any damages or loss that may occur from individuals attempting this modification.
 
Last edited by a moderator:
You're too funny. And actually it's not a fair comparison because I do this kind of stuff for a living. :)
 
Okay, here's my materials list. And yes, I did go a bit overboard, but I tend to have a slight case of OCD. I purchased everything from amazon.com, mouser.com, and eBay. I'm trying to avoid drilling in the clear covered case, which is why I decided to go with adhesive type PCB offsets.

Each item is clickable and will take you to the merchant I used. Everything should be here by the end of the week, so I suspect this will become a weekend project. More to come...

Mini 0806 Power Supply
(1) Custom Accessories 12V Auxiliary Power Outlet (actually purchased from Walmart-thanks PurpleMoon)
(1) Scosche USBC202M Dual 2.1 Amp Charger
(1) Monoprice 6' Micro USB Cable with Ferrite (front camera)
(1) Monoprice 15' Micro USB Cable with Ferrite (future rear camera)
(2) Lumision Low Profile Mini FuseTaps

Mini 0806 Timer Relay Components
(1) VvW 12V Relay Cycle Timer Module
(1) Bulgin BEP01SBT0 Polycarbonate Case
(1) Siemens 3SX9926 M20 Cable Gland*
(4) Eagle Adhesive Standoffs
(1) 4-Pack of 16-Gauge Wiring
(3) Molex Female Quick Disconnect Connectors
(3) Molex Male Quick Disconnect Connectors
(4) Molex Butt Connectors 14-16 AWG
(2) Littlefuse 2-Amp Fuses

Test Equipment
(1) DROK USB Multimeter
(1) YCS USB 2.0 Female to Micro B Female Cable

* I purchased this because the Bulgin Cable Gland was on backorder. I only paid around $4. Not sure why amazon jacked the price up to $20, which is ridiculous for a cable gland. :)
 
Last edited:
Just so you'll know, the reason I purchased the DROK USB Multimeter is because I've had some power issues with a USB cable and charger I was using with my 0806 so I want to be able to test the components of my power supply setup to ensure everything is functioning properly. Plus, some of the reviews for the 15' Monoprice cables weren't too flattering so there's no way I'm running 15' of cabling through my car without checking it first. :) And, as and added bonus, I can use it to test other USB cables and ports throughout my home and office.

Here's a great review of the DROK USB Multimeter:
 
no offense to erkme73 but your diagram is a lot better

Ouch. Good thing I have such thick skin :)

In fairness, my drawing took all of about 45 seconds to put together - and was more conceptual to help RM get pointed in the right direction - which by the looks of it, I think it might just have. In fact, it could arguably be claimed that I'm helping promote his OCD... ;)
 
Well about half of the parts arrived yesterday. I'm just waiting on the stuff from mouser.com.

And, as luck would have it, my Steelmate PTS-800MM78 aftermarket parking assistant's ECU failed this past week, so I'm going to hold off running the rear camera wires until I get a replacement. That way I only have to tear apart the floor trim and rear pillars once–hopefully. BTW, thank God for SquareTrade, otherwise I'd be out $180. :)
 
Last edited:
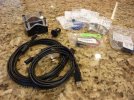
All of the parts have arrived, except for the 16-gauge wire. I was really impressed with mouser.com. They packaged everything like they were sending the parts to a surgeon. The Bulgin case is a little bigger than I thought so I'll need to rethink my mounting location. Plus, the inside bottom of the case has raised lines that form a grid pattern. Not sure what that's for or how it'll affect the adhesive standoffs.

P1050113.jpeg

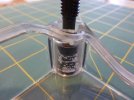
Sadly, one of the parts is defective, but only cosmetically. ALL four inside corners of the top of the polycarbonate case (see image below) have some kind of a molding problem. I wouldn't normally mind, but this case cost more than the timer! If you run your fingers along the defect it's very rough. I contacted mouser.com and they're sending a replacement today and I don't have to return the defective case.

By the way, the screws that attach the cover are plastic, which I wasn't expecting. That'll probably be fine since I won't be opening it much. And, if you look close, there's a clear rubber seal that goes around the entire permitter of the case, which makes it weather resistant. Unnecessary for this application—unless I mount it under the hood. Can you imagine my mechanic's expression if he sees that thing counting down in my engine compartment? I'll probably end up in jail over this project. :)

image001.jpg

Plus, as an added bonus, the guy who sold me the timer sent me a happy face button, a Chinese charm, and a note asking for feedback. Sure, it's cheesy, but it did put a smile on my face AND I will definitely be posting positive feedback provided it works.

P1050117.jpeg
 
Last edited:
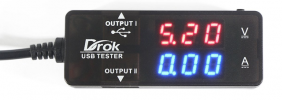
And the DROK USB tester is AWESOME! At under $12 that is the best deal I've purchased in a while. Well built, easy to read, and it comes packaged in a cool Altoid type case with foam padding. To me, that means the company has style. Very nice five star item, in my humble opinion.

61W5M7uIHfL._SL1200_.png
 
Last edited:
I just found out that mouser.com decided to overnight me a new case. Quite frankly, I haven't seen that kind of support from a company in a long time, and it's very refreshing. I give mouser.com a big two thumbs up and I would encourage any of my fellow DashCamTalk forum members to give them a try if you need any electronic components—and they have a lot.

mouserlogo.gif

http://www.mouser.com
 
Last edited:
I like your diagram and passion to do "not like others", @ instead of buying ready made ( maybe even cheaper similar ) solutions, of course it's all depends on individual situation.
I also prefer to do my car service myself, spending 2-3 times more time and in some cases more $ than going to garage, but at least I can trust myself more than "garage-guys". Do I have an issue with trusting "garage-guys"?, - yes, - few bad experiences from the past. Sad I didn't had dashcams back then.
 
I like your diagram and passion to do "not like others", @ instead of buying ready made ( maybe even cheaper similar ) solutions, of course it's all depends on individual situation. I also prefer to do my car service myself, spending 2-3 times more time and in some cases more $ than going to garage, but at least I can trust myself more than "garage-guys". Do I have an issue with trusting "garage-guys"?, - yes, - few bad experiences from the past. Sad I didn't had dashcams back then.

Thanks niko. I actually looked at a few ready-made solutions, but, as far as I could tell, none of them could be programmed the way this timer can. Plus, all of the pre-made systems had LCDs. When erkme73 posted the video of what he created (see below), that's what set me over the top. Visually, it was way too cool of a toy to pass up. And, that's also why I opted to go with a clear case. :)

 
Thanks niko. I actually looked at a few ready-made solutions, but, as far as I could tell, none of them could be programmed the way this timer can. Plus, all of the pre-made systems had LCDs. When erkme73 posted the video of what he created (see below), that's what set me over the top. Visually, it was way too cool of a toy to pass up. And, that's also why I opted to go with a clear case. :)


There is one Korean made similar ready made solution for dashcams out there for nearly 1 year, but unfortunately it's only for Korean market and never have been yet introduced to western market.
 
My replacement parking assistant didn't show up so I'll have to hold off on this project until next weekend because I don't want to tear apart the car twice–once to install the dash cams and a second time to install the parking assistant CPU.
 
Okay, just a quick update. I finally tore my CR-V apart and installed the replacement parking assistant. As planned, I took this opportunity to run the front and back Monoprice Micro USB cables to the new Scosche power adapter. I decided to hold off on the timer until I have a chance to test both Mini 0806 dash cams to make sure they're functioning properly. At first, I was going to run the rear USB cable under the headliner, but in the end that proved to be way to difficult so I took the tradition route along the drivers side floorboard.

Overall, I think it's a pretty solid installation, but I did have to think about a few things before proceeding, which I'll share with you later tonight. I do have one question though. Does it matter which Mini 0806 Micro USB slot I use? Since the rear camera is mounted upside down the A slot is much easier to access.
 
It shouldn't. If you take the mount apart, you'll see that the PCB is nothing more than a buss connecting the two µUSB ports together. If it does act flaky, try going directly to the camera. That's what happened with mine on the camera that had the defective mount (pin that wouldn't extend). It worked just fine (less GPS data) when plugged into the camera directly.
 
Thanks erkme73, but I was talking about the slot in the camera for the Micro USB memory card. :)
 
Oops... My bad :) I've been using the bottom one exclusively - so no help from me on that one.

On edit - nah, not MY bad. You said micro USB slot... The microSD card goes into the microSD slot, not the microUSB slot. gotcha...

...I do have one question though. Does it matter which Mini 0806 Micro USB slot I use? Since the rear camera is mounted upside down the A slot is much easier to access.
 
Back
Top