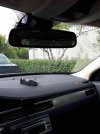
Paul, I think you could benefit from just tilting the lens slightly more upward. No point in recording so much dashboard and it should reduce the annoyance of the reflexes further in the overall picture.
I would expect the CPL filter to suppress reflexes a bit more in the lower center part but it could be due to a steeper angle of the windshield than I have in my car, as EJB mentioned above. The mounting of the camera behind the rear view mirror is optimal IMO, perfectly out of sight and a bit down from the top of the screen for best angle.
I would expect the CPL filter to suppress reflexes a bit more in the lower center part but it could be due to a steeper angle of the windshield than I have in my car, as EJB mentioned above. The mounting of the camera behind the rear view mirror is optimal IMO, perfectly out of sight and a bit down from the top of the screen for best angle.

")


