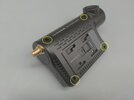
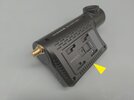
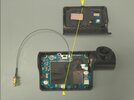
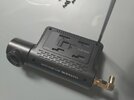
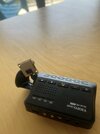
Viofo A139 pro // 1ch // stock-lens // focus issues // refocusing/IR-enabling

I was trying with various tools but I couldn’t get it to budge…it only seemed to damage the plastic. I guess I’ll keep trying.

The best tool for this kind of project is called a "Spudger". - "A spudger (also known as a spludger, non-marring nylon stick tool) is a tool that has a wide flat-head screwdriver-like end that extends as a wedge, used to separate pressure-fit plastic components without causing damage during separation."

You can find these tools all over the internet. I can recommend the iFixit Prying and Opening Tool Assortment It comes with everything you could need. There are more advanced tool kits available but for dash cams they are not usually necessary.
 
Last edited:
I’m talking about the plastic casing in the first photo you posted- is that what you’re talking about? It sounds like your talking about the lens itself.

The tools I recommended are exactly what you want for cracking open a dash cam housing - check them out. There are a number of good competative options for kits and individual tools that are available on Amazon at very modest prices.


P.S. You can also just use a steel knife like Müller does but these plastic tools are specifically designed for doing this job and they are much less likely to cause cosmetic damage.
 
Last edited:
The best tool for this kind of project is called a "Spudger". - "A spudger (also known as a spludger, non-marring nylon black stick tool) is a tool that has a wide flat-head screwdriver-like end that extends as a wedge, used to separate pressure-fit plastic components without causing damage during separation.

You can find these tools all over the internet. I can recommend the iFixit Prying and Opening Tool Assortment for Electronics, Phone, Laptop, Tablet Repair. It comes with everything you could need. There are more advanced tool kits available but for dash cams they are not usually necessary.
Thank you very much. I’ll check them out.
 
Hello Zwack419, hello Dashmellow.

Zackw419: "I was trying with various tools but [...]"

... you took out the screws? Just asking because i think i never mentioned these which is kind of stupid ...

dct_030523_001.jpg

When you "just" want to work on the sensor-module you do not have to open the main casing. The connector-cable can be popped out from the senor-module and is not in the way so it doesn´t have to additionally be popped out from it´s plug on the mainboard.

Dashmellow: "[...] apply some heat [...]"

Yes, that would have helped. Good advise.

---

I didn´t try it, but thinking about it now, if opening the main body one might test the oyster from this spot and insert a tool here:

dct_030523_002.jpg

There´s "just" one snapper on this position:

dct_030523_003.jpg

The connector-cable mainboard/sensor-module poppes out and is plugged back with only little effort, which is a good thing, BUT take intensive care on aligning plug and board-connector when reassembling everything after a hopefully succsessfull modification because there are so many tiny contacts in a small space and there´s not much mechanical guidance on these kind of plugs ...
 
Last edited:
Hello.

Müller: "I didn´t try it, but thinking about it now, if opening the main body one might test the oyster from this spot and insert a tool here:"

Confirmation: the main-/board housing is much easier to open up like this/from here:

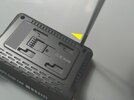
1.) Insert for example a "sharp" screwdriver here:

dct_030523_004.jpg

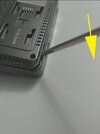
2.) Push the tip of the screwdriver a bit upstream:

dct_030523_005.jpg

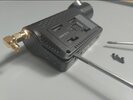
3.) Lower the shaft of the screwdriver in a prying manner:

dct_030523_006.jpg

4.) Done.

dct_030523_007.jpg
 
Hello Zackw419.

Lens sits tight. No play. But rotatable with two fingers. As i said, needs no additional fixation once the optimum focus is found. But that was valid with my lens. I do not know the potential spread of manufacturing quality of (mechanical) components used in this cam (lensholder/threadquality). So maybe some lenses just fall out if unglued. Just kidding. And i cannot predict how aftermarket lenses will behave in that thread. This is your part. > Report back ...
 
Maybe it's because I live on a bumpy dirty road on a mountain but after many years of installing aftermarket lenses in dash cams and action cams I've always found it to be a good practice to secure a new lens in place once it is focused properly. Most of the time focusing would not be so stiff as Müller describes, although I do find that FRP (fiber reinforced plastic) lens holders tend to be much stiffer and more difficult to focus than metal lens holders. I've even used a little bit of Nyogel on stiff lens holders to make focusing much easier, especially for fine tuning the focus as it's easier than fighting with a stiff lens barrel.

Years ago I just used to just place a small piece of electrical tape on the lens to secure it in place because I wanted to be able to refocus if necessary or if I wanted to install a different lens. Ultimately, that wasn't the best solution.

Eventually, I started to use UV cement. I place three tiny dabs of cement around the threads where they meet the lens holder and cure them with UV light. With this method the lens focus is extremely secure but easy to remove the lens again if and when you need to. Using UV cement for this is essentially what they do at the factory when they manufacture the camera. Once cured UV cement is completely inert and will not harm or fog your lens or sensor like other adhesives such as super glue (which you should NEVER ever use near any lens surface.)

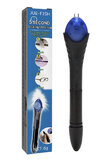
You can purchase UV cement application pens that come with a small UV light source and they are perfect for this job. Amazon has a good selection of UV cement applicators.


UV cement pen
uv_pen.jpg
 
Last edited:
Regarding focusing- I bought multiple mm telephoto lenses (4, 6, 8, 12mm) but I’m probably going to be using the 6. How do I decide what distance I should focus at, or does it not work like that?
 
Regarding focusing- I bought multiple mm telephoto lenses (4, 6, 8, 12mm) but I’m probably going to be using the 6. How do I decide what distance I should focus at, or does it not work like that?

It kind of depends on the optical design of the lens but I find the best method is to focus on infinity and work your way closer if necessary. I have found that the best method is to focus on a particular tree about 100 yards outside my office window and everything near to far is just about right for dash cam use. You "may" have to play with the hyperfocal distance a bit if you find that you need to adjust focus for your lens and circumstances.

Hyperfocal distance can sometimes be a complicated and confusing subject but at its simplest, hyperfocal distance is the focusing distance that gives your images the greatest depth of field for your particular lens. Basically, every lens has a fixed "depth of field" which is its ability to focus on near objects and farther objects at the same time. Objects closer than your depth of field will be out of focus and objects beyond your depth if field will be out of focus. Some lenses have a very deep range of depth of field and some have a shorter one. The hyperfocal point is usually about 1/3 of the way past the nearest point of focus. When focusing a lens you may need to adjust the hyperfocal distance nearer or farther depending on how you want to use the lens. What you are doing is moving the available depth of field for your lens backwards and forwards by adjusting the optimal hyperfocal distance. With dash cams this can be tricky because we want to see things both close and far as best as we can and the small M12 lenses in dash cams and small sensors have limitations compared with say a big DSLR, so you may need to do some experimentation and adjusting.

When I first introduced the idea of using telephoto lenses on a dash cam six years ago using a varifocal lens, a similar phenomenon to what is happening here occurred with @TonyM's A139 mod where suddenly everyone wanted to install a telephoto lens (on the Mobius). I started getting a lot of questions and PMs from members who were having trouble getting their new lens to focus properly. Finally, I created a graphic to try to explain this whole business of depth of field and optimal hyperfocal distance. Maybe the graphic will be useful here since, as I've said, this concept seems to confuse people.

Keep in mind that most of the time if you just focus on infinity you shouldn't have to do much if any adjusting but this shows how the concept of lens focusing works if you need to make adjustments or just want to bring the sharpest focus closer to your car.

hyperfocal_distance.jpg
 
Last edited:
It kind of depends on the optical design of the lens but I find the best method is to focus on infinity and work your way closer if necessary. I have found that the best method is to focus on a particular tree about 100 yards outside my office window and everything near to far is just about right for dash cam use. You "may" have to play with the hyperfocal distance a bit if you find that you need to adjust focus for your lens and circumstances.

Hyperfocal distance can sometimes be a complicated and confusing subject but at its simplest, hyperfocal distance is the focusing distance that gives your images the greatest depth of field for your particular lens. Basically, every lens has a fixed "depth of field" which is its ability to focus on near objects and farther objects at the same time. Objects closer than your depth of field will be out of focus and objects beyond your depth if field will be out of focus. Some lenses have a very deep range of depth of field and some have a shorter one. The hyperfocal point is usually about 1/3 of the way past the nearest point of focus. When focusing a lens you may need to adjust the hyperfocal distance nearer or farther depending on how you want to use the lens. What you are doing is moving the available depth of field for your lens backwards and forwards by adjusting the optimal hyperfocal distance. With dash cams this can be tricky because we want to see things both close and far as best as we can and the small M12 lenses in dash cams and small sensors have limitations compared with say a big DSLR, so you may need to do some experimentation and adjusting.

When I first introduced the idea of using telephoto lenses on a dash cam six years ago using a varifocal lens, a similar phenomenon to what is happening here occurred with @TonyM's A139 mod where suddenly everyone wanted to install a telephoto lens (on the Mobius). I started getting a lot of questions and PMs from members who were having trouble getting their new lens to focus properly. Finally, I created a graphic to try to explain this whole business of depth of field and optimal hyperfocal distance. Maybe the graphic will be useful here since, as I've said, this concept seems to confuse people.

Keep in mind that most of the time if you just focus on infinity you shouldn't have to do much if any adjusting but this shows how the concept of lens focusing works if you need to make adjustments or just want to bring the sharpest focus closer to your car.

View attachment 64949
Super helpful! Thank you.
 
Super helpful! Thank you.

BTW, I forgot to mention that with a varifocal lens the focusing process can be more challenging because each time you change the zoom factor the aperture and depth-of-field changes as does the point of sharp focus and hyperfocal point. With prime lenses (fixed focal length) the process of focusing is much easier because you'll know right away if you've found the sweet spot or need to make an adjustment. Occasionally, you might think your lens is perfectly focused but after using it in your dash cam for a while you realize that focus could be better and then you can go back and tweak it. Unlike a varifocal lens, it's either in focus in one position or it is not and the hyperfocal distance is finite and the depth of field will be fixed.

Still, depending on the properties of the lens you can prioritize the optimal point of focus closer or farther from the sensor due to the nature of how M12 lens barrel threads function. Unlike traditional camera lenses that position the rear glass element at a very specific fixed distance from the sensor with a flange, M12 lenses can be screwed (focused) in or out all the way because they do not have a flange. This allows for a very wide range of focusing options, so for example, on the Mobius camera people have been known to focus the lens for macro photography or use the same lens focused differently for dash cam use or FPV drone imaging.

Also, when you go to focus the lens try to do it on a bright sunny day and aim the camera at something with a lot of contrast and sharp edges. I use a tree and focus on the branches and the tree bark because I live out in the countryside but I suppose if I lived in an urban area I would focus on a brick wall or a building detail with sharp contrasting straight lines like windows or doors.
 
Last edited:
I'm having an issue where - once I plug everything in with the new lens (and ready to focus it)- the camera will go into a restart loop once I enable wifi (by pressing the wifi button). But if i don't enable wifi it continues to work.

This particular camera was a re-newed version from the amazon re-newed store.

The only other thing I can think of is - I did use a hair dryer on the lens computer part to get the resin to soften.

Also the GPS light is blinking.

What do you all think?

This is how it looks currently 38EC8B63-7268-46C5-92EC-8A271DE12821.jpeg
 
Last edited:
Hello Zackw419.

The hair-dryer shouldn´t be a problem unless it was propane powered. Did you take out the sensor-module completely, so did you dis- then reconnect the sensor-side push-connector of the flatbandcable? Did this behavoiur occur after the mod and hasn´t been there before? Which firmware is running on that cam? What are the HDR-settings in your app? The gps flashing is ok. The cam´s doing this as long as it has no gps fix. If it´s got one, the gps will be solid blue. Wifi doesn´t need to be enabled. Powering up the cam, wifi is automatically activated by the women in the cam itself, telling "Wifi enabled!" with the Wifi-LED flashing in state of searching but not being connected to a partner-device like your phone with the app on it yet and getting solid blue after doing so with the women telling "Wifi connected!" in that moment. So what happens on startup? In order. What´s the Wifi-LED doing? What does Maddam Viofo say or not say?
I’m not home right now - so once I get home I will update exactly what’s it’s doing. But I will try to recount accurately from memory.

Recording light comes on first (maybe blinks for a bit?). Then mic light. The voice says “now recording 1 channel”. Then it will just stay like that. Perhaps I didn’t wait long enough for the wifi to come on. I waited about a minute.

So, after the WiFi doesn’t turn on- I then press and hold the WiFi button. “WiFi enabled”. Then the camera shuts off and reboots and continues to do that in a loop.
——
I did completely seperate the sensor module and made sure not to connect or disconnect while powered.

And I didn’t test the camera before hand, so I’m not sure if it was already like this.

And I’m not sure about the firmware or HDR since I am unable to access the app without the wifi.
 
Hello Zackw419.

My "knowledge" regarding A139 cam-behaviours ends with my 1ch-version. What is your´s? 1,2,3ch? Let´s stay with 1ch.: Recordlight first: ok. Then that "glitter-from-heaven-sound". Then mic. Also ok. Then gps and the Miss telling at the same time "Recording xy-channel started". But then, shortly after that, Miss Viofo should tell "Wifi enabled" without any need to push her. Therefore, again, the question: What does the Wifi-LED do during startup? Anything? Nothing? You write you disconnected the sensor-block completely and made shure not to connect or disconnect WHILE [the cam? (being)] powered. This means you powered the cam WITHOUT the sensor-block being connected to the cam? Because this MAYBE having been a notsogood idea. I, no one, knows what´s happening on/with the mainboard/the brain of the cam when the eye it´s waiting for and usually communicating with (on startup for example? like "Hello, everybody on board?") is not attached to it´s body? So: Was the camera being powered on WITHOUT the eye attached?

Edith: In your picture. There it is. It´s the 3ch-model ...
 
Last edited:
Hello Zackw419.

My "knowledge" regarding A139 cam-behaviours ends with my 1ch-version. What is your´s? 1,2,3ch? Let´s stay with 1ch.: Recordlight first: ok. Then that "glitter-from-heaven-sound". Then mic. Also ok. Then gps and the Miss telling at the same time "Recording xy-channel started". But then, shortly after that, Miss Viofo should tell "Wifi enabled" without any need to push her. Therefore, again, the question: What does the Wifi-LED do during startup? Anything? Nothing? You write you disconnected the sensor-block completely and made shure not to connect or disconnect WHILE [the cam? (being)] powered. This means you powered the cam WITHOUT the sensor-block being connected to the cam? Because this MAYBE having been a notsogood idea. I, no one, knows what´s happening on/with the mainboard/the brain of the cam when the eye it´s waiting for and usually communicating with (on startup for example? like "Hello, everybody on board?") is not attached to it´s body? So: Was the camera being powered on WITHOUT the eye attached?
No activity from the WiFi light on startup - so no light at all, not flashing either.

And I have only powered on the cam with the “eye” attached.

And yea- mine is 3ch.

Is there any chance I could have overheated the sensor module with the hair dryer - that’s the only thing I can think of other than a defective unit.

And once I get home tonight I’ll give more proper updates.
 
Hello Zackw419.

No Wifi-LED activity oO? That´s odd. At least for me with my 1ch-knowledge. I think there´s no feature in the app via which one might be able to disable Wifi on/for startup generally. I looked for such. None. Wifi should be activated on startup by default. The only app-features aiming at Wifi is the transmitting frequency, WLAN pw and SSID and the Wifi-station config. But anyway, Wifi should come to live during startup automatically ...

Any (multi-channel) expert´s opinions on that case?
 
Hello Zackw419.

You got the cam only or was it equipped with an sd-card? If the latter, what´s on the card? Did you get all the standard ding-dongs the A139pro usually ships with? The cables for example? If so, there should be a short and a long USB-cable in your hands. With the long one you can connect the cam to a windows-machine which recognizes the cam as removeable storage device. Means: you can browse the content of the card in windows file-explorer. Does this work? I do not know which and how any reset-procedures work on an A139pro because i never had to. So please consult the documentation of your spy regarding that. You can also try: Download the current firmware of the A139pro to your Windows-machine. Put the sd-card into the card-reader of that machine. Try to format the card (usually that´s done via the app but ... you have no app oO!) or erase everything that is to be found on that card. Copy the firmware to the card. Transplant the card into your cam. Take the short USB-cable and connect the cam with this to your computer. The, i think the recording-light?, should come on, then flicker somehow during the update/firmware installation process. The camera should restart by itself after the process is through, but i am not 100% sure regarding that, so please also refer to the offical firmware-installation manual found online.
Those are good ideas that I’m going to try tonight.

Something in my gut tells me something else is wrong though- but we will see.

And yea- standard everything just re-packaged.
 
Good luck and Good Night. The children here in Germany have to go to bed now. The old children too ... ;)
 
Back
Top