GT680W Super-Capacitor (& Stealth) Mod

@wrdjr20, thanks for your follow-up.

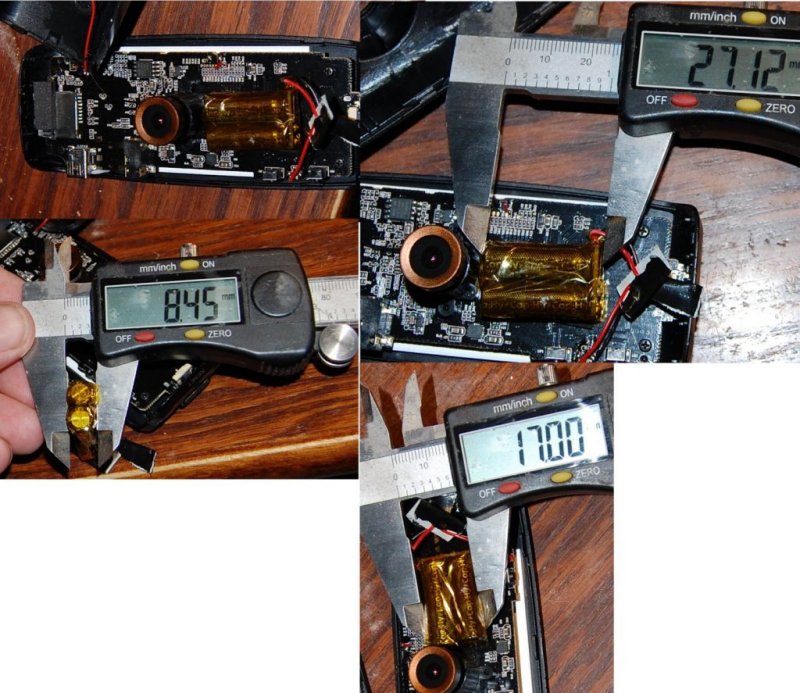
I do have a few replacement capacitors but no data sheet or part numbers, I'm afraid. I bought the caps from a small seller on eBay as it was otherwise difficult to find small size caps in small quantities from the larger electronics suppliers. The seller calls them "Nano Force" Super Capacitors but I don't know if that is actually a brand name or his own moniker. Smaller super-capacitors seem to be fairly rare when I've looked for them. For example, Mouser Electronics will sell small parts quantities but the shortest 10F caps they sell are 30mm long compared to the 20mm ones I found on eBay. This was typical of the suppliers I checked. The shorter size seemed to work well with how they fit the remote mounting scheme I came up with and now that I think about it, when I purchased them the original plan was to mount them on the outside of the camera body itself but even 20mm proved too long.

As I've said, I am no expert in electronics and indeed some of the technical terms on the Mouser super-capacitor page are kind of over my head but I think I can do what you are suggesting without too much trouble. I'm still unclear about how to resolve the current leakage question though.

When I get a little time I will replace the super-caps in the Gt680W with a battery and see how well the camera is still functioning before proceeding. I am about to embark on a major construction project with my house that will be rather disruptive and time consuming so I'll have to see how it goes with "hobby projects" such as this. In any event, I appreciate your willingness to help me explore this further.

One final thought. So far, you and @outofthebox are the only two to mention the need to balance the super-caps. Other knowledgable folks here have solely focused on the apparent requirement to accommodate for super capacitors in the firmware yet somehow, so far, it seems that installing the caps in the GT680 worked fine with the existing firmware. Of course, that was until the caps failed but they did last 5 weeks. So, is it possible that the firmware has something more to do with how the super-capacitors function?...Or does the firmware simply accommodate for the loss of voltage at shut-down in order to save the last file properly?
 
Last edited:
I have noticed that some on the Möbius thread have had problems with capacitor failures. I will be reading that thread in more detail as time allows. The next two weeks are going to be busy ones for me as well. But as I fine time I will pursue this problem more. Often, lower cost capacitors like those found on Ebay are lower quality, higher tolerance, higher leakage current ones, meaning the capacitance, ESR, and leakage current, can be quite different from one capacitor to another. Higher quality capacitors have tighter tolerances, that's why they cost more. That does not mean that the ones you have are not good for this applaction, we may still be able to balance them assuming the leakage current is not to high.

This is what I plan to do: I have a few higher quality capacitors which I need to balance for my GT680W. I will document the procedure I use to balance them including pictures and illustrations, then post the document here on the forum. I will keep the procedure simple just using 3 batteries, and a volt meter. Items most have or can get cheaply. I will keep you posted on the progress.
 
You know, I am not surprised that cheap no-name super-capacitors from eBay may be part of the problem here. In fact, I thought about mentioning that possibility in my last post. As to the Mobius capacitor failures, we only have a small sample of users, most of whom, like me, have had success and the alleged failures have in some cases turned out in the end to be a flaw with something other than the caps. I'd have to go back and re-read some of those threads myself but at least in some cases the "failed" super-caps were actually traced to ignition switch cut-offs and timing delay issues.

In any event, thanks again for your response. I look forward to hearing about what you come up with and seeing the documentation you provide.
 
The firmware in a camera using capacitors will typically pre charge the caps prior to recording starting and will close the file and shutdown within about 1second of losing power
 
The firmware in a camera using capacitors will typically pre charge the caps prior to recording starting and will close the file and shutdown within about 1second of losing power

Thank you for explaining this!
 
hi folks, sorry for the delay. was away on a road trip. wrdjr20 has covered it pretty nicely.

formula to derive resistor value is: (ideal voltage expected across the cap)/10 x leakage current.

leakage current value would be available in the cap data sheet.

Here's an explanation of the how's and why's of choosing 10x the leakage current:
say the caps have an average leakage current of 10uA +/- 3uA, then a 1% resistor which will bypass 100uA may be a good choice. (10 times the leakage current)
by using this resistor in parallel to each cell the average leakage current is now 110uA +/- 4uA. Introduction of this resistor has now decreased the variation in leakage current from 30% to 3.6%.

by having the same value resistor in parallel with all caps, the cells with higher voltages will discharge through the parallel resistor at a higher rate than the caps with lower voltages. this helps to distribute the total stack voltage evenly across the entire series of capacitors.

i know you are connecting the caps in series, but just for reference of anyone reading this thread, if you ever decide to connect some in parallel, then you have to add up the leakage current of each to derive the total leakage current.
 
So today at the suggestion of @wrdjr20 I did some testing. I dug out some hook type probes I have for my multi-meter and used them to monitor the voltage at the super-caps for an extended period of time. They power up fairly rapidly but only go to 4.20 volts.
//
When I first did this mod I would get readings slightly above 5 volts, maybe 5.2-5.4v at the capacitors, so it "appears" that either something has failed within the caps or they are no longer charging fully.

I would have thought that the charge circuit in the camera would limit your capacitors to 4.2V as that is the maximum recommended voltage for lithium cells and would also allow their voltage to drop a little before recharging, as you currently observe
 
That's my recollection. I'm afraid I am unable to go back and re-check at this point. If and when I re-immerse myself in this project, I'll see what results I get. Like I have said, I'm not an electronics guy, just a dubber, so please forgive any errors or omissions, but from what I read before I started this project and some measurements I made, I did get more than 5 volts at the caps after I initially charged the thing up. After that the voltage did drop. In any event the camera worked perfectly for five weeks after I did the mod before failing.
 
Every info is good info, even if result is a failure.
So, i have a spare gt300w and i tested it with that earlier mentioned mobius capacitor pack and result is that camera works just fine, but when power is cut capacitor gives power only 4 seconds and this time is not enough for gt300w to shut down (it takes 6 seconds), resulting corrupted last video file.
That is a shame because capacitor pack fits inside gt300w housing just fine.
Maybe now i'm forced to buy a mobius dvr:p
Mobius project was on techmoan and capacitors from joovuu.com
gt300.jpg
 
@Dashmellow,
Finally finished the work I had to do, so I can focus on the super capacitor problem now. I found Niko's thread http://dashcamtalk.com/forum/threads/gt680w-disassembly.3350/ that shows a single cell lipo 3.7 volt 125 mah battery. The absolute maximum safe voltage for single cell lipo's is 4.2v. So the voltage measurements you made on post #26 make more since, you seeing a max of 4.2v. In such a case, using good quality 2.7v capacitors should not require balancing. I have some 2.5v capacitors that I expect will also work fine without balancing. I will be using them in the balancing demo I will post here in the next few days. Your problem could still be the result of lower quality capacitors being unbalanced. The good news is your voltage is consistent with the lipo charging circuit in your camera working properly. So I suspect that your camera is OK and the capacitors are at fault. Installing the battery temporarily would verify that. Swapping out the capacitors for some balanced ones may also verify it.
When replacing a battery with capacitors, i recommend higher quality low leakage 2.7v capacitors that come with data sheets. These may cost a couple dollars more but are well worth the investment, since they will not require balancing, and will keep the camera powered up longer. (Higher leakage currents and the resistors required to balance the capacitors drain the charge off quicker, shutting the camera down sooner).
 
Last edited by a moderator:
Thanks for your post wrdjr20!

I'm still hip deep.....make that neck deep, in major house repairs and renovations. For example, I've been racing to keep an exterior painting job one step ahead of a roofing contractor and that's just on the outside. Much of my place is packed up in boxes for interior work, so unfortunately, this project is still way on the back burner for the time being and will continue to be for awhile. It is usually during the dead of winter when I spend time on projects like this. Here in rural New England there is so much to do in the summer months on my house, property and gardens that there's little time for anything else, except that I'm an avid hiker and am usually off climbing some peak in my spare time.

Nevertheless, I appreciate your continued exploration of this and the encouraging sounding news. I think you may be correct about the cheap eBay capacitors (they were $1.99 each actually). Remember, I bought them in part because it was the only source I could find for 20mm long caps and some suppliers won't ship small quantities. Thinking about this though, since I have the caps mounted outside the camera, there's no reason beyond appearance and perhaps the mounting scheme that I couldn't use 30mm long caps of higher, more predictable quality, like some Maxwells I saw (I think it was at Mouser).

When I get a little time I will solder the battery back in and see how the camera functions.

Thanks again and please keep posting your results.
 
I'm still hip deep.....make that neck deep, in major house repairs and renovations.
Been there, done that. In fact I'm planning some major home improvements this winter. Here in Florida it is just to hot to work hard in the summer, unless you pay someone else to do it for you. Just cutting the grass and I'm wet from head to toe and the heat quickly sucks the energy out of me. That's why I'm interested in getting the GT680w working with capacitors. So that I can leave it in the car when I am running around town on hot days.
 
So, I left off on my super-capacitor mod project 8 months ago after my GT680W began spitting out random corrupted files and would fail to save the last file at shutdown. For the previous five weeks after first installing super-capacitors the camera worked perfectly, but unfortunately something had gone wrong.

A couple of DCT members, @outofthebox and @wrdjr20 offered helpful advice and some suggestions regarding the possibility of using resistors to voltage balance the two super-caps or the idea of just using different higher quality super-caps but I was WAY too busy with other much more pressing projects last summer to indulge in this apparently failed venture so I put the whole thing on hiatus.

In my last post to this thread all the way back on August 4th, 2014 I mentioned that it is usually during the dead of a New England winter when I can spend time on projects like this and that is exactly what happened somewhere around early-December last year. Finally, I had some time (and some inspiration) to re-immerse myself in this project.

So finally, here's an update:

Well, the first order of business was to follow @wrdjr20's advice and swap a battery back in to ascertain that the camera was still working properly after my initial tampering with it to install the super-caps. The result was that the camera functioned just fine, good as new again.

So then, just for the heck of it, the first experiment I tried was to install another pair of “Nano Force” brand super-capacitors which were identical to the ones I used initially since I just happened to have some lying around that were part of the first batch of caps I ordered. Unlike the initial success I had with the mod when the camera functioned really well at first, this time it simply didn't work at all. I experienced the same sort of corrupted video files and the camera always failed to save the last file on shutdown right out of the starting gate. At least the first time I tried this the camera captured and save the files without corruption for more than a month until it failed. Well, so much for that original batch of super-capacitors I bought on eBay! It was beginning to look as though they were bad from the get-go, without even having to wait for any voltage balancing issues to damage them.

At this point I put the camera away again until I could decide what I wanted to do with it, if anything. I was thinking perhaps I might just reinstall a battery and leave it at that. (As a little aside here, I didn't bother with the dinky little 110mAh battery that originally came with the GT680W, instead using a much larger capacity and beefier lithium-polymer cell mounted externally on the mounting bracket the same way I previously mounted the super-caps.)

With the camera sitting back in a box in my office/workshop I spent some time reading up on balancing resistors and trying to enhance my rudimentary knowledge of electronics. In the meantime, I started looking around here and there for some higher quality super-caps I might try. It seemed like the Maxwell brand was the way to go from things I've read and I was looking for a supplier that would sell them in small quantities at a reasonable price but then on eBay I came across some Kamcap brand super-capacitors from Jinzhou Kaimei Power Corp, a Chinese manufacturer with an apparently decent reputation and so kind of on a whim I went ahead and ordered a pair. There was no data sheet available like with the Maxwells but what the hell? (edit: Actually, it turns out there is a data sheet but it is in Chinese.) The Kamcaps were basically around the same price as the Maxwells. Like the ones I used previously these were 2.7 volt 10F caps.

Once the super-caps arrived, (around the beginning of January) feeling impatient I went ahead and installed them even though I hadn't yet figured out the whole balancing resistor thing and after testing out the camera for several days indoors it seemed to be working perfectly.

So, at that point (mid-January) I installed the camera in my vehicle on a side facing rear window to test it out for awhile but instead of being “awhile” it's been three months now and at this point I can feel confident in saying that it WORKS!

The camera boots up normally and shuts down anywhere from around 7 seconds to almost instantly after the power is cut but so far it has never failed to save the last file. It has not skipped or corrupted any files in these three months. I can't account for the apparent variation in shut-down times but I figure, if it works, it works.

Of course, as you might imagine, the truth is that I've been just dying to report on this turn of events here on DCT after all this time but since the last effort with the Nano Force brand capacitors died after five weeks I wanted to be absolutely certain this thing was really working before posting about it to this thread, so my lips have been sealed until today. So far, my patience since mid-January seems to have paid off and at this point I'd say I can call this project a success!

Things are not perfect though as there is a strange quirk sometimes. Occasionally, there is an odd pulsating buzzing noise in the audio that tends to go away after the camera has been running for awhile. Then again, sometimes there is no pulsating buzz at all and the audio is perfect and quiet. There is however almost always a series of brief high pitched buzzing sounds at shut down that sounds sort of like some kind of weird insect........zzzzzznnnttt!! As best as I've come to understand from reading I've done these noises are very likely a low voltage issue. The noises apparently were happening mostly during the extreme cold weather we've experienced here in New England this winter with the temps sometimes dropping to as much as 15 degrees F below zero and usually hovering in the teens. Now that Spring is here and the temperatures are more moderate (still cold though) I've noticed I don't hear the buzzing noises so often except for the shutdown buzz. I have a hunch that as the weather heats up I may not hear them at all any more. Time will tell. One theory is that the GPS unit may be intermittently creating a greater current demand on the camera but I have no facts to back up such a guess. I really should just unplug the GPS and see what happens and at some point I will do that. Ultimately, I don't really know the cause of the buzzing sounds or reason for a possible voltage drop and so I can only speculate but either way I consider it a relatively minor issue in the scheme of things. Since I'm using the camera for the time being as side view auxiliary cam in the back window of a truck, I can live with some noises in the video if need be.

I'm one of those people who rarely get sick and can't even remember the last time I had anything resembling a flu; it's literally been years, but it finally caught up with me this February and the result was my truck sat idle out in my driveway for about 4 days in bitter, bitter cold weather. I was delighted though when I finally started up my vehicle and discovered that the GT680 had retained the date and time data with aplomb. I'm pretty confident that it will hold the time & date much longer than 4 days.

So, it now looks like the previous problem was indeed bad capacitors after all and @wrd2jr20's theory that better quality caps might work just by themselves without having to resort to balancing resistors was correct.

The moral of the story is that under certain circumstances (probably depending on the camera) (and some luck) it is indeed possible to get a DIY super-capacitor install mod to work without any factory supplied super-capacitor specific firmware modifications to accommodate them.

One interesting discovery I made was that those “Nano Force” brand super-capacitors I bought on eBay and used initially in this project happen to be the same brand that are used in the Viofo A118C dash cam. In fact, in various photos I've seen posted here on DCT the caps appear almost identical to the ones I used - same diameter but slightly longer. (part #D0A in the A118C instead of #D1A like I used in the 680W) Unless anyone is reporting problems with those Nano Force brand caps in their A118C it would appear that I simply must have gotten a bad batch when I ordered mine on eBay.


Screen shot from the GT680W installed as a rear window side cam on the passenger side.
(In this screen grab the camera is in "parking mode" running on an external power bank while I'm in the store.)
GT60sample1.jpg

The Nano Force caps I first used in this project -part #D1A
super-caps.jpg

Nano Force super-caps in the A118C - part #D0A
nanoforce.jpg

These are the Kamcap super-capacitors now installed on my GT680W .
kamcap2.jpg
 
Last edited:
The temporary installation I performed to test out the GT680W super-cap mod was a pretty flaky affair that was done during bitter cold snowy weather with the temperature around 15 degrees F. It seems a miracle that I actually got a suction cup mount to attach to a vertical glass surface in those conditions and that it stayed there throughout most of the winter. One of the main reasons I left the camera like this for a full three months was that it was just damned too cold and miserable to be outside fiddling with this thing, including the GPS unit that was sort of dangling and jammed under the passenger seat headrest. Occasionally, I would remove the micro SD card so that I could check the footage and see if my mod was still working but that was about it. Now that warmer weather is here I've decided to go ahead and make a more permanent install of the modded GT680W considering that it's been working so well as a rear side camera.

So here are some photos of the install.

The suction mount is now off the glass and the camera is a few inches farther away from the glass. Instead of a suction mount on the glass itself a smaller adhesive mount is now used on the upper frame of the panel. I shortened the GPS cable to 8 inches and have that mounted on the upper part of the frame as well. Keep in mind that this camera is installed in a pick-up truck, mostly driven in a rural/sub-urban environment. If I were not driving what is basically a "working" vehicle out beyond where the pavement ends, I wouldn't do such a mounting scheme. In an urban or suburban environment in a "family" car this kind of install probably wouldn't really be suitable for practical and cosmetic reasons. I'm not even sure it's suitable for me but for now I'll see how it goes. The main thing that makes this install viable is that the rear side windows of my vehicle are darkly factory tinted so that the camera is usually pretty hard to see from outside under most lighting conditions.


The slack cable allows the door to fully open without disruption to the camera install. Velcro on the GPS unit allows for quick and easy camera removal if necessary.
interior680w.jpg


Most of the time you can't tell there is a camera behind the dark tinted glass. This is where my ultra flat black stealth paint job is proving its mettle.
tint2.jpg

Under certain lighting conditions the camera is visible but often just in silhouette.
behind-tinted.jpg
 
Last edited:
I've noticed that the VIOFO A118C dash cam sold by FoxOffer is now shown sporting a different brand of super-capacitors from the Nano Force ones that were previously used in that model and that also failed in the first iteration of my mod.
It makes me wonder if there is indeed a problem with Nano Force super-caps?


A-188C caps.jpg
 
things like this can change from batch to batch, not necessarily because of a problem

I'm aware of that of course, but it made me wonder. In my case, as best I can tell, all four caps I originally tried were bad to one degree or another which is unusual, so of course it raised the question when I saw that Nano Force super-caps were no longer used on the A118C.
 
Last edited:
I'm aware of that of course, but it made me wonder. In my case, as best I can tell, all four caps I originally tried were bad to one degree or another which is unusual, so of course it raised the question when I saw that Nano Force super-caps were no longer used on the A118C.

we had a less than 1% failure rate with the same caps, I'd expect the same sort of results from any brand really
 
Back
Top