Low profile tripod thread windshield mounts

I received my mounts 12 days after they were ordered despite the seller taking more than a day to ship them. I am impressed by the speed of shipping. Maybe shipping was faster than normal because I got a larger package with multiple items in it?

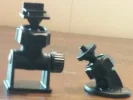
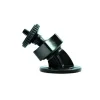
This modification was as simple and easy as a DIY project can get. I bought these 2 mounts. Notice the tall mount has a notched tube end on the right side.

original maxi mounts.jpg

I then removed the threaded collar and removed the balls used for camera attachment.

balls same size.jpg

Then it was just a matter of putting the wrong ball in the right mount. Notice the tall mount has ribs on the inside right leg (not both sides). Those raised ribs allow the mount to "click" into a locked position. This could be easily adapted to a much shorter version by drilling 2 holes much lower on the sides. The only issue with doing this modification is at least one hole needs to be square to use the self holding carriage bolt and all of my drill bits cut round holes. The locking ribs only exist on one side. To lengthen this (if needed) I would cut the side brackets in half and glue, bolt, or screw a piece of metal or plastic the needed length in between the 2 halves.

mounts with reversed mounting balls.jpg

Compare my finished product shown above and still available today for $1.49 and $1.49 with free shipping for these 2 mounts with the ball parts switched out to Jovuu's mount shown below costing £4.50 and £5.00 for shipping (£9.50) Combined cost about $11.09). If anything my mount is slightly (maybe 1/4"?) shorter (better?). I see less than 3mm that could be removed by modifying the bolt to gain more usable threads. If the retaining nut is included in this conversion probably 2mm of thread (about 1/2 turn or 180 degree rotation of the locking nut) are left over after the mobius maxi cradle is mounted. In short, I would guess that less than 5mm of rod length could be removed by using other more drastic DIY measures such as grinding the threaded section a little bit shorter or drilling out the ball to insert a threaded rod of your choice of length or angle. A rod could always be bent to achieve a needed angle as long as you have a rotating head as used on these mounts.

jovuu mount to compare.jpg

If you want to find these mounts forget about ebay. I have not seen the angled mount anywhere else except for Jovuu (I have looked) and the other mount may have a different size ball if bought elsewhere.

The 90 degree mount for the wrong kind of camera is found here. (11 pieces are currently available and may or may not be restocked when sold out) I bought 6 as that should be more than enough for my future needs. I bought 3 rear mirror type/handlebar mounts and they are no longer available from that seller.
https://www.aliexpress.com/item/T-T...3M-Sticker-Stander-Mount-Car/32854558069.html

The other threaded mount from the same seller is found here. (105 pieces are currently available)
https://www.aliexpress.com/item/Car...-Holder-Car-Styling-Adhesive/32858406770.html
 

Attachments

  • mounts with reversed mounting balls.jpg
    mounts with reversed mounting balls.jpg
    63.9 KB · Views: 2
  • adhesive-mount jovuu.jpg
    adhesive-mount jovuu.jpg
    13.7 KB · Views: 2
Last edited:
I am still working on this mount. I call it the Frankenstein mount. The name is based on its many scars not because of various parts cobbled together.

My g1w-s came with a mirror mount that broke on me. The raised column the ball mounts in literally cracked and broke in half below the adjusting nut. The clamshell next to it broke in half. The half broke in 3 different places. These have a design defect. Instead of both halves closing together with a tight fit they have an uneven gap. Thus when trying to tighten the clamp anyone can break it. There is no "feel" available that allows you to know you have reached its maximum tightening ability

mount original.jpg

Because this mount was junk anyway I decided to try to make it shorter. To reuse this meant I would have had to glue the column (under the locking nut) back together. I took a hand file and shaved the raised column part down to size. This mounts top is cast in one piece. The ball holder column does not unscrew from the clamp. A replacement mount (the cheapest on ebay) was made with screwed together parts. I turned hard plastic into shavings using a very course file probably made to shave down lead used in auto body work or for horses feet.

Instead of using a round bottom to hold the ball in place this viofo mount used a raised column with an internal pipe that used a countersunk hole in the middle. As a result the bottom of the ball was marred. I shaved the marred part of the ball down hoping for smoother movement.

One of the first things I noticed when I had an intact mount in my hand was the space wasted by filling in the oversized middle hole.

The manufacturers give us a length of rubber to fill in the gap. When we simply roll it in place a lot of height is gained. I fixed that problem by using this approach.
filled in.jpg
The remaining gasp is mostly located where it will not increase the distance from my rear view mirror stalk down to the dashcam.


I cut (and broke) this mount down to size. You can see a previous repair on the furthest left piece.
The upper right piece has 3 cracks in it needing repair. Proper design would have not have resulted in any cracks.
I am trying to figure out how to drill a round ball for 1/4x20 threads. Removing the previous plastic part was easy.
frankenstein parts.jpg

The size difference is easily seen when compared to a factory mount. Notice the uneven gap where the bolt pulls the 2 halves together.
comparison of column length.jpg

I am debating about cutting the threaded section down a bit more. However, I am at the point of diminishing returns.
I do not want to save 3/32" in height by losing structural integrity.
Again, you can see the intact mount has an uneven gap that leads to breaks as happened to the clamp on the right.
Using a shorter rod in the original ball would make the modified mount even shorter.

height comparison.jpg
I am debating about losing the factory clamp (with all its cracks and huge inside diamater) for an electrical clamp that would be about the right size.
I could epoxy the mount part to that metal without losing anything except for unnecesary bulk. The down side is tightening 1 or 2 screws that are hard to see.

I do not think this would work without modifications as it probably would not tighten up very well on my rear view mirror.
Using a hacksaw to remove the end plate with the hole and drilling holes on that end for a second bolt would make this usable.
Making the drilled holes square could be tough.
031857491000.jpg

This one however should work exceptionally well. It is a metal clamp and nothing more. Yes, it would need to be cut in half (on one side) to work.
After getting the right size and using some black paint this would be almost invisible after adding the swivel mount from my broken mount.

031857496609.jpg

031857446659.jpg


filled in.jpgmount original.jpgshorter column.jpgfrankenstein parts.jpgcomparison of column length.jpgheight comparison.jpg
 
Last edited:
I broke and repaired two of those RVM mounts in my minivan. The plastic just isn't up to the job at hand. I was careful to tighten it only to the point where it didn't slip, but that was stil too much for it. Part of the problem was that the rubber spacer strip was too long- this concentrated the stress at one point. When wrapped around the mirror stem and tightened, the ends of the strip should have a small gap. You really can't feel the tension on the knob to judge tightness; I'm sensitive to such things and thought I wasn't close to tight when the first one snapped.

Something which might help the experimenters here: The cheap brass toilet flange mounting bolts here in the US have a 1/4-20 thread. Coupled with their thin flat 'head' and metal softness, they should be ideal for experimenting with. They can be cold-bent somewhat, but for sharper bends a propane torch should be used to soften the metal first. Be sure you don't grab the 5/16-18 ones instead unless you're actually mounting a toilet, where they are the only ones you should use. 2 bolts for just over a buck.

Another way to lose 'space' is to eliminate the locknut as I did with my "T-bracket" mount. Just twist the cam tight until the bolt bottoms out in the mount, see where it points, then file the end of the bolt down till it's aimed where you want it. Works best if that bolt end is rounded off somewhat instead of flat. Alternately you might drop a small piece of plastic in there to tighten against. I've removed my Mobius mount about a dozen times, and while it isn't quite as tight as it was at first, it still holds aim.

Though it might look ugly, the shortest RVM mount I can imagine would be a cut-down toilet bolt with the head narrowed ran through the side of a heater hose clamp. Maybe 2mm in height, and of course you could leave the threaded part as long as you like, even bending it for aim if necessary. More elegant clamps are made, but you get the idea ;)

Phil
 
I believe I figured out a solution to the handlebar mounts hole being to large for our mirror stalks.
Use a hole saw to cut a 1 1/4" to 1 1/2" (probably) wooden plug from a 1" thick softwood board to completely fill the mounts round opening.
Use a micrometer to determine your rear view mirrors stalk size.
Drill a slightly undersized hole for the rear view mirror stalk within 1/8" of the bottom of the wooden plug you will have to clamp back together.
Cut the wooden plug for the windshield mount diameter in the middle of the where you will drill a larger hole on the edge of the wooden plug to create a correct size mounting option.
Dremel (Could this be drilled?) your undersized drilled hole to the right size or maybe just undersized (1/64"?) for the rear view mirror stalk that is within 1/8" of the bottom of the wooden plug you must clamp back together.
Clamp the wood pieces onto the rear view mirror stalk with a tool such as a real wood working clamp or vise grips.
After putting the plastic mount around the wooden plug the mount will believe it is holding onto a handlebar like it was designed for and hopefully will not break (again).
 
Last edited:
If your mounts are like mine, that won't be enough. I'm not sure where mine came from but may have been with the G1W/S? Just in the cam drawer loose when I scrounged around in there and there were 2 of them. Mine are junk, the plastic is just too wimpy. These are bad engineering or a victim of cheapening o_O

Phil
 
While I can not say how well this will work long term this is the end result.

I drilled and tapped the plastic ball and used a very short threaded rod.
This is still longer than I would like. It still hangs under my rear view mirror.
I may be fabricating another mount that will be very different from this.

I used abs plastic melted in acetone to glue this together. It has some strength to the bond.


mirror mount short.jpg
 
Recently, I purchased one of the low profile tripod threaded mini mounts from GitUp that @Harsh recommended a while back. When it arrived I was struck by how similar it is to my original DIY version that I dubbed the "Nano" and in fact they are virtually the same size and exactly the same height! One could almost get the impression that the GitUp mount was inspired by my concept, first posted here almost two years ago! Either way, I'm very pleased to see a commercially available, well made mount like this on the market. My inspiration for building these DIY low profile tripod threaded mounts in the first place was that there was nothing really quite like them available.

One issue I've encountered with the GitUp mount that is potentially problematic is that the range of adjustment in the ball joint is very limited to the point where I almost couldn't use it for one of my side mount cameras which was the reason I purchased it. It's clearly designed for a sloped windscreen which can be a problem for any other type of installation. In my case, my side facing cameras require a horizontal "ceiling mount" inside the frame of my fixed glass rear truck windows. Luckily, the range of adjustment just made it to the angle I needed by having the slanted tripod mount oriented inwards. I would love to see a version of this mount with a slightly larger ball and joint mount, perhaps with a vertical orientation like my Nano design that would provide greater angles of adjustment and in all directions. All in all, though this GitUp mini mount has a lot to recommend it especially for someone looking for a tiny low profile tripod mount who doesn't want to go to the trouble of building their own.

https://www.gitup.com/mounts/90-3m-adhesive-mount-for-gitup-git1git2git2p-action-camera.html

mounts4.jpg
 
Last edited:
I agree, nice tiny little mount. I remember complaining that when fully tightened it still can be adjusted with a little bit of force, not so, wasn’t tightened all the way. Not easy tightening them all the way with another one mounted so close...turned out to be easier from the passenger side.
 
Is there any way I can buy that low profile mount in the US?
 
are these still available and if yes , where do we order ?
 
are these still available and if yes , where do we order ?

This is a DIY thread so you can use the information herein to build your own version any of the low profile mounts described in this thread such as the one on the right in this photo.

The one on the left in the photo is commercially available from Gitup and the link to purchase one is in the same post as the photo in post #27.
 
In the same thread Dashmallow mentioned I put together something very similar.

The links to those posts are here.
https://dashcamtalk.com/forum/threads/low-profile-tripod-thread-windshield-mounts.16504/post-427607 (includes links to ali express which may still work)
and here.
 
In the same thread Dashmallow mentioned I put together something very similar.

The links to those posts are here.
https://dashcamtalk.com/forum/threads/low-profile-tripod-thread-windshield-mounts.16504/post-427607 (includes links to ali express which may still work)
and here.

That same thread would this thread, country_hick. ;)
 
Back
Top