New thread on polarizer filter for BlackVue DR500GW-HD

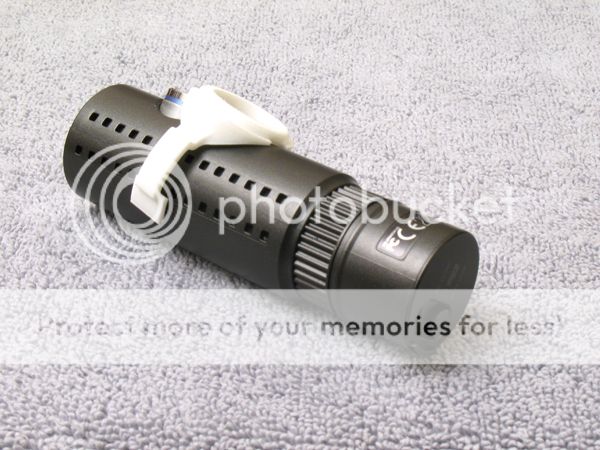
Such an astounding job erewhon. I'm looking to purchase a complete set... I have the filter purchased, now I simply need to purchase your adapter. $20 shipping is steep but looks to be worth it. Plastic or detail resin? Before I buy the adapter, I am wondering if I should hold off because of your new design. Only question I have regarding your new design is your clip will end up covering some ventilation holes. Think that will be a problem?

Hello Agilis,

Thanks for your comments!

From Sculpteo, the expedited shipping charge for one original adapter was $6.50, from France to Atlanta GA, USA. From Shapeways, the standard shipping charge was also just $6.50, from New York. Where are you getting the $20 shipping charge?

For the new prototype design, I ordered one in detail resin and one in sintered polyamide powder from Sculpteo, and I ordered one prototype from Shapeways in sintered nylon powder.

The detail resin is a much smoother finish. The sintered products have a slightly sandpaper-like finish, which sandpapering and paint cannot eliminate. Resin looks nicer. However, the sintered products are supposed to be more flexible, and the Shapeways sintered nylon powder appears to be the most heat tolerant of the three materials.

On the original design, the press-fit might slowly deform the adapter. The adapter I have been using (made of Shapeways sintered nylon powder) still fits snugly, but nevertheless seems a bit looser than when I first put it on. In the long run, a touch of mild adhesive of some sort might be needed.

The idea behind the clip adapter is that once installed, there are no further stresses to deform the material. Also, there should be no need for sanding and custom fitting. With the three different prototype materials, I'm trying to get a subjective feel for the "best" material, and possible refinements to the shape.

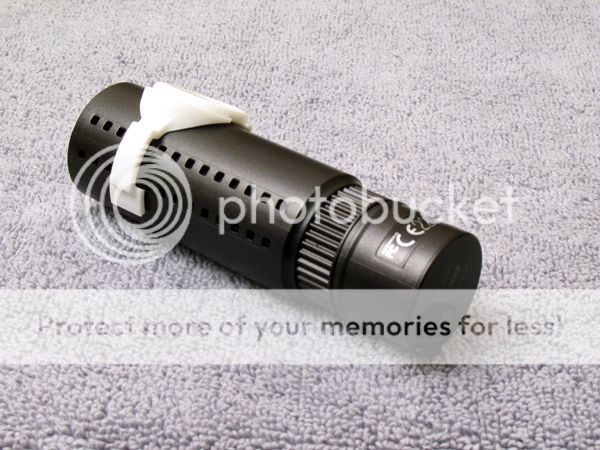
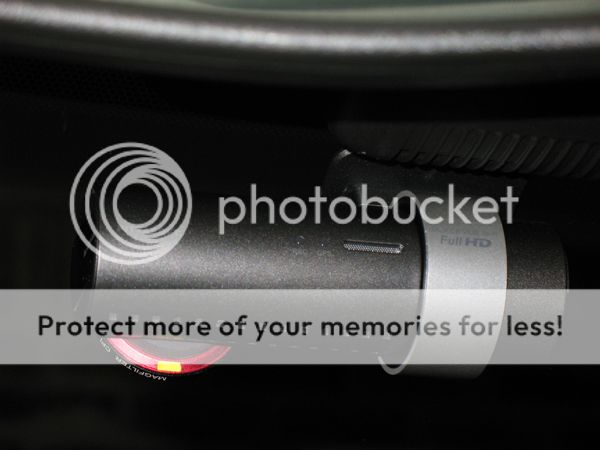
You are right about the clip and the ventilation holes. Six holes are covered. There is a security LED just below the lens on the dashcam. The original adapter did not cover the LED, but the view was nevertheless blocked from the front of the car. You have to put your head on the dashboard of your car and look straight up to see the LED. I therefore used dashcam settings to turn the LED permanently off. This might also reduce heat a bit. If you look closely, the two ventilation holes closest to the LED are already blocked and are non-functional. On the bottom of the mounted dashcam, only the two holes in the next row are actually blocked by the clip. On the top of the mounted dashcam four functioning holes are blocked. Photos in the dashcam comparisons show that in the BlackVue, most of the electronics are located away from the blocked holes. Close to the top four blocked holes is the capacitor that holds enough charge to power the BlackVue during shutdown. I assume that the capacitor does not generate much heat during operation.

Nevertheless, I'm looking ways to uncover the ventilation holes in later designs. There will be more prototypes! :p It takes a week or more to get the 3D printed parts, so the final design for the clip adapter is still a month or so away. The original design works well for the time being. I've found that with a thin sharp knife, I can remove the Carry Speed adhesive backed adapter ring from my adapter and re-use the Carry Speed ring, using a touch of super-glue.
 
If you lived in the UK you can buy a 3D Printer from maplin electronics for under a couple of grand.
 
Hello Agilis,

Thanks for your comments!

From Sculpteo, the expedited shipping charge for one original adapter was $6.50, from France to Atlanta GA, USA. From Shapeways, the standard shipping charge was also just $6.50, from New York. Where are you getting the $20 shipping charges?

You were right. I was seeing $20 before I went through the Payment process but once I did, I was able to see the $6.50.

I am more than likely going to order detail resin because resin is usually more heat resistant than plastic unless you can persuade me not to.

Now once I receive the part, what are the instructions on prepping the piece, installing, and calibrating? Would you mind reiterating the instructions please?

I look forward to your future designs. This is pretty cool and I'm fortunate to have found this thread along with being able to purchase your work.
 
I am more than likely going to order detail resin because resin is usually more heat resistant than plastic unless you can persuade me not to.

Now once I receive the part, what are the instructions on prepping the piece, installing, and calibrating? Would you mind reiterating the instructions please?

Hi Agilis,

I think the resin part will work fine. I have one in resin ready to install, but have so far kept using the sintered plastic part because the sintered plastic continues to work with no problem. The resin looks better, however.

****​

To install the part: The central hole for the lens barrel needs to be sanded for a proper press-fit. The central hole is 20.5 mm diameter and the lens barrel is also 20.5 mm diameter, but the part tends to print with a smaller diameter.

dimensions-top-web_zps354603ed.jpg


Use 220 grit sandpaper to make the central hole larger and do frequent trial fits to the lens barrel. A digital caliper is very useful to make sure you are keeping the hole circular as you do the sanding.

(An older design part is shown.)
sanding_zps952ae7be.jpg


calipers_zpsea88ae7c.jpg


The Carry Speed adhesive backed adapter ring should fit around the 27.75 mm projection shown in the first diagram above. In one case, however, I had to sand the projection slightly to allow the ring to fit.

An uninstalled Carry Speed adapter ring next to a painted resin part.
IMG_0626web_zps77a24e24.jpg


The adhesive backed adapter ring installed.
IMG_0627web_zpsf4029a37.jpg


My adapter installed onto the BlackVue.
IMG_0629web_zpsa9878395.jpg


A press-fit should be good enough. If the fit is too loose, you might try a tiny piece of vinyl electrical tape or plumber's Teflon tape to make the fit tighter, or maybe a dab of rubber cement. A press-fit has always worked for me, however.

I marked the filter with a bit of yellow sticky tape to show the proper filter orientation for maximum reduction of glare and reflection. Orient your car to get a lot of reflection in the windshield. Hold the filter by itself in front of the windshield and rotate the filter to note the best orientation. Mark the bottom of the filter to show the best orientation. Here's a picture of my BlackVue from the driver position, showing the yellow marker on the installed filter.
yellow-dot-1_zpseebff126.jpg


That's it.
 
Only question I have regarding your new design is your clip will end up covering some ventilation holes. Think that will be a problem?

Still waiting for the prototypes with the clip to arrive. Meanwhile, here is a version with an offset part of the clip to uncover the ventilation holes. I'll see how the initial prototypes fit and try some changes, probably with the ventilation mod.

vent-safe-clamp-web_zps09092f6c.jpg
 
Hi Agilis,

I think the resin part will work fine. I have one in resin ready to install, but have so far kept using the sintered plastic part because the sintered plastic continues to work with no problem. The resin looks better, however.

****
That's it.​
Wow. I purchased the resin and can't wait to put this all together. Excellent write up. I'm sure I will not be the only 1 benefitting from your write up. Thank you for taking the time to help me out.
 
Hi erewhon,

Great work with the filter adaptor!!!
  • Any news from the new part with the clip?
  • Did you get it from Shapeways or Sculpteo?

I was going to get the version you have uploaded already, but was wondering if it would be worth to wait for the clip version.

I can't see the new prototype in either Sculpteo nor Shapeways. Have you published that model anywhere?

Thank you
 
Still waiting for the prototypes with the clip to arrive. Meanwhile, here is a version with an offset part of the clip to uncover the ventilation holes. I'll see how the initial prototypes fit and try some changes, probably with the ventilation mod.

vent-safe-clamp-web_zps09092f6c.jpg

Nice! Looks very promising. :)
 
Hello pyarza and TallTom,

I've been working on several prototypes.

From left to right...
(1) the original clip
(2) clearance for dashcam cooling holes, clip extended for more secure fit
(3) wide/thick pads on end of clip for even more secure fit
three-clips_zpsc804fa62.jpg


*****​

Putting the adapter on the BlackVue...

Slide adapter up to lens barrel:
clip-position-1_zps95e94b2f.jpg


Gently lift adapter over lens barrel:
clip-position-2_zpsdf6b8b89.jpg


Let adapter snap into place:
clip-position-3_zps560c4c40.jpg

(Note that the clip does not cover the ventilation holes - the second row of holes has disappeared in the shadow.)

*****​

I have a 4th prototype print order at both Shapeways and Sculpteo, with minor dimension tweaks. The hole for the lens barrel seems to print with an ID about .2 to .3 mm too small (so I still have to resort to sanding). I'm trying to find a specified diameter that results in an actual printed diameter that requires no sanding for the adapter to fit around the lens barrel, and yet with the minimum play between the adapter and the lens barrel.

For both Shapeways and Sculpteo, I've found that the sintered plastic seems best. The resin material has a smoother finish, but the part size is not accurate. For example, the thickness of the clip is supposed to be 2 mm, and both the Shapeways and Sculpteo sintered plastic parts met that dimension, but the resin parts had clip thicknesses of 2.5 mm and were more stiff.

I'll make the parts public at both vendors in a day or so, but note that the parts are not yet necessarily final.
 
Dammit. Knew I should have waited. I wonder if I should have mentioned that I have no way to remove my camera from the windshield due to its placement. Clip might be the best option for me.
 
Dammit. Knew I should have waited. I wonder if I should have mentioned that I have no way to remove my camera from the windshield due to its placement. Clip might be the best option for me.

You can't remove the camera? What if you need to get the memory card out?
 
Dammit. Knew I should have waited. I wonder if I should have mentioned that I have no way to remove my camera from the windshield due to its placement. Clip might be the best option for me.

Wow, you must have a very unusual installation. One of the features I really like about the BlackVue is that it is so easy to remove the dashcam, which I usually do to discourage car break-ins.

Anyhow, not all is lost. :):D:p You can rotate the BlackVue in its mount so that the camera lens is facing you, making it easy to access and remove the press-fit adapter. You can slide on the clip-on adapter from either end of the BlackVue. The way I did it in the photos was just to have a clear illustration of what the process is like. You can instead slide it on from the "short" end of the BlackVue and avoid the need to unmount the dashcam. Sliding in from the end minimizes how wide you have to stretch open the clip to install the adapter.

But, as long as the press-fit adapter is working, why remove it? The press-fit adapter is more hidden from view. The clip-on adapter is a bit more baroque or clunky looking. The clip-on adapter, however, does not depend on a tight plastic fit, which might relax over time with the heat inside a parked car.
 
Gentlemen, I knew I'd create some sort of confusion :D First answer is, I simply eject the memory card from the unit. But I hardly ever need to do that because of the camera's WiFi connectivity.

The reason why I can't remove it is because the direction of the camera's release is blocked by the center area that extends from the rear view mirror and upwards towards the roof. If I mounted the dash cam on the left side, the camera lens would have been more off center. See, I went with trying to keep the lens of the camera centered with the car. Where it's mounted tho is pretty much invisible to anyone walking by, excellent view, and not in my field of view when driving. I also can see any of lights that need to be seen - I did however turn off the security LED because in my opinion, that creates a risk for a possible break in.

Erewhon, excellent idea with how to fit the adapter. That is exactly how I was going to approach the fitment when I do it this weekend.

Ahhh, ok. Mine is slightly off-center to the left. I wanted it as close to the factory tint strip as possible. If I had it in the center, it would sit below the rearview mirrow and totally visible from the outside.

I plasti-dipped the silver holder ring and the silver ring that surrounds the lens. Looks better all blacked out.
 
Hi Erewhon,

Thank you for the update. And for such a great job!!!

I have seen that you have uploaded the new "prototype" to both shapeways and sculpteo. I was going to get it from shapeways but I have seen that you recommend, at least that is what shapeways says: "White Strong & Flexible material recommended." http://www.shapeways.com/model/1544...rryspeed-magfilter.html?li=cart&materialId=25

I was thinking about the shapeways black one (Black Strong & Flexible) as it is less break-in risky than the white one...
Is there any reason to go with the white one that I have missed?

From the materials at sculpteo which ones would you recommend: plastic or detail resin?

Thank you in advance,

Pedro
Hello pyarza!

The Shapeways "Black Strong & Flexible" is simply the "White Strong & Flexible" dyed black. The material is porous so that it can be easily dyed. I will probably get the white material and paint it with plastic compatible black paint. The resulting painted surface is slightly smoother than the dyed surface, but not by much. Maybe not even worth the bother! The black dyed surface is much easier than painting.

The Sculpteo detail resin has a very nice smooth finish that looked even better when I painted it black. However, the resin parts tend to be less accurate than the standard sintered nylon/plastic parts from Shapeways or Sculpteo. If you order the detail resin, you will almost certainly have to sand the adapter hole (nominal 20.5 mm ID) that fits around the dashcam lens barrel, and you will also have to sand the surface (nominal 27.75 mm OD) that the the Carry Speed adhesive adapter ring fits around. My goal for the latest design was to eliminate the need for custom sanding, but I do not see any reason why you could not make the detail resin work if you are willing to do some custom sanding/fitting. I decided to not bother with the resin. However, I would prefer resin for items that did not require accuracy.
dimensions-top-web_zps354603ed.jpg

The Sculpteo plastic is very similar to the Shapeways plastic (it is polyamide rather than nylon, whatever that means). I cannot tell the difference as far as surface texture, flexibility, or dimensional accuracy. The colored parts are dyed, just like the Shapeways parts.

Hope that helps! :)
 
Thank you for the info erewhon.

I have just bought a couple of "black strong and flexible" prototypes from shapeways...
Hope to get the soon!!!

I'm sure they will work great. Thanks for your work once again!!!!
 
Back
Top