Nextbase 402g battery replacement/ ls430

Right… sorted :D … I have a few 4mm x 20mm x 35mm batteries on order but I realised last night that I had a couple of spare 6mm thick batteries that came with my little quad-copter from Maplin's. The original battery has a small rubber space piece stuck to the 'top' which easily makes up the total thickness to 6mm so I de-soldered the old battery, taped up the flying leads to stop them shorting… cut the little connector off the the new battery, one wire at a time! … soldered in the new one and it works.

I did noticed that the old battery would allow a the charging volts to go above 4.1volts. This new battery holds to around 3.8volts which is more like it for a 3.7v lithium polymer.

Anyway after a quick charge the 402G runs on battery for the max timeout period I can set.

I will probably have some spare 4mm batteries some time in August :D


Z.
Hello Zaphod, got the same cam and junk battery.
Did you get anywhere with a new battery?

I have seen these POS china batteries in those wee helicopters. Great while they last, which is not very long!
I consider strapping a larger battery to the cam and be done with it.
 
Hello Zaphod, got the same cam and junk battery.
Did you get anywhere with a new battery?

I have seen these POS china batteries in those wee helicopters. Great while they last, which is not very long!
I consider strapping a larger battery to the cam and be done with it.

Hi Betram


Yes I sorted it long since and my 402G has behaved ever since.


Z.
 
I discovered 'Dashcam talk' through this thread, as my Nextbase 402G kept giving 'low battery' warnings and I googled for any advice.
As with others, it is about 12 months old and I couldn't find my receipt so considered my best action.

Having seen the relatively straightforward repair, I thought that was best, given the batteries are so cheap anyway.
As it happens, I had been in touch with Nextbase customer support and they kindly sent me a battery free!

However, the good news ended there...

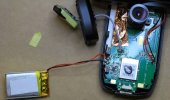
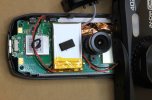
I did indeed replace the battery, following the instructions here (the screws do actually hold the case together at the top). My doubts first arose, though, when I measured the voltage of the removed battery and found it to be 3.68v.
I thought, perhaps, that this was just not necessarily an accurate figure, as I believe that can drop considerably if the battery is failing and there is a current draw.
Unfortunately, though, the new battery behaved in exactly the same way.

It can be charged perfectly well using a USB, but does not maintain that level when plugged to the car supply, which is very curious.

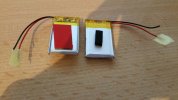
Anyway, in the hope that the second battery may have been faulty too, I purchased a couple more through ebay (no guarantee of quality I know!) and tried them. No difference.
Again, the voltage was around 3.7v. I also measured the voltage when attached to a USB charger and it was barely 3.9v.

In the end, I simply bought a new cam but, out of curiosity, got in touch with Nextbase again. Their reply has left me stumped.

I asked what the voltage threshold for a low battery warning would be, as I would have assumed that if using a nominal 3.7v battery it would have been something like 3.0 - 3.2 at the worst.
Bizarrely, apparently the 'Technical Director' has said that the threshold is 4.2v!

I can't for the life of me imagine why they might use a step-up converter to get a higher voltage with just one small cell, if indeed they have, and I can't see how his information can be true using a 3.7v nominal battery.
Am I missing something here (I have a reasonable understanding of electronics, but wouldn't describe myself an expert), or is Nextbase doing something completely bonkers?

For my part, I suspect that the issue with this model of cam is not with the battery at all, but rather the charging circuitry and voltage threshold. I think if the charging is at too low a voltage then, while the cam is on, the available power drops too much to effectively charge. Then, because the threshold kicks in too soon and determines 3.7v is too low, the system switches off before saving the last file, which completely destroys the entire point of the camera.

I'd be grateful for a wiser and more knowledgable assessment, though, as I'm totally flummoxed!
 
My 402G had been playing up for a while, doing this crazy on/off jingle-jingle, 'battery low' indication at the end of every journey. I then found that the last video file on every journey had not been saved, missing the most important file in event of an accident! My camera was 3 days within its warranty period when I contacted NextBase customer support and I have to say they were most helpful. Apparently there is an integrated circuit built into the Lithium Polymer battery which prevents it from discharging below 3 volts, which can wreck the battery. It is this IC which is failing on the older cameras. One of the functions of the battery is to shut down the camera in the correct sequence and to save the last video file whenever 12V power is removed.

Cameras with serial numbers higher than 1525xxx are apparently fitted with a new battery and its protection IC which overcomes the problem. Today NextBase provided me with a new camera, so I have no complaints.

So don't buy a 402G camera with a serial number less than 1525xxx!
 
Hey, I think I need to replace my battery.
When I plug it into the USB plug, it turns on an the led is purple, if I turn off while plugged in it flashes blue.

If I unplug when turned on, the device turns itself off immediately.

Would this battery work? If it is the battery.

https://www.ebay.co.uk/itm/231873002394
 
Adam,

Sounds like the battery is faulty. It should continue to run for 30 seconds after the power is removed, then it jingles and shuts down. If it doesn't, you will lose the last recorded file which, in the event of an accident, is the most important one!

If it was me, I would contact NextBase first and see how much they would charge to replace the battery. If the 402G is less than a year old, they should do it for free. I'm not sure if they might be prepared to do so even if it's out of guarantee as I think this is a design fault, although the argument might be that a battery is a 'consumable'

Tom
 
you need to replace the battery, these are as shown in the image to temp fix the problem for about 12 months before you need to replace it again
 

Attachments

  • Screen Shot 2016-08-02 at 17.33.52.jpg
    Screen Shot 2016-08-02 at 17.33.52.jpg
    55.4 KB · Views: 36
  • 20160802_173223_resized.jpg
    20160802_173223_resized.jpg
    423.7 KB · Views: 33
  • Screen Shot 2016-08-02 at 17.34.20.jpg
    Screen Shot 2016-08-02 at 17.34.20.jpg
    72.4 KB · Views: 36
Remove the four small screws that hold the top half of the the top support on and remove top piece, gently ease out the gps module and remove the four screws that hold the base part to the main unit. This does not hold the two halves of the case together but it makes prizing it apart easier. Oh watch the black screws you remove the ones that hold the base to the main unit are slightly longer than those that hold the top part on.

Turn the unit over and with a blunt knife or strong fingernail etc prize the bottom apart and try and put matchstick ends or similar to keep the case open as you work around to the sides and the top. It came apart pretty easily and my photo above shows the opened case.

The Lithium polymer battery is stuck to the main board by a double sided sticky pad.

I measured the charging volts on the battery, over 4 volts, and the battery did retain volts with the unit switched off but as soon as I tried to power the unit on battery alone the volts would dip and the unit would go into a mad cycle on turning on… screen on… power consumption rises… battery volts fall… unit turns off… battery volts recover…unit back on…. and repeat.

Looked on ebay for a suitable battery but won't know if I have sorted it until I replace it


Z.
Thanks for that, I now have the battery out, ordered a replacement, from China ? might be here by Christmas! Is there not UK supplier?
 
Ok, same problem with me. The lithium polymer battery seems to have failed after nearly a year and because of that the GPS loses its 'last location' data and takes ages to lock as it does not know, on Earth, where you are and, in fact, will not lock when moving so unless you are prepared to start the car and sit for ages until GPS lock happens you will not get speed or location data.

So I have opened up the unit, that was fun, and found the battery, identified one on ebay and will let you know how I get on.


Z.
Thought this would be of interest to anyone having problems with the Nextbase 402G. Contacted their Technical Support by email and had a reply by return with full instructions & photo's on how to open the camera. They are also sending a free replacement battery.
 
Thought this would be of interest to anyone having problems with the Nextbase 402G. Contacted their Technical Support by email and had a reply by return with full instructions & photo's on how to open the camera. They are also sending a free replacement battery.

The 402G has a reputation for battery problems which then lead to reliability problems related to not saving the last file (which is the one you'll want if you have an accident).
A couple of years ago I had a 402G which suffered that problem quite soon after purchase and I insisted on a refund rather than keep repairing it until the warranty ran out and after the warranty I'd have to source my own batteries, make my own repairs and run the risk that my cam wouldn't capture that important moment.
And, of course, a failing lithium battery is a safety hazard.
 
We have two of these cameras and they both have the same fault. UK and EU law states that if there is a manufacturing defect, which this clearly is, within 2 years the item should be repaired or replaced, regardless of warranty period. Surely Nextbase should be made to recall or replace all of the affected units given this is clearly an inherent fault. We should all get together to get Nextbase to acknowledge this issue properly and provide a suitable solution. We're not talking a cheap £20 device here, not that is should matter.
 
We have two of these cameras and they both have the same fault. UK and EU law states that if there is a manufacturing defect, which this clearly is, within 2 years the item should be repaired or replaced, regardless of warranty period. Surely Nextbase should be made to recall or replace all of the affected units given this is clearly an inherent fault. We should all get together to get Nextbase to acknowledge this issue properly and provide a suitable solution. We're not talking a cheap £20 device here, not that is should matter.

You'll probably be offered a repair. The cam will probably be sent away perhaps for several weeks and you'll have to go without a cam in your vehicle or buy another to cover its absence.
It's only because mine died so quickly, plus my forceful attitude, that persuaded the retailer to give me a refund.
 
Nextbase were very helpful when I told them of my battery problem after 2 years. They sent a new battery free of charge and instructions on how to replace. Instructions are shown but unfortunately without the photographs:


Battery replacement in Nextbase 402G


The basic tools necessary to change the battery are: a small Phillips screwdriver (PH00x40 is a good fit), a suitable metal pry tool, a suitable plastic pry tool and finally a soldering iron.

Before starting it is crucial that the unit is powered off and the micro-SD card removed.

Screws removed during this battery replacement are of different lengths. Replace the same screws back in their original positions to avoid damaging the product.

1. Start by removing the four screws from the top of the iN-CAR CAM.
2. Remove the top cap and then remove the next four screws as shown below.


3. Loosen the GPS module and lift the GPS housing away from the body of the iN-CAR CAM.

4. Insert a metal pry tool less than half a centimetre (as shown below) in order to make a gap between the front and rear housings. Do NOT twist the pry tool or damage to the housing will result. Do NOT push beyond half a centimetre or damage to the LCD screen can result.

5. Taking a plastic pry tool, run along the casing from the middle towards the power button to unclip the casing in two places.
6. Once both clips have been undone towards the power button, run the plastic pry tool in the opposite direction and undo both clips on the end with the USB socket.


7. Run the plastic pry tool down the side of the camera at the USB end and along the full length at the bottom of the camera.

8. After the plastic pry tool has been run around the perimeter of the case it should unclip. Carefully lift the front of the case from the back taking particular care not to put stress on the wires connecting the cases. You now have access to the battery and can rest the front of the case on the other side of the lens as below.


9. The battery is secured in place with double sided tape. It can be lifted from the main circuit board now. Be gentle as too much force could also pull the wires underneath the battery away from the circuit board, which connects to the LED light. Once the battery is removed, the battery connections are exposed, so that they can be de-soldered with a soldering iron.


10. Once the old battery has been de-soldered from the circuit board the new battery can be soldered on, making sure the red and black wires are soldered on in the same configuration as before, and as below.


11. The battery should have double sided tape on the side with no writing, remove the backing from the double sided sticky tape.


12. Before placing the battery back into the camera first tuck the cables for the LED light underneath where the battery will sit as in the picture below. Now place the battery so that the base of the battery is butted up against the power button and the double sided tape is facing the main circuit board.

13. Once in place, the battery should have the foam pad facing upwards and look as below.


14. Align the front of the case with the back of the case, making sure that there are no wires protruding. Before clipping the case back together hold it loosely together and stand it on its base, locate the grey wire connecting to the GPS module as below.

15. Clip the case back together and locate the GPS unit housing on top of the in Camera body. Secure it using the four longer screws that you removed earlier.


16. Now place the GPS unit back in place, with the end with black tape on the same side as the USB socket.

17. Now place the top cap back on, securing it with the four small screws.
 
Has anybody tried replacing the battery with a supercap? Something like this:-
https://www.ebay.co.uk/itm/181834565213

I think the specs of that cap are not appropriate for dashcam use. I have a spare supercap on my desk from a dashcam and it's 2.7V 5F (your link is 5.5V 4F and a very different shape).

Even if you find a suitably sized and rated cap, success or failure would depend on the cam's hardware and firmware; there's a high probability that it won't save that all-important last file.

The ebay supercap I linked, at 6mm thick, I believe would just about fit physically in the case, but would need some insulation over the exposed metal of course.
At 5.5V rating, it is safe to use on a system of upto 5.5V - the 402g uses a 3.7-4.2V LiIon.
4F vs 5F simply means the capacity is 1 Farad lower. With 1 Farad being an Amp.second/Volt, this means a 4Farad supercap at 3.7V will hold up for ~49s.
The advantage being that it's a supercap not a LiIon, and the longevity improvements that entails.
 
even if it worked like another type of super capacitor it still won't help without appropriate firmware changes to support it
 
Remove the four small screws that hold the top half of the the top support on and remove top piece, gently ease out the gps module and remove the four screws that hold the base part to the main unit. This does not hold the two halves of the case together but it makes prizing it apart easier. Oh watch the black screws you remove the ones that hold the base to the main unit are slightly longer than those that hold the top part on.

Turn the unit over and with a blunt knife or strong fingernail etc prize the bottom apart and try and put matchstick ends or similar to keep the case open as you work around to the sides and the top. It came apart pretty easily and my photo above shows the opened case.

The Lithium polymer battery is stuck to the main board by a double sided sticky pad.

I measured the charging volts on the battery, over 4 volts, and the battery did retain volts with the unit switched off but as soon as I tried to power the unit on battery alone the volts would dip and the unit would go into a mad cycle on turning on… screen on… power consumption rises… battery volts fall… unit turns off… battery volts recover…unit back on…. and repeat.

Looked on ebay for a suitable battery but won't know if I have sorted it until I replace it


Z.
Works a treat, thanks.
Followed your instructions, used an R/C model battery (approx £2.50), tight fit but it's been working for over a month now and holds it's charge well. For reference googling "BPI-402035P battery" will get results from ebay, amazon and some online stores, I just picked a 3.7V battery that would fit.
 
Hi. I had the same issue with the battery not holding charge, so contacted Nextbase via their web site. Explained the problem and 2 days later a replacement battery arrived, free of charge. Very easy to replace using the on line instructions, so am pleased with their customer service. The 402 was out of warranty.
 
Back
Top