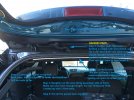
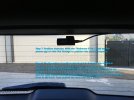
So it's taken a little while mostly piecemeal to get this thing setup properly, with a vacation in between. But first, let me tell you about this dashcam. The Thinkware F750 is a front & rear dashcam setup that has a constant power hookup for parking mode surveillance. It's got a motion sensor inside that will trigger recording in case someone hits you in a parking lot as well as independent motion sensing. Plus of course it captures both simultaneous front and rear recording while you are driving. It also has additional features that do forward collision warning, lane departure, speed limit warnings, red light camera warnings. Depending on which Explorer you get, you won't need those features and can disable them, like I did. While the parking mode is running and feeding off the car battery, there is a setting in the dashcam to have it turn off when the battery reaches a certain voltage.
I had this thing hooked up in my last car, and it worked like a charm, and even caught a car accident that I got into with a 89 year old priest that drove into my lane. Insurance ruled it 50/50, and then I supplied the dashcam footage and they quickly ruled 100% priest's fault. It was a test of the crappy "he-said/she-said" insurance system. And the priest lied, and there were no witnesses because it was a minor accident and nobody bothered to stop! So money well saved because the accident would have resulted in paying a deductible and potential insurance rate increases.
In my last car, I utilized the "add-a-fuse" concept to wire it up. But the location of the Explorer's fuse is very difficult to access. Also the new the 2017 uses new Micro2 & 3 fuses, which no auto parts shop carries yet. Older Explorers will be using the normal Mini fuses, that have easy access parts. I don't know when Micro2 & 3 fuses were added in the Explorer. 2016? 2017?
My brother is an auto mechanic, so he hardwired it for me. He wired it into the driver's side A-pillar. There is a large molex plug, and he tapped into that. Pulling the panels off to access the A-pillar required no tools. After watching him work, it was an excellent install. Except the wire-tap failed. I had to take it apart and wire it more conventionally -- strip the wire, and tap in directly and duct tape it. Happy enough for me. The reason the wire tap failed was because the dash cam wires are just so thin.
Airbags are a concern/risk, and there are cases of airbags deploying while wiring stuff up, so YMMV. I unplugged the molex before playing with the wires, and only connected it after I was done. Did that a few times without anything going awry. Also we used zip ties to wire it up behind the air bag. The molex also clips into the chassis, and you can pull it out to make it easy to work with.
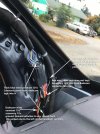
I prepared this picture:

All the dashcam connections were made below the plug. And of course, not all cars are the same, but my loaded 2017 Explorer Sport had a red wire on the bottom that went into the plug and didn't come out the top -- so it's a live accessory wire that doesn't actually connect to anything. Who knows maybe it serves a purpose for a Platinum trim, although apparently this is a pretty common technique for car makers. So we were able to literally just cut the wire and hook the accessory wire directly to it. Platinum has a couple extra features like rain sensing wipers, lane assist, that would go up that way.
The constant power was indeed being used and had a thick blue with red wire underneath and above the plug.
The advantage to doing it this way instead of using fuse tap is that it's a cleaner installation and you don't have to pull as many panels to run the wires. In addition, the A-pillar is easy to access and work with.
And for your entertainment, here's a short video of how easy it is to get through the soft interior:
Basically he ripped out 4 panels with his bare hands, without even thinking. I would have been much more careful, but he was so fast, I only got video of 2 of the 4 panels, and I nearly had a heart attack. My new car wasn't even a week old! He didn't break anything, but did have to use needlenose pliers to reset one of the plastic hook things, so it would clip back in.
Next post, I'll detail how I got the rear dash wired up.
I had this thing hooked up in my last car, and it worked like a charm, and even caught a car accident that I got into with a 89 year old priest that drove into my lane. Insurance ruled it 50/50, and then I supplied the dashcam footage and they quickly ruled 100% priest's fault. It was a test of the crappy "he-said/she-said" insurance system. And the priest lied, and there were no witnesses because it was a minor accident and nobody bothered to stop! So money well saved because the accident would have resulted in paying a deductible and potential insurance rate increases.
In my last car, I utilized the "add-a-fuse" concept to wire it up. But the location of the Explorer's fuse is very difficult to access. Also the new the 2017 uses new Micro2 & 3 fuses, which no auto parts shop carries yet. Older Explorers will be using the normal Mini fuses, that have easy access parts. I don't know when Micro2 & 3 fuses were added in the Explorer. 2016? 2017?
My brother is an auto mechanic, so he hardwired it for me. He wired it into the driver's side A-pillar. There is a large molex plug, and he tapped into that. Pulling the panels off to access the A-pillar required no tools. After watching him work, it was an excellent install. Except the wire-tap failed. I had to take it apart and wire it more conventionally -- strip the wire, and tap in directly and duct tape it. Happy enough for me. The reason the wire tap failed was because the dash cam wires are just so thin.
Airbags are a concern/risk, and there are cases of airbags deploying while wiring stuff up, so YMMV. I unplugged the molex before playing with the wires, and only connected it after I was done. Did that a few times without anything going awry. Also we used zip ties to wire it up behind the air bag. The molex also clips into the chassis, and you can pull it out to make it easy to work with.
I prepared this picture:

All the dashcam connections were made below the plug. And of course, not all cars are the same, but my loaded 2017 Explorer Sport had a red wire on the bottom that went into the plug and didn't come out the top -- so it's a live accessory wire that doesn't actually connect to anything. Who knows maybe it serves a purpose for a Platinum trim, although apparently this is a pretty common technique for car makers. So we were able to literally just cut the wire and hook the accessory wire directly to it. Platinum has a couple extra features like rain sensing wipers, lane assist, that would go up that way.
The constant power was indeed being used and had a thick blue with red wire underneath and above the plug.
The advantage to doing it this way instead of using fuse tap is that it's a cleaner installation and you don't have to pull as many panels to run the wires. In addition, the A-pillar is easy to access and work with.
And for your entertainment, here's a short video of how easy it is to get through the soft interior:
Basically he ripped out 4 panels with his bare hands, without even thinking. I would have been much more careful, but he was so fast, I only got video of 2 of the 4 panels, and I nearly had a heart attack. My new car wasn't even a week old! He didn't break anything, but did have to use needlenose pliers to reset one of the plastic hook things, so it would clip back in.
Next post, I'll detail how I got the rear dash wired up.
Last edited:


