Dashmellow
Well-Known Member
- Joined
- Sep 22, 2013
- Messages
- 18,280
- Reaction score
- 18,925
- Location
- Uncanny Valley (●_●)
- Country
- United States
- Dash Cam
- Umpteen
We often see requests from DCT members for a method to mount a wedge shaped camera like the Viofo A119 V3 or A229 without having to attach it permanently to the windshield. Often the desire for this capability is to mount the camera temporarily, for example in a rental car, or perhaps the ability to move the camera between multiple vehicles that they own.
Another reason for wanting an alternative mounting method for wedge cams would be to have the ability to adjust the aim of the camera on the fly, including angle, horizontal tilt or lateral side to side aim, or to have the ability to quickly swivel the camera towards your driver’s side window which you otherwise couldn’t do with a wedge cam.
The only viable commercial platform option for most wedge cams these days is the Arkon EZ Pass suction cup mount which is a decent basic temporary option, but there are some drawbacks to this, such as potential vibrations and camera stability and this mount has become a lot harder to find. They are no longer available on Amazon for example, only directly from the company even though most of their other products are still featured on Amazon. Plus this mount offers no ability to adjust the camera at any angle you might want or swivel the camera towards a window.
Here is a simple DIY and inexpensive alternative mounting platform that will provide all of the above described adjustments either permanently or temporarily using ANY dash cam mount that has a standard 1/4-20 threaded tripod screw, either a suction cup mount or an adhesive mount. It requires only two basic parts to build - a platform material and a stop nut, plus some epoxy glue or putty.
My personal motivation for designing a mount like this was because I’ve been using a Viofo A119 V3 as my rear facing dash cam for several years now, mounted on an aluminum plate attached to the headliner in my pick-up truck. My truck has a center sliding glass window in the rear and this precludes mounting a camera directly on the glass because it would prevent me from opening the window, so I mount the camera on the aluminum plate on the headliner with the lens peeking down at the top of the glass. In general, this cam set-up has worked out well but the fact is that it has never been quite right. The horizontal angle of the camera has always been slightly off and this has bugged me even though the results are perfectly acceptable for dash cam recordings. This problem has been exacerbated though by the fact that this is a pick-up truck and the perfectly horizontal tailgate and straight side rails of the bed exaggerate this out of level effect. I’ve tried various methods of adjusting for this and nothing has really worked to my satisfaction, so I finally decided to try a different mounting approach.
Somewhere along the line I got the novel idea to use a 2 by 2 inch piece of 5mm thick tempered plate glass for the camera mounting plate mounted on one of the DIY low profile windshield mounts I came up with some years back. I liked the concept of having a tiny piece of “windshield” glass that I could mount anywhere in my vehicle at any angle using 3M VHB tape in the same way one would ordinarily mount a wedge camera on the actual windshield glass, except that it is highly adjustable and easily removable. Also, the garage where I take my truck for servicing has a fleet of loaner cars they're happy to lend you if they need to keep your vehicle overnight, so with this threaded flat platform mount all I need to do is unscrew it (with the V3 cam still attached) and temporarily install it on a suction cup mount for use in one of the loaner vehicles. Then, when I pick up my truck, it only takes a few seconds to put the camera back in my truck and I'm back in business and ready to go.
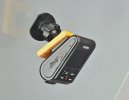
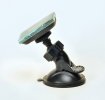
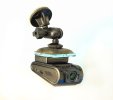
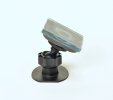
As we all know, some stem mounted ball joint mounts are prone to vibrations and that has been a consideration here with all the mounts I've shown. The mounts I've chosen tend to be highly stable and vibration free.
This one is the iSaddle mount. It is a remarkably versatile, solid, stable and vibration free mount once you adjust it to your preference and fully tighten the thumbscrew.
After you tighten the thumbscrew it feels like one solid object and you cannot budge any of the articulated joints even with a fair amount of force.
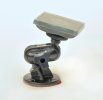
Obviously, not everyone can or would want to use glass for the mounting surface. Plate glass is not practical for everyone to work with. The fact is that for a project like this you can use any material you like – wood – plastic – aluminum, whatever. Anything you can embed or secure a 1/4-20 thread nut to will work. I present both methods here. You can also make the platform any size or shape you like. This one is slightly longer than it is wide with the hole drilled in the center.
For both methods I used a 1/4-20 thread stop nut (aka: locknut) rather than a standard hex nut because it offers deeper threads that can better accommodate a tripod screw and it is more secure in a moving, vibrating car. A wood or plastic flat platform with an embedded nut has the advantage of being thinner and lower profile than my glass mount with the nut cemented to the glass using a thick layer of epoxy putty.
For the wood mount I used another novel material, bamboo, that I finished using another unique product – a natural, non-toxic polyurethane-like floor finish made from polymers that are created with whey protein rather than petroleum. It’s made from whey protein obtained from our local cheese making industry here in Vermont and is called PolyWhey manufactured by a company called Vermont Natural Coatings. Vermont is an agricultural state with a large dairy industry so whey protein is an abundant natural byproduct from the making of cheese and Greek yogurt. PolyWhey finish is an amazing product! I’ve been using it for several years now and it’s not only a pleasure to work with and non-toxic but so far it appears to be more durable than standard polyurethane finishes. I’ve mostly used it on wood floors and furniture. Their products are so popular they can be hard to find sometimes, even here in Vermont. It is sold throughout the U.S.A and Canada.
The idea of applying a finish like this is that it makes an excellent surface to apply VHB tape to and it holds up well if and when you go to remove the VHB tape. It also looks very nice if you apply it correctly as imparts a nice golden color to plain wooden surfaces and leaves an attractive smooth satin or gloss finish.
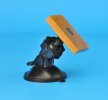
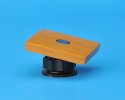
I drilled a hole in the center of the wooden plate just the right size to accommodate the hex nut and glued it in place with a two part Loctite epoxy glue which dries to a dark amber color. On the top of the plate I used a carefully cut piece of blue painter’s tape to seal one end of the hex nut to keep out any stray cement and to maintain a flat surface after several coats of the floor finish.
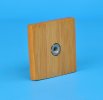
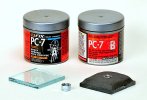
For the glass mount I used a product called PC-7 epoxy. This is an excellent two part epoxy that has the consistency of thick peanut butter. Once mixed I donned some nitrile gloves, rolled the mixture into a ball and formed it into shape with my hands. I then applied it to the glass square to get the shape and thickness I wanted, carefully inserted the hex nut in the center and let it cure overnight. The cement is solid by the next day but it really takes up to 72 hours to fully cure. You’ll note in the photos that the glass has many deep scratches near where the center hex nut appears. The Protective Coating Company (The “PC” in PC-7) recommends that you abrade very smooth hard surfaces before applying the cement for enhanced adhesion. For this I used a glass cutter.
So, what you end up with here is a versatile, small flat plate with a hex nut embedded in it or on it that you can attach to any mount with a tripod thread. Once you attach a camera to the mount using 3M VHB tape you can easily dismount the camera from your car simply by unscrewing the plate with the camera still attached if you want. This way you can move a camera between two cars without having to purchase a second GPS mount. Obviously, with a wedge camera you can also simply dismount the cam from its supplied VHB tape attached GPS mounting plate. I suppose if you had the need or desire, you could even mount your wedge dash cam on a standard tripod and use it like a regular video camera.
Another reason for wanting an alternative mounting method for wedge cams would be to have the ability to adjust the aim of the camera on the fly, including angle, horizontal tilt or lateral side to side aim, or to have the ability to quickly swivel the camera towards your driver’s side window which you otherwise couldn’t do with a wedge cam.
The only viable commercial platform option for most wedge cams these days is the Arkon EZ Pass suction cup mount which is a decent basic temporary option, but there are some drawbacks to this, such as potential vibrations and camera stability and this mount has become a lot harder to find. They are no longer available on Amazon for example, only directly from the company even though most of their other products are still featured on Amazon. Plus this mount offers no ability to adjust the camera at any angle you might want or swivel the camera towards a window.
Here is a simple DIY and inexpensive alternative mounting platform that will provide all of the above described adjustments either permanently or temporarily using ANY dash cam mount that has a standard 1/4-20 threaded tripod screw, either a suction cup mount or an adhesive mount. It requires only two basic parts to build - a platform material and a stop nut, plus some epoxy glue or putty.
My personal motivation for designing a mount like this was because I’ve been using a Viofo A119 V3 as my rear facing dash cam for several years now, mounted on an aluminum plate attached to the headliner in my pick-up truck. My truck has a center sliding glass window in the rear and this precludes mounting a camera directly on the glass because it would prevent me from opening the window, so I mount the camera on the aluminum plate on the headliner with the lens peeking down at the top of the glass. In general, this cam set-up has worked out well but the fact is that it has never been quite right. The horizontal angle of the camera has always been slightly off and this has bugged me even though the results are perfectly acceptable for dash cam recordings. This problem has been exacerbated though by the fact that this is a pick-up truck and the perfectly horizontal tailgate and straight side rails of the bed exaggerate this out of level effect. I’ve tried various methods of adjusting for this and nothing has really worked to my satisfaction, so I finally decided to try a different mounting approach.
Somewhere along the line I got the novel idea to use a 2 by 2 inch piece of 5mm thick tempered plate glass for the camera mounting plate mounted on one of the DIY low profile windshield mounts I came up with some years back. I liked the concept of having a tiny piece of “windshield” glass that I could mount anywhere in my vehicle at any angle using 3M VHB tape in the same way one would ordinarily mount a wedge camera on the actual windshield glass, except that it is highly adjustable and easily removable. Also, the garage where I take my truck for servicing has a fleet of loaner cars they're happy to lend you if they need to keep your vehicle overnight, so with this threaded flat platform mount all I need to do is unscrew it (with the V3 cam still attached) and temporarily install it on a suction cup mount for use in one of the loaner vehicles. Then, when I pick up my truck, it only takes a few seconds to put the camera back in my truck and I'm back in business and ready to go.


As we all know, some stem mounted ball joint mounts are prone to vibrations and that has been a consideration here with all the mounts I've shown. The mounts I've chosen tend to be highly stable and vibration free.
This one is the iSaddle mount. It is a remarkably versatile, solid, stable and vibration free mount once you adjust it to your preference and fully tighten the thumbscrew.
After you tighten the thumbscrew it feels like one solid object and you cannot budge any of the articulated joints even with a fair amount of force.

Obviously, not everyone can or would want to use glass for the mounting surface. Plate glass is not practical for everyone to work with. The fact is that for a project like this you can use any material you like – wood – plastic – aluminum, whatever. Anything you can embed or secure a 1/4-20 thread nut to will work. I present both methods here. You can also make the platform any size or shape you like. This one is slightly longer than it is wide with the hole drilled in the center.
For both methods I used a 1/4-20 thread stop nut (aka: locknut) rather than a standard hex nut because it offers deeper threads that can better accommodate a tripod screw and it is more secure in a moving, vibrating car. A wood or plastic flat platform with an embedded nut has the advantage of being thinner and lower profile than my glass mount with the nut cemented to the glass using a thick layer of epoxy putty.
For the wood mount I used another novel material, bamboo, that I finished using another unique product – a natural, non-toxic polyurethane-like floor finish made from polymers that are created with whey protein rather than petroleum. It’s made from whey protein obtained from our local cheese making industry here in Vermont and is called PolyWhey manufactured by a company called Vermont Natural Coatings. Vermont is an agricultural state with a large dairy industry so whey protein is an abundant natural byproduct from the making of cheese and Greek yogurt. PolyWhey finish is an amazing product! I’ve been using it for several years now and it’s not only a pleasure to work with and non-toxic but so far it appears to be more durable than standard polyurethane finishes. I’ve mostly used it on wood floors and furniture. Their products are so popular they can be hard to find sometimes, even here in Vermont. It is sold throughout the U.S.A and Canada.
The idea of applying a finish like this is that it makes an excellent surface to apply VHB tape to and it holds up well if and when you go to remove the VHB tape. It also looks very nice if you apply it correctly as imparts a nice golden color to plain wooden surfaces and leaves an attractive smooth satin or gloss finish.


I drilled a hole in the center of the wooden plate just the right size to accommodate the hex nut and glued it in place with a two part Loctite epoxy glue which dries to a dark amber color. On the top of the plate I used a carefully cut piece of blue painter’s tape to seal one end of the hex nut to keep out any stray cement and to maintain a flat surface after several coats of the floor finish.

For the glass mount I used a product called PC-7 epoxy. This is an excellent two part epoxy that has the consistency of thick peanut butter. Once mixed I donned some nitrile gloves, rolled the mixture into a ball and formed it into shape with my hands. I then applied it to the glass square to get the shape and thickness I wanted, carefully inserted the hex nut in the center and let it cure overnight. The cement is solid by the next day but it really takes up to 72 hours to fully cure. You’ll note in the photos that the glass has many deep scratches near where the center hex nut appears. The Protective Coating Company (The “PC” in PC-7) recommends that you abrade very smooth hard surfaces before applying the cement for enhanced adhesion. For this I used a glass cutter.

So, what you end up with here is a versatile, small flat plate with a hex nut embedded in it or on it that you can attach to any mount with a tripod thread. Once you attach a camera to the mount using 3M VHB tape you can easily dismount the camera from your car simply by unscrewing the plate with the camera still attached if you want. This way you can move a camera between two cars without having to purchase a second GPS mount. Obviously, with a wedge camera you can also simply dismount the cam from its supplied VHB tape attached GPS mounting plate. I suppose if you had the need or desire, you could even mount your wedge dash cam on a standard tripod and use it like a regular video camera.
Last edited:
