Other changes are mostly related to behavior/parameters modifications, like setting ISO value recording with Shutter Speed Auto has no effect in stock firmware, while modified one treats such case as ISO Limit settings, so if ISO 1600 is selected, autoexposure won't go higher than specified value in low light. Another major change is Low Light option, which sets 1/30s shutter speed for 60fps only modes in stock firmware and same frame is recorded twice in low light. This option behaves differently for mod - 1/50s - 1/60s min shutter speed is used for 24/25/30fps modes when Off, and 1/30s, same as stock firmware, is used when it is On (for 60fps and 50Hz 1/60s is used, so can cause flickering with pulsating light sources) and no frame doubling in any mode. So, it depends on your needs - Off for faster shutter and less motion blur, On - less noise in low light and stronger motion blur.
You are using an out of date browser. It may not display this or other websites correctly.
You should upgrade or use an alternative browser.
You should upgrade or use an alternative browser.
I would suggest following standard settings for video recording:
Bitrate: Medium
Loop: 10min
Sharpness: Medium
Contrast: Medium
Low Light: Off
Effect: Black&White (if video will be played directly in player without editing or uploaded to YouTube)
Bitrate: Medium
Loop: 10min
Sharpness: Medium
Contrast: Medium
Low Light: Off
Effect: Black&White (if video will be played directly in player without editing or uploaded to YouTube)
I have retested all video resolutions with High Bitrate and Loop Mode Off/On (5min), and it looks like 1080p60 and WVGA (1440p25) failing to start recording with Loop Mode Off, although both working fine when some Loop Mode option is selected. Bitrate settings for these resolutions will be reduced in next release.
I would recommend using Loop = 5min, as due to max file size limitation new file recording will be started with High Bitrate around ~7-8 minute and several seconds of record will be lost in between, while enabling Loop mode will chop files by time specified and no frames are missing, so files could be joined together seamlessly.
I would recommend using Loop = 5min, as due to max file size limitation new file recording will be started with High Bitrate around ~7-8 minute and several seconds of record will be lost in between, while enabling Loop mode will chop files by time specified and no frames are missing, so files could be joined together seamlessly.
Issue with EIS for 1080p60 seems to be fixed and some other updates have been applied. Please check top post in the thread to download latest fw version.
@yok3later, could you please test the latest version of mod and check if EIS works better now (please use following settings: Resolution: 1080p60, Effect: Sepia)
@yok3later, could you please test the latest version of mod and check if EIS works better now (please use following settings: Resolution: 1080p60, Effect: Sepia)
user777
Member
- Joined
- Jan 29, 2019
- Messages
- 44
- Reaction score
- 6
- Location
- Finland
- Country
- Finland
- Dash Cam
- GitUp Git2P
Hi @hc_1982
First of all, many thanks for your amazing and constant efforts to improve the IQ of the GitUp cameras.
I'd like to ask a favour; I really like the original video colours, curves and sharpness. I know they are all a bit over the top but the videos come out quite nice out of the camera. The only issue is that the low bitrate makes all the details mushy when viewed in 100% zoom.
So, could you make a firmware that keeps your high bitrates/video quality and has the original curves, sharpness and colours?
Also ideally it would be great if you would also keep your photo mods as they are because they are very nice indeed.
If you don't have the time, how easy/difficult would be for me to modify the firmware? Is there a guide for that?
Hi, @user777 ,
do you need firmware for Git2P or Git3? Currently I'm working on updates for Git3 FW mod, which has image with higher contrast/saturation/sharpness with default/normal settings. It would be very helpful to have some feedback, if you want to test it. Also, probably, similar updates will be applied to Git2P FW mod, if these experimental parameters are good.
do you need firmware for Git2P or Git3? Currently I'm working on updates for Git3 FW mod, which has image with higher contrast/saturation/sharpness with default/normal settings. It would be very helpful to have some feedback, if you want to test it. Also, probably, similar updates will be applied to Git2P FW mod, if these experimental parameters are good.
user777
Member
- Joined
- Jan 29, 2019
- Messages
- 44
- Reaction score
- 6
- Location
- Finland
- Country
- Finland
- Dash Cam
- GitUp Git2P
Hi mate,
I am talking about the Git3. Of course I would like to help out by testing the new firmware if you want.
Basically, what I am trying to do is to make the video colours as similar to the Git2p.
I have both cameras and they are both running your firmware.
On the Git2P I did a lot of testing and ended up with a video setting that I like very much. It is very colourful out of the camera but without becoming too much.
However, the Git3 in all the colour modes I find that it has a strong green cast and its curves lift the mid/highs a bit too much for my liking even in high contrast.
Here are two test videos between the two cameras:
Git2P

 drive.google.com
Git3

 drive.google.com
The Git2P has Sharpness strong / Contrast normal / Vivid and the Git3 has Sharpness strong / Contrast high / Colorful / EV -1/3 and both are running your firmware.
You can clearly see the difference in colours, curves and sharpness. Could you bring the Git3 video colours / style closer to the Git2p?
PS. By the way, I tried to play with the custom White Balance, increasing the Blue level all the way to +19 but there was no effect to the colours. I think that custom WB doesn't work at all.
I am talking about the Git3. Of course I would like to help out by testing the new firmware if you want.
Basically, what I am trying to do is to make the video colours as similar to the Git2p.
I have both cameras and they are both running your firmware.
On the Git2P I did a lot of testing and ended up with a video setting that I like very much. It is very colourful out of the camera but without becoming too much.
However, the Git3 in all the colour modes I find that it has a strong green cast and its curves lift the mid/highs a bit too much for my liking even in high contrast.
Here are two test videos between the two cameras:
Git2P
git2p.MP4
Git3
g3.MP4
The Git2P has Sharpness strong / Contrast normal / Vivid and the Git3 has Sharpness strong / Contrast high / Colorful / EV -1/3 and both are running your firmware.
You can clearly see the difference in colours, curves and sharpness. Could you bring the Git3 video colours / style closer to the Git2p?
PS. By the way, I tried to play with the custom White Balance, increasing the Blue level all the way to +19 but there was no effect to the colours. I think that custom WB doesn't work at all.
Ok, try this current development version of mod:
 drive.google.com
Colors are different as it has different sensors and settings for it. I guess, it is possible to make it more or less similar, but it won't be absolutely same. BTW, Git2P and Git3 mods have the same curves and sharpness settings.
GIT3FW.mod.test.zip
 drive.google.com
Colors are different as it has different sensors and settings for it. I guess, it is possible to make it more or less similar, but it won't be absolutely same. BTW, Git2P and Git3 mods have the same curves and sharpness settings.
user777
Member
- Joined
- Jan 29, 2019
- Messages
- 44
- Reaction score
- 6
- Location
- Finland
- Country
- Finland
- Dash Cam
- GitUp Git2P
Good morning @hc_1982
Just got some testing done with your new FW.
First impressions are that as follows:
1. Saturation is increased significantly. New normal colours are equal to colorful mode on your current modded FW. Similarly, new colorful mode = vivid mode on current mod.
2. Very very slight increase in Contrast.
3. No change in sharpness. Normal setting is too soft and high setting is just ok.
4. Custom WB still doesn't work.
Personal thoughts:
- Sharpness needs to be increased meaningfully. The current high setting should become the medium and the new high should receive about +50% sharpness. You can offer the low sharpness mode as it is now for anyone who doesn't want pre-sharpened footage (same as keeping the unsaturated sepia and B/W modes for post process work).
- The camera ahas a tendency to clip highlights. This can be corrected by adding a bit of exposure compensation, but this makes the whole image look slightly darker. You can leave it as it is, but it would need a small curve adjustment in the midpoint to bring it up again. (see below)
- I think increasing colour saturation is not needed. If anything the G3 always had very strong saturation, almost to the point of cartoon colours in Vivid mode.
When testing I also took a video with the G2p and I will say this: The G3 has the potential to output GREAT footage but it leans too much toward the yellow channel, oversaturating the greens a bit too much.
I did some work on Photoshop comparing the G3 footage to the G2p and I found that if you increase the Magenta channel by 10% in the midtones and increase the blue channel by 5% in the shadows and increase the Curves mid point by 15% the look improves greatly.
Have a look at the following screen shots.
One is the G2p footage with your modded FW (colourful mode, contrast high, sharpness high, EV -1/3).
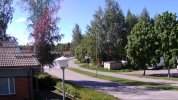
Ths is G3 straight from camera with your test FW (Normal colours, contrast high, sharpness high, EV -1/3)
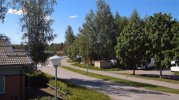
The third is modded in PS with my suggested adjustments.
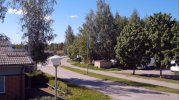
Just got some testing done with your new FW.
First impressions are that as follows:
1. Saturation is increased significantly. New normal colours are equal to colorful mode on your current modded FW. Similarly, new colorful mode = vivid mode on current mod.
2. Very very slight increase in Contrast.
3. No change in sharpness. Normal setting is too soft and high setting is just ok.
4. Custom WB still doesn't work.
Personal thoughts:
- Sharpness needs to be increased meaningfully. The current high setting should become the medium and the new high should receive about +50% sharpness. You can offer the low sharpness mode as it is now for anyone who doesn't want pre-sharpened footage (same as keeping the unsaturated sepia and B/W modes for post process work).
- The camera ahas a tendency to clip highlights. This can be corrected by adding a bit of exposure compensation, but this makes the whole image look slightly darker. You can leave it as it is, but it would need a small curve adjustment in the midpoint to bring it up again. (see below)
- I think increasing colour saturation is not needed. If anything the G3 always had very strong saturation, almost to the point of cartoon colours in Vivid mode.
When testing I also took a video with the G2p and I will say this: The G3 has the potential to output GREAT footage but it leans too much toward the yellow channel, oversaturating the greens a bit too much.
I did some work on Photoshop comparing the G3 footage to the G2p and I found that if you increase the Magenta channel by 10% in the midtones and increase the blue channel by 5% in the shadows and increase the Curves mid point by 15% the look improves greatly.
Have a look at the following screen shots.
One is the G2p footage with your modded FW (colourful mode, contrast high, sharpness high, EV -1/3).

Ths is G3 straight from camera with your test FW (Normal colours, contrast high, sharpness high, EV -1/3)

The third is modded in PS with my suggested adjustments.

Hello @user777
Thanks again for your detailed feedback!
Current sharpening settings for Normal are near the edge, where sharpening artifacts becomes too obvious. especially in motion, and I would prefer to leave it as is for now. But we can adjust Strong sharpening settings, to make it even stronger, if you think it is too low, also it would be possible to adjust curve for high contrast for your taste (current test mod has only curve for Normal contrast changed).
Looks like, sensor in Git3 (IMX117) tends to produce yellowish image (same as Git2P MN34120 has too much of pink/magenta), although it is partially fixed with color correction settings, but I agree, that green and yellow are oversaturated in some conditions, especially in bright light. I will try to reduce it a bit. Not sure if it would be possible to apply other color changes you have suggested (+10% Magenta in midtones, +5% Blue in shadows), as there is no means for such fine grain control of color - single curve is used for all color channels, Color Correction Matrix is applied globally, 3D LUT has quite low resolution (9x9x9) etc.
But let's start with gamma curve adjustment. Could you please make some test videos with Normal contrast (we will use it as base for High and Low Contrast) and EV 0 in different conditions and adjust curve in Photoshop for good contrast and share this curve screenshot (and point coordinates), so I can apply it to gamma curve for High contrast.
user777
Member
- Joined
- Jan 29, 2019
- Messages
- 44
- Reaction score
- 6
- Location
- Finland
- Country
- Finland
- Dash Cam
- GitUp Git2P
@hc_1982 before anything I want to thank you again for your responses and efforts. I am simply amazed that anyone would put so much work on any product voluntarily. GitUp are lucky to have you on their team!
So, I think we should recap here.
1. Leave Normal sharpening as it is.
2. Increase Strong sharpening (suggest 50%-60%)
3. Bring down the yellow cast overall towards more neutral settings / control the yellow and green oversaturation.
4. Gamma curve adjustment. I will do the test videos but I think it is important to note that previously I was talking about increasing the mid point of the curve due to the fact that I had to use -1/3 EV to control the overexposure. (The camera is too happy to blow out the highlights) I think with EV 0 it will blow the highlights so any adjustments to the curve might be pointless then. In any case I'll do the tests and report back.
@user777 , I'm not affiliated with gitup in any way. It just started with git2p, and I was not happy with video it produced, so at some point I have tried to mod its firmware. FW of Git3 seems to be quite close to Git2p while sensor is much better, so it was easy for me to continue my experiments with it.
Yes, sharpening for Strong will be increased.
Regarding overexposure, please note, that Center-weighted metering is used by default, and you have quite dark trees in center of the frame, and bright sky at the top, which have low weight for AE algo. Probably, better results could be obtained with Average metering (center still has highest weight, with some additional weight for corners), or just a bit different framing to avoid highlights blowing away for now, as we need them for gamma curve adjustment. Also, I can try to adjust settings for AE a bit more, to reduce luminance target for bright light environment, so it will be similar to EV -1/3, but in automatic mode.
For custom White Balance, make sure WB mode "Custom" is selected, otherwise, manual settings from WB Custom has no effect.
user777
Member
- Joined
- Jan 29, 2019
- Messages
- 44
- Reaction score
- 6
- Location
- Finland
- Country
- Finland
- Dash Cam
- GitUp Git2P
HC, I know you are not affiliated with the company. When I mentioned they are lucky to have you I meant that they should be happy that a customer with so much techincal knowledge is improving their products. 
Ok, so now back to the tests. 4 vids.
All settings standard. Normal colours, normal sharpening, middle contrast, EV 0. 1080p 30fps. Using your latest modded FW.
The first two videos are with center weight metering and the other two are with average metering.

 drive.google.com

 drive.google.com

 drive.google.com

 drive.google.com
Just as I suspected, the camera overexposed by a fair amount in all cases. If anything, using the average metering made things worse regarding the blown highlights.
In the first and third video the sky is blown on the right side of the video and in the second and fourth video the white doors/wooden planks on the houses are again blown. Basically anything white illuminated by the sun is gone. Keep in mind that the videos were shot in mild afternoon light, so this behaviour will be worse midday.
As such, I don't know how much to tweak the curves in PS because the information in the blown highlights is lost.
My suggestion for the moment is this: adjust only the mid point of the curves as follows:
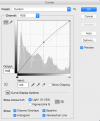
As you can see, the curves shape is a very gentle ellipse. I don't know the curve shape you have now, but whatever it might be, you can add the above to the mix.
This gives a nice luminance boost in the mids, lifting the shadows a tad, while (crucially) also keeping the highlights largely intact.
This modded curve together with a -1/3 EV results in the excellent exposure that I posted in the morning.
Also, your suggestion to reduce the luminance target to be similar to -1/3 EV would be a good one but I don't know what effects it would have until I can test it. If it is more difficult than tweaking the curves maybe we can start with that for now?
Finally, tomorrow morning if the lighting conditions are the same as today I can try with normal settings and see if I can provide a overall tweak to the curves.
Ok, so now back to the tests. 4 vids.
All settings standard. Normal colours, normal sharpening, middle contrast, EV 0. 1080p 30fps. Using your latest modded FW.
The first two videos are with center weight metering and the other two are with average metering.
001.MP4
002.MP4
003.MP4
004.MP4
Just as I suspected, the camera overexposed by a fair amount in all cases. If anything, using the average metering made things worse regarding the blown highlights.
In the first and third video the sky is blown on the right side of the video and in the second and fourth video the white doors/wooden planks on the houses are again blown. Basically anything white illuminated by the sun is gone. Keep in mind that the videos were shot in mild afternoon light, so this behaviour will be worse midday.
As such, I don't know how much to tweak the curves in PS because the information in the blown highlights is lost.
My suggestion for the moment is this: adjust only the mid point of the curves as follows:

As you can see, the curves shape is a very gentle ellipse. I don't know the curve shape you have now, but whatever it might be, you can add the above to the mix.
This gives a nice luminance boost in the mids, lifting the shadows a tad, while (crucially) also keeping the highlights largely intact.
This modded curve together with a -1/3 EV results in the excellent exposure that I posted in the morning.
Also, your suggestion to reduce the luminance target to be similar to -1/3 EV would be a good one but I don't know what effects it would have until I can test it. If it is more difficult than tweaking the curves maybe we can start with that for now?
Finally, tomorrow morning if the lighting conditions are the same as today I can try with normal settings and see if I can provide a overall tweak to the curves.
Hey @user777 ,
I have reduced saturation for green, increased by 50% sharpness for Strong, applied some changes to reduce yellow cast and tried to adjust AE to make luminance target lower in bright light. Cannot test it myself at the moment, as it is night here. But I'm afraid it could be too much and may result in underexposed image at midday. Please test it when you have chance, and let me know. Gamma curve for high contrast has not been updated yet, as I don't like the current one, and it would be better totally replace it with something more standard.
 drive.google.com
I have reduced saturation for green, increased by 50% sharpness for Strong, applied some changes to reduce yellow cast and tried to adjust AE to make luminance target lower in bright light. Cannot test it myself at the moment, as it is night here. But I'm afraid it could be too much and may result in underexposed image at midday. Please test it when you have chance, and let me know. Gamma curve for high contrast has not been updated yet, as I don't like the current one, and it would be better totally replace it with something more standard.
GIT3FW.mod.test2.zip
 drive.google.com
user777
Member
- Joined
- Jan 29, 2019
- Messages
- 44
- Reaction score
- 6
- Location
- Finland
- Country
- Finland
- Dash Cam
- GitUp Git2P
Hi there @hc_1982 I did some quick test now in the afternoon. I took a small video with your latest official mod FW and then two more with this new test FW. Colorful mode, strong sharpness, EV 0, mid & high contrast.
To be honest I was puzzled by the results to the point that I think I did something wrong.
First of all I didn't see ANY change in sharpening, and secondly the test FW was blowing the highlights even more than the normal modded FW.
Considering that you made all these adjustments it was not what I expected to see. The only meaningful difference I saw was more saturated colours with the new FW. I am puzzled by this. Could you do some testing also?
I will redo the tests tomorrow if the weather is up for it and I will report back.
Hello @user777
Probably, some mistake from my side or maybe, I have sent wrong file. Anyway, no significant improvements were with that changes according to my tests. So, I have done some other adjustments and tweaks for curves. I will test it tomorrow and send you new version of mod if it is ok.
Probably, some mistake from my side or maybe, I have sent wrong file. Anyway, no significant improvements were with that changes according to my tests. So, I have done some other adjustments and tweaks for curves. I will test it tomorrow and send you new version of mod if it is ok.
Hi @user777
Please test Normal/High contrast and Sharpness updates:
 drive.google.com
Also, effect Sepia could be enabled to add more contrast.
Please test Normal/High contrast and Sharpness updates:
GIT3FW.mod.test4.zip
 drive.google.com
user777
Member
- Joined
- Jan 29, 2019
- Messages
- 44
- Reaction score
- 6
- Location
- Finland
- Country
- Finland
- Dash Cam
- GitUp Git2P
Dobroho ranku @hc_1982!
I just came back from my morning tests on your new FW. All I can say is that you are most definitely onto something amazing here mate!
Ok, so let me take it from the top.
All the videos I took were within 20 minutes so no significant change in lighting conditions (sunny and bright).
First I took a video with the original GitUp FW, all settings normal.
Then I took 2 videos with your latest official FW: Colorful mode, Sharpness strong, EV 0, Contrast mid & Contrast high.
Following that I loaded the test FW and tried with the same settings as above.
1. Sharpness is increased A LOT. I would still love to have the previous strong sharpness to become the new normal, as I think now that the gap between the normal sharpness and the new strong might be a bit too big. However, even like this it is a great step in the right direction.
Normal Modded FW
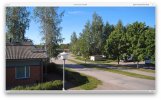
Test FW
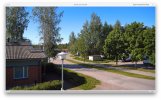
2. Contrast has also increased significantly. I would say that medium contrast now is the high contrast from your normal FW, and the new high contrast is maybe a bit too much. However, the new high contrast seems to keep highlights from blowing quite a bit better.
Test FW Contrast Medium
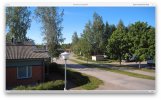
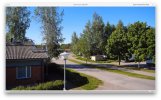
Test FW Contrast High
It may not be very easy to see in a browser but these screenshots viewed back to back show the meaningful increase in contrast and the better handling of the highlights (notice the streetlamp hood). I still think I would not prefer this high contrast mode compared to EV -1/3 for general highlight retention as the shadows become too dark but it is still something interesting to work on.
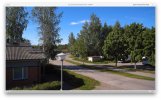
Test FW EV -1/3 (Normal colours, mid sharpness, mid contrast)
Suggestions:
1. I think by tweaking the contrast you have made the curves slightly too steep. The new FW brings up the contrast a bit too much. In the medium contrast the highlights blow up a bit easier than in your official FW. However, the new curves bring a very nice saturation overall which I would love to keep.
Additional update: I just took another batch of videos with the test FW, this time testing the low contrast compared to the medium. As I suspected, the low contrast mode controls the highlights better and keeps them from blowing. Nice!!!
I think we should readjust the contrast/curves slightly so they don't tend to over/underexposure so easily, but on the other hand as I said I do like the warmer tone of the footage. It is possible to tweak the low contrast and high contrast individually? If yes, then keep the medium contrast settings as they are and only tweak the low and high contrast to lift the shadows in order to lighten up the dark areas a bit more. (The high contrast needs a bit more of shadow lifting)
If this is not possible then just leave contrast as it is for now.
2. The new high sharpness is working as it should but it might be a bit too much.
I still think it would be good to make sharpness levels like this:
Strong Sharpness --> Keep strong sharpness from test FW and just decrease it about 10%
Normal Sharpness --> Strong sharpness from Official FW
Low Sharpness --> Normal Sharpness from Official FW
For those who would like to have even lower sharpness maybe you can adjust the B/W mode to provide that? That mode is already very neutral/cinematic as it is.
3. The greens/yellows are unaffected in their saturation but I think we can keep them as they are for now.
Is it possible to tweak one of the other colour modes for less green/yellow specifically? The sepia mode in the test FW is disappointing BTW. The curves are extreme on this one. I'd say let's take it back to what it was on your latest modded FW.
Conclusion:
The new test FW has essentially made the previous Modded FW high settings the new mediums.
Eg:
- Test FW Normal colours --> Mod FW Colorful
- Test FW Mid Contrast --> Mod FW (Almost) High Contrast
- Test FW Mid Sharpness --> Mod FW (Almost) High Sharpness
I like it very very much and I think it is definitely a step in the right direction towards making this camera a true giant slayer!
And just as a reminder, let's remember how the original GitUp FW footage looks, compared to your latest tweaks. The difference is MASSIVE!
Stock GitUp FW
From this...
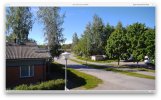
To this...
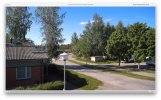
and even to this!
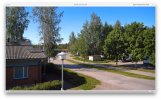
I just came back from my morning tests on your new FW. All I can say is that you are most definitely onto something amazing here mate!
Ok, so let me take it from the top.
All the videos I took were within 20 minutes so no significant change in lighting conditions (sunny and bright).
First I took a video with the original GitUp FW, all settings normal.
Then I took 2 videos with your latest official FW: Colorful mode, Sharpness strong, EV 0, Contrast mid & Contrast high.
Following that I loaded the test FW and tried with the same settings as above.
1. Sharpness is increased A LOT. I would still love to have the previous strong sharpness to become the new normal, as I think now that the gap between the normal sharpness and the new strong might be a bit too big. However, even like this it is a great step in the right direction.
Normal Modded FW

Test FW

2. Contrast has also increased significantly. I would say that medium contrast now is the high contrast from your normal FW, and the new high contrast is maybe a bit too much. However, the new high contrast seems to keep highlights from blowing quite a bit better.
Test FW Contrast Medium

Test FW Contrast High

It may not be very easy to see in a browser but these screenshots viewed back to back show the meaningful increase in contrast and the better handling of the highlights (notice the streetlamp hood). I still think I would not prefer this high contrast mode compared to EV -1/3 for general highlight retention as the shadows become too dark but it is still something interesting to work on.
Test FW EV -1/3 (Normal colours, mid sharpness, mid contrast)

Suggestions:
1. I think by tweaking the contrast you have made the curves slightly too steep. The new FW brings up the contrast a bit too much. In the medium contrast the highlights blow up a bit easier than in your official FW. However, the new curves bring a very nice saturation overall which I would love to keep.
Additional update: I just took another batch of videos with the test FW, this time testing the low contrast compared to the medium. As I suspected, the low contrast mode controls the highlights better and keeps them from blowing. Nice!!!
I think we should readjust the contrast/curves slightly so they don't tend to over/underexposure so easily, but on the other hand as I said I do like the warmer tone of the footage. It is possible to tweak the low contrast and high contrast individually? If yes, then keep the medium contrast settings as they are and only tweak the low and high contrast to lift the shadows in order to lighten up the dark areas a bit more. (The high contrast needs a bit more of shadow lifting)
If this is not possible then just leave contrast as it is for now.
2. The new high sharpness is working as it should but it might be a bit too much.
I still think it would be good to make sharpness levels like this:
Strong Sharpness --> Keep strong sharpness from test FW and just decrease it about 10%
Normal Sharpness --> Strong sharpness from Official FW
Low Sharpness --> Normal Sharpness from Official FW
For those who would like to have even lower sharpness maybe you can adjust the B/W mode to provide that? That mode is already very neutral/cinematic as it is.
3. The greens/yellows are unaffected in their saturation but I think we can keep them as they are for now.
Is it possible to tweak one of the other colour modes for less green/yellow specifically? The sepia mode in the test FW is disappointing BTW. The curves are extreme on this one. I'd say let's take it back to what it was on your latest modded FW.
Conclusion:
The new test FW has essentially made the previous Modded FW high settings the new mediums.
Eg:
- Test FW Normal colours --> Mod FW Colorful
- Test FW Mid Contrast --> Mod FW (Almost) High Contrast
- Test FW Mid Sharpness --> Mod FW (Almost) High Sharpness
I like it very very much and I think it is definitely a step in the right direction towards making this camera a true giant slayer!
And just as a reminder, let's remember how the original GitUp FW footage looks, compared to your latest tweaks. The difference is MASSIVE!
Stock GitUp FW
From this...

To this...

and even to this!

Hi @user777!
Thanks again for your such detailed review and tests!
First of all, let me start with brief description of how image processed and AE algorithm works in chip used in this camera (please note, that is result of reverse engineering of firmware and experimenting with it, so that's only how I see it, and it could be absolutely wrong).
Raw image is obtained from sensor and some basic processing: defect pixels are replaced with neighbors' values interpolated, cropping and scaling done, noise reduction filter applied, debayering performed etc. At some point, in the middle of the processing, image has to be gamma-corrected, as old displays expected it in such form, and newer one just behave in the same way. At first glance, it seems to be trivial - just apply power function with 1/2.2, as display will reverse it with power function with 2.2, and should get the same data we have before gamma correction has been done. But in reality, different powers are used (1.8, 2.0, 2.4 etc), several standards exist (sRGB, rec.709 etc), and different formulas are used. So, curve could be built using that formula, and this curve is applied to RGB data, to each channel separately (or put it differently, non-linear digital gain/amplification is applied according to this curve). Internally this curve, or gamma, is stored as lut (or array) of 128 numbers. As input data has 10-bit resolution (range 0-1023), only 1/8 of points are in this lut, all missing points are interpolated. So, it is not very precise, but good enough to describe general form of curve. When all this processing is done and RGB data converted to YUV, luminance of image is calculated somehow, and this value is used by AE, which compares obtained luminance with target value and adjusts exposure and gain accordingly, also it has some additional parameters to adjust target based on current amount of light, overexposure detected etc. But the main point here is that gamma in this camera has influence on exposure, as absolutely same scene will have different luminance calculated with different gamma, and AE will work differently, so the scene will not be the same anymore This is one of the trickiest things, in my opinion with this chip and it is very confusing. So, gamma could not be tweaked in the same way as in Photoshop, where e.g., shadows could be pushed down, and highlights up to increase contrast, here it may cause opposite result, as pushing shadows down can make luminance value too low, so AE adds more gain, which would lead to overexposure, and shadows go right into different segment of gamma for highlights, as result, overexposed image with low contrast and milky look and vice verse.
Now, let me explain what has been changed in last released mod and latest test mods. As you have noticed, difference in gamma, settings for AE, color and sharpness settings. Chip provides following functions to adjust color: Color Correction Matrix (CCM), Color Control (something similar to HSL, where Hue and Saturation could be adjusted globally, or across 24 sectors individually), and 3D Color Correction (3D lut with 9x9x9 dimensions, and is usually unused, as I can see in firmwares of this one and similar cameras). Coefficients used in CCM in original firmware are quite high, which results in strong colors and oversaturated image, instead of correcting sensor colors, and distort colors even more, or even clip data in some extreme cases. So, I have disabled it last mods for Git3 and Git2p, and emulated it with 3D LUT. Unfortunately, its resolution is too low, due to this fact and some additional restrictions I have applied during LUT calculation, produced colors were too weak, that is the reason, colorful or vivid effects were required to boost saturation. In latest test mods combined approach is used - CCM with lowest coefficients which are enough to get colors more or less correct and 3D LUT to selectively add saturation mostly in mid tones. As for me, it seems to be acceptable now, but LUT could be improved still.
Settings for sharpness actually are higher now in test mods, but thresholds and some other settings have been changed to make edge detection less sensitive and avoid sharpening of every single pixel with a bit different color. Latest test mod has Normal setting equal to Strong one from previous test mod (Normal from stock firmware), and Strong similar to Strong from stock (it could be reduced), and Soft disables sharpening in the same way, as in other mods. It is useful in some cases during experiments and in low light. I guess, disabling sharpening could be possible with B/W effect, but current purpose of this effect (same as Sepia) in mod, is to adjust video levels for players (VLC, most of players on Windows 7 etc) which treat it as Limited Range instead of Full Range, and clip partially shadows/highlights and show image with excessive contrast, while players which treat Limited Range as Full Range, will show it as low contrast and unsaturated.
Normal curve in latest test mod has only one change in highlights segment, which has been pushed down a bit to prevent soft clipping you have noticed previously on white objects in direct sunlight, and only top 20% of curve has been changed. Contrast increase mentioned with this test mod, is caused, probably, with some changes of AE settings, which are responsible for adjusting luminance target when overexposure is detected, and basically, just reduce exposure a bit in such case. Curve for High contrast now has midtone lifting applied you have suggested. As for me, its form looks too aggressive, but I must admit, it helps with overexposure in bright light, although I guess, it would cause more noise with high iso in low light due too high gain. But let's discuss curves in details a bit latter, as I need to render them as images.
Thanks again for your such detailed review and tests!
First of all, let me start with brief description of how image processed and AE algorithm works in chip used in this camera (please note, that is result of reverse engineering of firmware and experimenting with it, so that's only how I see it, and it could be absolutely wrong).
Raw image is obtained from sensor and some basic processing: defect pixels are replaced with neighbors' values interpolated, cropping and scaling done, noise reduction filter applied, debayering performed etc. At some point, in the middle of the processing, image has to be gamma-corrected, as old displays expected it in such form, and newer one just behave in the same way. At first glance, it seems to be trivial - just apply power function with 1/2.2, as display will reverse it with power function with 2.2, and should get the same data we have before gamma correction has been done. But in reality, different powers are used (1.8, 2.0, 2.4 etc), several standards exist (sRGB, rec.709 etc), and different formulas are used. So, curve could be built using that formula, and this curve is applied to RGB data, to each channel separately (or put it differently, non-linear digital gain/amplification is applied according to this curve). Internally this curve, or gamma, is stored as lut (or array) of 128 numbers. As input data has 10-bit resolution (range 0-1023), only 1/8 of points are in this lut, all missing points are interpolated. So, it is not very precise, but good enough to describe general form of curve. When all this processing is done and RGB data converted to YUV, luminance of image is calculated somehow, and this value is used by AE, which compares obtained luminance with target value and adjusts exposure and gain accordingly, also it has some additional parameters to adjust target based on current amount of light, overexposure detected etc. But the main point here is that gamma in this camera has influence on exposure, as absolutely same scene will have different luminance calculated with different gamma, and AE will work differently, so the scene will not be the same anymore
Now, let me explain what has been changed in last released mod and latest test mods. As you have noticed, difference in gamma, settings for AE, color and sharpness settings. Chip provides following functions to adjust color: Color Correction Matrix (CCM), Color Control (something similar to HSL, where Hue and Saturation could be adjusted globally, or across 24 sectors individually), and 3D Color Correction (3D lut with 9x9x9 dimensions, and is usually unused, as I can see in firmwares of this one and similar cameras). Coefficients used in CCM in original firmware are quite high, which results in strong colors and oversaturated image, instead of correcting sensor colors, and distort colors even more, or even clip data in some extreme cases. So, I have disabled it last mods for Git3 and Git2p, and emulated it with 3D LUT. Unfortunately, its resolution is too low, due to this fact and some additional restrictions I have applied during LUT calculation, produced colors were too weak, that is the reason, colorful or vivid effects were required to boost saturation. In latest test mods combined approach is used - CCM with lowest coefficients which are enough to get colors more or less correct and 3D LUT to selectively add saturation mostly in mid tones. As for me, it seems to be acceptable now, but LUT could be improved still.
Settings for sharpness actually are higher now in test mods, but thresholds and some other settings have been changed to make edge detection less sensitive and avoid sharpening of every single pixel with a bit different color. Latest test mod has Normal setting equal to Strong one from previous test mod (Normal from stock firmware), and Strong similar to Strong from stock (it could be reduced), and Soft disables sharpening in the same way, as in other mods. It is useful in some cases during experiments and in low light. I guess, disabling sharpening could be possible with B/W effect, but current purpose of this effect (same as Sepia) in mod, is to adjust video levels for players (VLC, most of players on Windows 7 etc) which treat it as Limited Range instead of Full Range, and clip partially shadows/highlights and show image with excessive contrast, while players which treat Limited Range as Full Range, will show it as low contrast and unsaturated.
Normal curve in latest test mod has only one change in highlights segment, which has been pushed down a bit to prevent soft clipping you have noticed previously on white objects in direct sunlight, and only top 20% of curve has been changed. Contrast increase mentioned with this test mod, is caused, probably, with some changes of AE settings, which are responsible for adjusting luminance target when overexposure is detected, and basically, just reduce exposure a bit in such case. Curve for High contrast now has midtone lifting applied you have suggested. As for me, its form looks too aggressive, but I must admit, it helps with overexposure in bright light, although I guess, it would cause more noise with high iso in low light due too high gain. But let's discuss curves in details a bit latter, as I need to render them as images.
Hello @user777
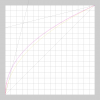
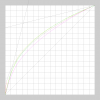
These are curves as defined for sRGB (magenta) and rec709 (yellow):
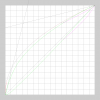
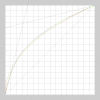
Please note, that there is another grey curve, which is generated from power function with 1/2.2 and sRGB is quite close to it with main difference in shadows. Also, there is line which has equation y=4x and rec.709 curve goes very close to it. During my first tests with gamma curves, I have noticed, that angle of curve in shadows section has strong influence on image contrast and noise/banding level, and according to my experiments, it would be better not to cross this line, or at least, difference between each point of curve should not be more than 4. Actually, it makes sense, as we have 10-bit data input, and it will be converted to 8-bit in the end. Looks like developers of rec.709 had similar reasons to define their gamma in such form. Both these curves produce very low contrast image and are not very usable in such original form, but it could be used as base. Current gamma from latest test mod (test4), is based on rec.709 curve with pulled down shadows and highlights (magenta), while previous test mod had the same levels for shadows, but lifted a bit highlights (green):
As you can see, old curve is the same and it covers new one up to highlights segment. There are 2 another curves near diagonal line on the chart, and they show final curve, when gamma correction (power 2.2) is reversed on display.
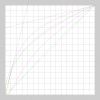
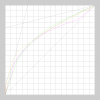
Some custom curve has been used for High contrast in test mod (test2), and I have lifted midtones according to your suggestion (test4):
Probably, it lifts too much, and we can try something between old and new curves.
Low contrast curve currently used in test mod seems to be similar to curve for Normal contrast from last mod release. I liked image it produced, but contrast seems to be a bit too low so it was moved to Low contrast.
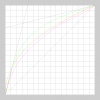
Let's examine curves for Low (yellow), Normal(magenta) and High(green) contrast used in latest mods and stock firmware:
I guess, it should be easier now to decide how exactly curves should be modified to achieve desired contrast etc. Another thing which should be considered, is that target luminance is calculated based on gamma curve. Actually that is the point which lies on curve near its center (47% from the left side of image).

