NARider
Member
- Joined
- Jul 12, 2020
- Messages
- 40
- Reaction score
- 32
- Location
- Alabama
- Country
- United States
- Dash Cam
- Current: SG9667DC2K Previous: SG9663DCPRO
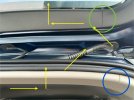
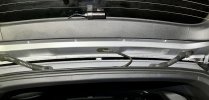
After running the SG9663DCPRO without problems for 3 years in our 2016 CR-V we decided to trade in the car and buy a new 2024 CR-V Hybrid Sport Touring. I left the old cam in place for the next owner and bought a SG9667DC2K for the 2024. Installation was similar to what I documented earlier but this time the front camera went on the right side of the center HondaSense camera cluster, the GPS is mounted in the upper right corner of the windshield, the cables went down the A pillar on the passenger side behind the airbag, the hardwire power cable went behind the structures under the dash across to the fusebox, and the cable to the rear cam travelled down the passenger side of the vehicle. To get the rear cam cable through the rubber wiring tube that goes between the car body and the tailgate frame I taped it to a very long cable/zip tie and sprayed some CRC 2-26 Multi-Purpose Spray Lubricant (which is plastic- safe and non-conducting) into the wiring tube. The lube made it much easier to pull the cable through. These are the fuses I used with the SG hardwire kit Add-A-Fuses (the CR-V requires the Mini Low Profile fuse version):
Battery: Fuse 21, Cargo Accessory Socket (always on), 20A
Accessory: Fuse 46, [energized but empty], switches on/off when car is turned on/off
Note that different fuses in the fusebox have the hot contact on different sides of the fuse, identified with a testing probe. Fuse 21 and Fuse 46 had the hot contact on opposite sides, so the two Add-A-Fuses were installed in opposite directions. The outside contact (farthest from the wire) of the Add-A-Fuse was installed on the 'hot' side of each fuse location. This allows power to run through the dash cam fuse as well as the original fuse that is installed in the Add-A-Fuse. If you don't install it correctly the power will bypass the fuse, which would result in not having a fuse in the circuit.