Magnetic CPL lens filter for Street Guardian SG9665GC

niko

Well-Known Member
Retailer
Joined
May 1, 2013
Messages
10,668
Reaction score
6,561
Location
Dublin
Country
Ireland
Dash Cam
Street Guardian UK / EU / EEA Distributor
For few month ( almost from day one I got SG9665GC ) I wanted to make a CPL lens filter for it, I have tried few stock CPL lens filters ( from Mini 0806, mobile phones CPL lens filters etc ) but I have faced few challenges due to limited space that can be used for this project.
I was not able to use CPL filter from mobile phones or the one from Mini 0806 directly even if just sticking with thin double sided tape to the base of dashcam camera, - they caused vignetting. And the second challenge - I was not able to adjust the vertical angle of the lens, due to CPL was "hitting" car windscreen due to CPL lens filter 3-4mm metal frame.

My goal was to make CPL lens filter ultra-slim, just wide enough to barely cover lens FOV area without going too much outside of the lens body and at the same time be able to rotate, and also be able to remove when needed.

I know this might not be a perfect project or acceptable for mass-production and not suitable for everyone's needs, but at least I have achieved all my goals and it works for me.

So this is the best I was able "to create" with materials I had in my hand. It's just a quick raw DIY I have made "on the go". The next one would look slightly better.

This is just to give an idea for those who also want to try something similar, or it might give other ideas to go from here further.


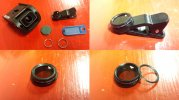
I have used
- a mobile phone clip-on CPL lens filter
- key-ring
- neodymium magnets
- thin 3M double sided tape
- permanent marker
c1.jpg

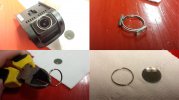
Yellow triangle on CPL fitler glass is a temporary sticker just to know which side is front, while working on the project.
c2.jpg


c3.jpg

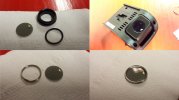
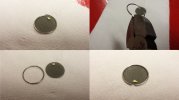
Key-ring need to be cut and slightly squeezed the way it creates a spring-tension over the CPL lens glass edge. You may use a thin layer of nail polisher or glue between key-ring and glass. I did not use glue yet, key-chain ring spring-tension worked fine for now.
c4.jpg

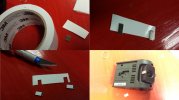
Using thin 3M double-sided tape to attach neodymium magnets to the lens holder body. This is just a temporary solution. For proper job need to glue them with super-glue.
c5.jpg
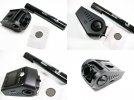
Painted front part of the key-ring with black colour permanent marker, so I can identify which side is front and which is back.
To be honest, within few days of use, marker starting coming off. I was thinking to make some marks on front area of key-ring with mini file.

Also painted shiny neodymium magnets to look more stealthy.
c6.jpg


c7.jpg


c8.jpg
 
Last edited:
What size is the ring? It looks like it fit perfectly.
 
What size is the ring? It looks like it fit perfectly.
I dont remember from my head. I just took bunch of keys with key-rings and started test'n'try.
 
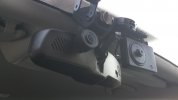
Excellent DIY niko. Going off topic, I'm curious as to the brand / model of this camera attached to your screen...

image.jpg
 
that's an X2 minus the front lens surround and with patented 'HiNiko' stealth paint job
"patented", - I never thought about that yet, but now I will run to the Patent Bureau ;)
 
Last edited by a moderator:
I like this idea, but I think I'd want to cover the whole front of the camera, if possible. Total blackout stealth mode.

That way anyone who looks at the camera form the outside wouldn't have clue what it was, which, as these cameras become more commonplace and more recognized by the public, would be a plus, imo. I'm on board with anything that would make it more stealth.

Sort of like this:
136098445.jpg
 
I dont remember from my head. I just took bunch of keys with key-rings and started test'n'try.

The size of the lens and the ring are nearly perfect. Since you mentioned in the video that the present placement of the magnets is not ideal, have you tried placing them on the sides of the ring, along the front of the camera body?
 
its ultra low plofire :D
 
The size of the lens and the ring are nearly perfect. Since you mentioned in the video that the present placement of the magnets is not ideal, have you tried placing them on the sides of the ring, along the front of the camera body?

Yes, I have tried placing magnets on the sides from ring ( left and right ), but in this case those magnets will leave 10x bigger footprint, because sooner or later black permanent market will come off from magnets and it will be shining. Of course if magnets would be black from factory, then its a different story.

Also I was thinking to disassemble dashcam lens unit and glue magnets from inside, so from outside you would not see them, if you know what I mean ?
 
One interesting fact if you didn't know it already, that is if you install magnets inside camera,
you can shield any magnet unwanted power using mu- metal shield, and you can find it right now in your home probably.
 
Yes, I have tried placing magnets on the sides from ring ( left and right ), but in this case those magnets will leave 10x bigger footprint, because sooner or later black permanent market will come off from magnets and it will be shining. Of course if magnets would be black from factory, then its a different story.

Also I was thinking to disassemble dashcam lens unit and glue magnets from inside, so from outside you would not see them, if you know what I mean ?
I wasn't focusing on the permanent solution as much as a temporary fix for the slightly undersized ring. It looked like the lens might be able to vibrate while driving.

Moving the magnets to the inside would solve many issues. Then you only need to find a black metal ring for the CPL. The size of the filter you found looks to be just right for this camera.

It does not vibrate while driving, even over ramps or on uneven road. Magnets are quite strong to hold it from vibrations, but I do like more idea of having magnets completely hidden inside as I mentioned earlier. To fulfil this idea - need time ,which I dont have much. Maybe someone else will have ?
 
I like this a lot. it makes my DIY CPL on my X1 look that much more terrible. going to copy this idea for sure.
 
I like this a lot. it makes my DIY CPL on my X1 look that much more terrible. going to copy this idea for sure.


I am making a CPL filter DIY for X1 which also can be used on X2 rear camera if needed. Will share it soon.
 
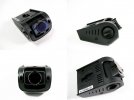
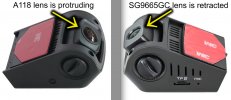
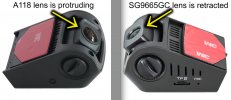
I have the generic, unbranded model of the SG9665GC called the A118 or the B40/A118, depending on where you look, and with the A118 model, the lens protrudes, whereas with the SG9665GC model, the lens is retracted within the lens housing.


Would this method still work with my A118 if I elevated the polarizing filter by sticking the neodymium magnets to the sides of the lens and placing the filter on top? Has anyone successfully found a way to adapt a polarizing filter to my specific model of dash-cam?

I'm going to give it a try and see if I can make it work, but I just wanted to see if anyone else has already tried...
 

Attachments

  • Compare.png.Still001.jpg
    Compare.png.Still001.jpg
    218.6 KB · Views: 107
Last edited by a moderator:
I have the generic, unbranded model of the SG9665GC called the A118 or the B40/A118, depending on where you look, and with the A118 model, the lens protrudes, whereas with the SG9665GC model, the lens is retracted within the lens housing.


Would this method still work with my A118 if I elevated the polarizing filter by sticking the neodymium magnets to the sides of the lens and placing the filter on top? Has anyone successfully found a way to adapt a polarizing filter to my specific model of dash-cam?

I'm going to give it a try and see if I can make it work, but I just wanted to see if anyone else has already tried...

For B40 you need a wider CPL lens, but I am sure it is possible to do some DIY the way CPL filter can be mounted similar way using magnets. You just need to add something to the body of lens housing that would rise CPL lens above camera lens. I can not draw right now, but I hope you can imagine what I am trying to say ?
 
Last edited by a moderator:
I have the generic, unbranded model of the SG9665GC called the A118 or the B40/A118, depending on where you look, and with the A118 model, the lens protrudes, whereas with the SG9665GC model, the lens is retracted within the lens housing.


Would this method still work with my A118 if I elevated the polarizing filter by sticking the neodymium magnets to the sides of the lens and placing the filter on top? Has anyone successfully found a way to adapt a polarizing filter to my specific model of dash-cam?

I'm going to give it a try and see if I can make it work, but I just wanted to see if anyone else has already tried...

Give it a go see if you can make something work but B40 is a superwide FOV.

More about: "generic, unbranded model of the SG9665GC called the A118 or the B40/A118, "

Q: Is the SG9665GC any better than your standard generic B40/A118 device?

A: The SG9665GC might "look" like the B40/A118 from the outside but it's totally different inside. Instead of the weaker Aptina sensor the SG9665GC uses a high end Sony IMX322 CMOS sensor which results in superior night performance. The all glass medium wide lens is also much sharper edge to edge resulting in a crystal clear perfectly focused image. The enhanced metal lens housing keeps the lens from warping in high heat as well. The budget B40/A118 lens is too wide and uses a plastic lens/housing which results in an often times out of focus soft image. The SG9665GC is a premium product that just happens to share the same shell. New PCB, New Upgraded Sensor, New Upgraded Lens, All Metal Lens Housing, updated extreme temp compatible super capacitor + enhanced power supply with a longer cord, 32GB microSD card pre-installed, microSD keychain USB card reader, microFiber bag, spare thicker mount for vertical windows, 3M static sticker for temp rental car installs, and more) Street Guardian is all about quality with over the top customer service and support.

Here is a side by side Night Time video so you can see yourself.
 
Last edited by a moderator:
Back
Top