Triggering xiaomi yi from a digital line (arduino)?

mikilon

New Member
Joined
Aug 16, 2015
Messages
2
Reaction score
0
Country
Israel
Hi
Anyone has an idea how to trigger the yi from a digital line (e.g. arduino, pi)?
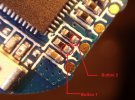
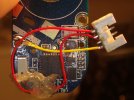
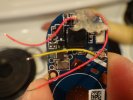
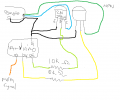
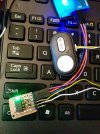
One option is to hack the bluetooth remote, but not sure how accurate the trigger
through the remote to begin with.
Its possible that it could be done through the USB port but again, not sure how.

Thanks
m
 
it is not. You can always hardwire it...
 
not sure about usb.. I think Andy said something about usb and when its connected all control is disabled.. if I remember correct

but that idea would be interesting
Pi or tablet or something
something like qdsldashboard but for xiaomi
 
while I was typing, there is Andy :D
 
Do you think it's possible to trigger it based in the internal clock/time?

Ex. start the time lapse photo mode at 12:15pm.

So if you have two or more cameras with the same time adjustment (made by the mobile app sync clock) the script can make them fire a single photo or time lapse photos syncronized.
 
You can always use my multitrigger, but then again - not without a device capable of running python...

OR you can grab duino with wifi and send them signals by yourself ;)
 
I'm trying to hack the bluetooth remote to be able to trigger mode and shutter from an Arduino.

The bluetooth remote is glued shut and it was quite difficult to open up without completely mangling it. I found locations on the board where I could patch in some wires to trigger the two buttons and used a 4 wire molex connector I found on a broken gimbal controller. Three wires used are button1, button2, and ground.

Now I need to figure out how to hook these up to some transistors and then control from an arduino. I'm hoping to input a PCM signal to the arduino, and use that to trigger the buttons. If the range is low, trigger button 1, if the range is high trigger button 2.

I've attached some pictures of my progress.
 

Attachments

  • back_together.jpg
    back_together.jpg
    121.7 KB · Views: 157
  • button_solder_points.jpg
    button_solder_points.jpg
    180.5 KB · Views: 198
  • connector_soldered.jpg
    connector_soldered.jpg
    167.3 KB · Views: 193
  • wires_soldered.jpg
    wires_soldered.jpg
    129 KB · Views: 190
Man, this is brilliant. Many thanks for sharing.
Could I ask you to post a snap of the diagram of the circuit and maybe specify which transistor you used.
In any case many thanks again.
Miki
 
I used 2N3904 transistors because they were what I found lying around, not because I have any clue what I'm doing.

I've attached a ghetto schematic I drew in paint and the arduino code I wrote.
 

Attachments

  • schematic.png
    schematic.png
    13.9 KB · Views: 212
  • PWMSignalToButtonPress.zip
    1.4 KB · Views: 113
I've now moved my circuit from a breadboard to a perfboard and switched out the arduino nano for an attiny85. I've attached a picture of the result.

Components used:
1 attiny85
1 330 ohm resistor
1 green led
2 bss123 mosfets
 

Attachments

  • attiny85_camera_trigger.jpg
    attiny85_camera_trigger.jpg
    319.6 KB · Views: 158
I've now moved my circuit from a breadboard to a perfboard and switched out the arduino nano for an attiny85. I've attached a picture of the result.

Components used:
1 attiny85
1 330 ohm resistor
1 green led
2 bss123 mosfets

I'm planning on making something like that to trigger a xiaomi yi from the RC controller of my drone. Could you share the program you charged on the attiny85 and a schematic.

Thank you very much and congratulations for this awesome work!
 
Git 2 can trigger by hdmi command. Does Yi have this ability ?
 
@bikemike please, can you explain what to do with the attiny85. I would like to use my yi, for taking photos with my copter...thank you...
 
@bikemike please, can you explain what to do with the attiny85. I would like to use my yi, for taking photos with my copter...thank you...

You don't need to use an attiny85 unless you want it to be smaller. I programmed my attiny85 using my arduino nano (do a search on the net for how to program it). The only change you need to make to the code is which pins to use.
 
Back
Top