LTO (Lithium Titanate Oxide) – The Ultimate Battery for Dash-Cam parking mode (DIY)

I think, a healthy lead-acid car battery can drop to about 10V during cranking.
Unfortunately, checking the YT video, I was unable to find the frame with the maximum current surge and voltage drop on 5S Battery.

Agree that both the 10AWG wires and the XT90 connector are undersized than optimal, but Jump Starter is only for emergency use and after cranking the engine several times in a row, I did not feel any increase in temperature on the wires or the XT90 connector.

I also have an EC5 connector which is rated at 120A vs. 90A for the XT90.
The EC5 connector is used in almost every portable jump starter on the market, but after testing I decided to stick with the XT90.
 
Here is the 6S 20Ah LTO battery working with 45W Ecoflow Solar Panel.
The open circuit voltage of this panel is about 24V and it drops depending on the MPPT voltage setting of the charge controller.
The MPPT voltage setting needs to be prioritized to operate at maximum efficiency when charging from the car/alternator, meaning the MPPT setting must be lower than the car/alternator output voltage at all times, otherwise the efficiency drops quickly and the charger gets very hot.
During the test the sky was mostly cloudy, and we know that a windshield will cut the output of any solar panel in half, however, under these conditions the average solar charging rate was around 10W.

 
Here is the bench test - video description on the 6S LTO battery with jump starter and solar charging functions and how it operates:

EDIT: Efficient 25A Charge Controller Actually Works With Solar Panel ! (see posts # 345 and 347)

 
Last edited:
Wow, awesome setup! That’s getting to be quite the feature packed box! I think the dedicated manufacturers should start getting concerned. The last time I saw someone put this much effort into exploring different options and configurations, they turned it into a full blown production company and it went on to dominate the market. When is your launch date? 😉

Bummer about the heat from the MPPT board. I suspect these will improve in efficiency in a few years…
 
A couple of remaining links just in case anyone needs them:

MPPT Charge controller:
https://www.amazon.com/gp/B0BVRQS5RN

12VDC, 30A, SPDT, 10 sec time delay Relay (used in reverse order, works as a Dual-Source Automatic Transfer Switch, preferred.
https://www.amazon.com/gp/B0744HSF8P
12VDC 30A, DPDT Relay (Works as a dual-source automatic transfer switch)
https://www.amazon.com/gp/B0DK7LLSXN

BTW,
This DPDT relay, assembled as a small standalone module, can be used with Ecoflow or any other power station to switch from car charging to solar charging when parked.
In fact I may build one and test it with River3.
 
Last edited:
Those are awesome relays. I’ve used a pile of them for a power sequencer for my home theater equipment: https://sites.google.com/bucknell.edu/ericshometheater/erics-home-theater/ac-power-filter-sequencer

The coils in those relays tend to generate a bit of heat which can lead to premature failure. I would recommend lowering their voltage by inserting a 10-20ohm resistor in series with the relay coil. This should take the coil voltage down to about 10v or so, still enough to operate, but with lower heat generation. Also, the “mounting side” of the relay has a lip around it that prevents full contact with the surface you mount them to. Some careful sanding/filing will cut down the lip, then you can mount the relay to a metal plate with some thermal paste for better heat dissipation. Haven’t had one fail since I made these two modifications more than a decade ago.

Should be pretty easy to build it into a neat little outboard switch box so it can be used anywhere.
 
Looks a lot more complicated than a DIY dash cam battery.
Ha - There were some interesting construction issues to overcome for sure. The nice woman from Avel Lindburg became a bit concerned when I started asking about modifying their balanced power transformer. She wanted me to return it and select a different voltage transformer. I thought it would just be easier and faster to modify it… The AC surge suppression and filtration were probably the most interesting elements of the design. It’s been running well for about 15 years now.
 
I was drawing up a wiring diagram for a standalone DPDT relay for solar option and it hit me.

The 10 sec time delay relay (TDR) that we use for regular DIY dash cam batteries is actually a 5 pin SPDT relay (single pole double throw).
For regular DIY batteries, we don't use the 5th pin in the middle of relay, which is closed (On) by default.

What if we use this TRD relay in reverse order, using the 5th output pin for the solar input and the second output pin for the car input, and the single input pin as the only positive output for the charge controller, essentially turning the SPDT into a "DPST" (double pole single throw) relay?

So I wired the TDR in reverse order as described and tested it successfully!
It works, including the 10 second delay, for car charging which is better option.

There was essentially no need to buy a DPDT relay :banghead:
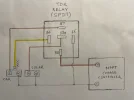
, so I updated my previous post to include a link to the 10 sec TRD relay as a preferred option.
 
Simpler solutions are nearly always better 🙂. I have boxes and boxes of parts that I’ve ordered that have never seen usage in the manner I intended…. On the flip side, I can often build or repair things with parts on hand.
 
Here is a block diagram for an LTO battery (6S, 20Ah, 276Wh) with Solar charging (while parked) and Jump Starter options.
Also a wiring diagram for the SPDT relay.
 

Attachments

  • LTO Battery - Jump Starter.webp
    LTO Battery - Jump Starter.webp
    179.4 KB · Views: 140
  • SPDT Relay.webp
    SPDT Relay.webp
    136.5 KB · Views: 151
LTO batteries are back in stock at BatteryHookup.com - $10 per cell for 16 cells with two cases, @viciouslancer

https://batteryhookup.com/products/36v-lto-toshiba-scib-20-000-cycles-16-cells-1
I saw them there yesterday, but gone again! However, this looks good for you and @GPak experimenting so much https://batteryhookup.com/products/27-6v-40ah-lto-toshiba-scib-20-000-cycles-24x-20ah-cells

I really want to pull the trigger, but trying to find all the other parts is scary (no experience building anything like this) and looking pricey, especially being in Canada 🙁
Parts are definitely considerably more expensive now, and in some cases you'll have no choice but to buy in bulk, more than you actually need.
24 cells would make 4 DIY LTO dash cam batteries, but the price of $8.33 per cell is fantastic!

Most expensive parts like BMS and Charge Controller and maybe a Box, are only available on AliExpress, so being Canadian, you will not need to pay tariffs.
 
Would something like this work for a charge controller? https://www.amazon.com/gp/B081X5YX8V What about the other (cheaper) BMS brands?
No it will not work for 6S or 5S configuration.

You will need this: (preferred)
Or this:

Unfortunately, including the shipping (used to be free) prices have now more than doubled!!!
 
Last edited:
$85 or $65 CAD. That's like almost 1/3 price of a EcoFlow River which is more-or-less plug-n-play fully working (but not LTO)
 
I saw them there yesterday, but gone again!
Damn, they go fast! Your find is a screaming good deal for a pile of the very same LTO batteries! I think I paid $250 for 12 batteries last summer.

A little while ago, AliExpress was showing a separate tariff charge, now it looks like the import tariff is rolled into the shipping fee. Shipping to Canada should be much less than what I’m seeing from the US. Maybe someone here could sell you some “spare/left over” parts 😉. Assembly is pretty straight forward and you have a few great people here that can guide your efforts…
 
Last edited:
The smaller charger is available on ebay with a much more reasonable price. The $8 shipping charge claims to include all applicable taxes and tariffs: https://www.ebay.com/itm/386433757757
Larger charger is here with the same claims: https://www.ebay.com/itm/196300180060

Am I understanding this correctly - the (more expensive) buck/boost converter is suggested to ensure the output (available power) to the BMS is sufficient. The original boost only converter https://dashcamtalk.com/forum/threads/lto-lithium-titanate-oxide-–-the-ultimate-battery-for-dash-cam-parking-mode-diy.50484/post-615648 or buck only https://dashcamtalk.com/forum/threads/lto-lithium-titanate-oxide-–-the-ultimate-battery-for-dash-cam-parking-mode-diy.50484/post-618005 won't work as well, especially if more than 4S.

BatteryHookup also had a 8 cell ($80), I think it was half of the 16 cell that you linked a few days ago, but that one is gone now too.

How fast does your car charge the pack? If I'm only driving 30-45mins twice daily, can it keep up to running 24/7? I have a 2016 Honda Civic, so ~135A alternator output (which of course also needs to power/charge the rest of the car first)
 
Last edited:
Am I understanding this correctly - the (more expensive) buck/boost converter is suggested to ensure the output (available power) to the BMS is sufficient. The original boost only converter https://dashcamtalk.com/forum/threads/lto-lithium-titanate-oxide-–-the-ultimate-battery-for-dash-cam-parking-mode-diy.50484/post-615648 or buck only https://dashcamtalk.com/forum/threads/lto-lithium-titanate-oxide-–-the-ultimate-battery-for-dash-cam-parking-mode-diy.50484/post-618005 won't work as well, especially if more than 4S.
The Boost Charger only works for 7S (7 in series) Battery, with the lower end of the Battery voltage range is always set above the car voltage.
For the original HK4 hard wiring kit to work properly, the upper end of the range should be limited to 18V

The Buck Charger only works for 4S (4 in series) Battery, with the upper end of the voltage range is always lower than the car voltage.
However, I do not recommend the 4S configuration due to the BMS operating at its limit.

The operating voltage range of the 5S and 6S (preferred) configurations may be lower or higher than the car voltage (depending on the charge stage), so a Buck/Boost Charge Controller is required.

The more expensive Buck/Boost Charge Controller is preferred for the following reasons:
-Less heat is generated at higher current settings (you may need this due to your driving/parking durations)
-Does not require a reverse current protection Diode
-Has an adjustable low voltage protection setting to protect the car‘s battery when the ignition is On but the engine is not running (the smaller Charger has this too, but it is in form of a permanently soldered resistor set somewhere below 12V, I think)
-Larger terminals – easier to work with.

The price difference is about $11, and even less if you include the cost of the reverse current protection diode.
 
Back
Top