Dr900x-2CH plus Battery Protection Do Not Work

evelyn427

New Member
Joined
Jul 10, 2022
Messages
1
Reaction score
0
Location
Sydney
Country
Australia
I just had a DR900x-2Ch Plus installed on my brand new car connecting to engine by a professional, after a couple of days not driving, the car gave several warnings because the camera drains the battery. The cut off voltage was set to 12.0v and the cut off time was 12h, apparently that didn't work.
Then I set the cut off voltage to be 12.5v, and the cut off time to be 1 hour to test if it could stop following my setting, and after 2 hours car powered off, it is still recording on time lapse under parking mode, and wifi still connectable.
I've searched this forum, seems I'm not the only one having this issue, someone said it was because of wires, that only 3-wire working, but also said that the wire provided in the box is the correct one...So I really don't know what cause the issue, anyone had any suggestions?
 
Then I set the cut off voltage to be 12.5v, and the cut off time to be 1 hour to test if it could stop following my setting
Good. That was the correct test for you to do.

  1. What vehicle is it?
  2. When you turn off your car do you hear the 900x-plus say "Parking mode on"? (You should hear a female voice).
  3. Did the professional installer use the "hardwiring" cable, or was it the cable with the cigarette lighter plug?
  4. If the professional installer used the hardwiring cable, can you show us a picture of where they connected the YELLOW wire and where they connected the RED wire?
  5. Do you know how to use a multimeter? You might have to do a some troubleshooting with one. (If you don't have one you can buy a cheap one.)
 
Last edited:
Has anyone else found the voltage settings in the DR900Xplus to be somewhat inaccurate?

I ask because I found my camera was shutting down far too soon. The battery has been checked and is sound.
I had 12.5v set in the camera & it shut down, even thought the battery measured 12.6v. I then reduced the camera settings gradually, 12.4, 12.2 and even though I was still measuring 12.4 at the battery the cam was still shutting down.
I'm now set at 12.1v in the cam, and it seems to be remaining on. Still the battery measures in excess of 12.4 (variable).
I setup my DR900X-2CH Plus dash camera on my test bench. I updated the DR900X-2CH Plus to the latest firmware 1.009 (released 08-Aug-2022). I checked the firmware settings. Parking mode is set to time-lapse, battery protection is enabled with a low voltage cutoff value of 12.4 volts for this test which can be changed in 0.1 volt increments. If I recall correctly, there is a +/- 0.1 volt tolerance allowed for this feature.

My test was to allow the DR900X-2CH Plus to operate at the currently selected voltage setting for three minutes and if it remained powered on, I would decrease the DC power supplied voltage by 0.05 of a volt and repeat the three minute wait period.
  • 12.50 volts / 3 minutes / remained powered on
  • 12.45 volts / 3 minutes / remained powered on
  • 12.40 volts / 3 minutes / remained powered on
  • 12.35 volts / 8 seconds / DR900X-2CH Plus powered down
That test result was 0.05 of a volt below the selected value which is within the +/- 0.1 volt allowed tolerance range.

The various computer modules in most modern vehicles, will stay active for some amount of time after the engine is turned off and the occupants exit the vehicle (doors opened/closed). The amount of time depends on the features in the vehicle and the power management strategies used by your vehicle's manufacturer. Many cars will have most/all of their computer modules go into a sleep mode usually within 10 minutes. Some vehicles (Ford for example) have been known to take up to 45 minutes for all of the modules to go into their sleep mode. Active computer modules will draw more power and reduce the battery voltage level until they go into their sleep mode and their power draw is minimized.

When I'm trying to track down a voltage level related issue in my vehicle, I either leave a multimeter or battery voltage monitor connected to monitor the voltage level or I sometimes use a Innova voltage level monitor plugged into a cigarette power which remains powered all of the time. Without opening/closing anything on the car, monitor the reported voltage level on a periodic basis and see when the dash camera powers down.

A 12-volt battery will have a 12.6 voltage level when it's fully charged (2.1 volts per cell X 6 cells = 12.6). When you turn off the engine in your vehicle and the charging system is shutdown, you'll see the voltage level bleed down from the charging voltage (13.5 to 14.5 roughly) down into the mid/low 12 volt range. As the modules go to sleep, you should observe a slight bump up in the voltage level, but when all of the modules go to sleep the voltage level should stabilize based on the current charge level of the battery. A brand new battery will likely be in the 12.5/12.6 range, but as the battery ages you'll likely see 12.2-to-12.4 voltage levels from that battery. I tend to recommend setting the low voltage cutoff setting to no lower than 12.2 volts, but that assumes the low voltage cutoff feature is working correctly (within tolerance).

Late this afternoon, I ran another low voltage cutoff test. This time I extended the time period at each voltage level to at least 10 minutes. I wanted to make sure I hadn't caused the 12.35 voltage I reported wasn't really part of the 12.40 voltage level test. The DR900X-2CH Plus was configured with a 12.40 volt low voltage cutoff value.
  • 12.60 volts / 10 minutes / remained powered on
  • 12.55 volts / 10 minutes / remained powered on
  • 12.50 volts / 10+ minutes / remained powered on
  • 12.45 volts / 10+ minutes / remained powered on
  • 12.40 volts / 10+ minutes / remained powered on
  • 12.35 volts / 24 seconds / DR900X-2CH Plus powered down
 
Last edited:
Very comprehensive!

Thinking about this voltage thing, I am considereing using the PMP I had previously with my 900S, the big advantage being the ability to switch off parking mode (when garaged etc).

I currently have the 900XPlus hardwired.

Question: Is this diagram correct to connect the PMP?

PMP.png
I think it should be.
:unsure:
 
Very comprehensive!

Thinking about this voltage thing, I am considereing using the PMP I had previously with my 900S, the big advantage being the ability to switch off parking mode (when garaged etc).

I currently have the 900XPlus hardwired.

Question: Is this diagram correct to connect the PMP?

View attachment 61323
I think it should be.
:unsure:
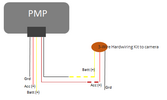
Unfortunately, the PMP does not provide two output (dash camera) power feeds (Batt+ and ACC+) it only provides Batt+ power and a ground for the dash camera. The PMP includes a cigarette lighter/power port adapter which is a two wire only connection. You could use the corresponding cigarette lighter/power port power adapter provided with the DR900X Plus. If you're using the 3-wire hardwire harness for the DR900X Plus you would have to wire both the Batt+(yellow) and ACC+(red) wires to the PMP's dash camera output power wire. This restricts the DR900X Plus to use the motion based entry/exit to/from parking mode.

Here's the wiring info from the PMP user guide. There are only five wires present in the connector that plugs into the PMP. On the input to the PMP there's a Batt+(yellow), ACC+(red) and GND(black) wire. The output from the PMP has a BATT+(red) and GND(black) that connect to the dash camera.

1660238567614.png

The DR900X Plus requires power on both the Batt+(yellow) and ACC+(red) wires (hardwire kit) to power up the dash camera. The cigarette lighter port power adapter provided with the DR900X Plus is taking the one power input and connecting it to both the Batt+ and ACC+ connectors inside of the power port connection on the dash camera. That's why if you use the 3-wire hardwire harness provided with the DR900X Plus to connect to a 2-wire power source (like the PMP), you must connect the dash camera's Batt+ and ACC+ wires to the single power source Batt+ (PMP's output Batt+ red wire) and the GND wire from the DR900X Plus to the GND (PMP output side black wire).

This is a wiring diagram from the PMP user manual.
 
Thanks.
Having already used the PMP I was aware of the cig lighter but I don't wish to use that. I'm not bothered about using motion activation in parking mode either.

Which of the 2 diagrams would be correct? I'm guessing Fig.1.

Clipboard.png
 
Thanks.
Having already used the PMP I was aware of the cig lighter but I don't wish to use that. I'm not bothered about using motion activation in parking mode either.

Which of the 2 diagrams would be correct? I'm guessing Fig.1.

View attachment 61340
Figure 1 would be the way to wire the 3-wire dash camera hardwiring harness to the 2-wire output from the PMP.
 
Thanks. Job for a cooler day ;)
 
Back
Top