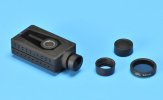
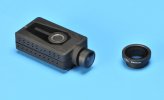
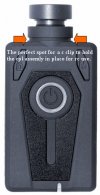
Mobius Maxi F1.5 2.7k

I presume therefore the lens end is Alu?

One suggestion that's just sprung to mind from the plate idea, that could be feasible could be to have a larger cradle with a holder that snaps to the base of the cradle in some way.

I presume the lens barrel is aluminum (or aluminium for those in the UK). I have not tested it with a magnet to verify.

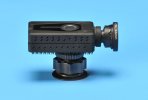
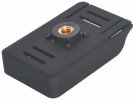
You would not need to make a larger cradle. The existing one is already made to allow this addition. The strap holes could easily accommodate an additional part using a reversed snap in holder as used by the 1/4" thread adapter. As there is room enough for straps to fit inside the case these mounting tabs should also be able to fit with the limited space inside the cradle. Mobius could create a new cradle as you suggest but most people would not notice or care about dust where the 2 parts meet and the tooling costs might be more economical for an addition instead of a complete redesign. Maybe a new cradle design would be needed to allow a press in fit for the cpl adapter similarly designed as was done for the 1/4" thread adapter.


mobius maxi cradle bottom.jpg
 
Beware of vignetting when putting a CPL on such a wide angle lens.
 
Beware of vignetting when putting a CPL on such a wide angle lens.
Yes, vignetting can always be a concern with a CPL. However the Maxi lens B is no wider than an A119 or SG9663.
 
Find SUGRU on the interweb, and use that to make your own mount, or cardmold (moldcard?).
 
Beware of vignetting when putting a CPL on such a wide angle lens.

It shouldn't be an issue with the suggestions here as they involve a mount onto the side of the lens, not the front, and also a 25mm lens which is much wider in width than the lens. The main cause of vignetting is where the ring of the cpl is sufficiently long to intrude into the field of view of the lens. However, where the suggestion involves mounting the bracket / hinged system on the lens tube side or bottom, plate as here, you're not adding any extra length to the lens housing at all, leaving the only possible causes being a CPL mounted too far away from the lens or too small in diameter so as to bring the ring into view in any event, not likely here with 25mm.
 
I'm a fan of the K.I.S.S principle. The more one adds complexity the more one invites problems. For example, the flip-up (or flip-down) concept will require the camera to be far enough away from the windshield glass to allow for it to function and that may make for an undesirable install. Plus it involves unique "parts" and customized fabrication. I'm definitely not a fan of manufacturing some sort of elaborate shroud to cover the camera just to hold a CPL nor do I see a redesign of the Maxi slide-in cradle being practical (or likely to happen anytime soon.)

There's been a long time tradition of DIY projects on DCT and CPL mods for the Mobius have been proposed going back to the early days. Many of them used lens caps often with some Ad hoc material such as the lens from 3D movie glasses or old sunglasses. While it's all well and good to throw out ideas and concepts suggesting that someone else figure out a way to make it happen, the only way to learn if something will actually work is to actually go and do it. That's another reason I like the K.I.S.S. approach.

The 24mm CPL designed for the mini-0906 is widely available on eBay and AliExpress for about $8 or $9 USD. Spare lens caps for the Mobius Maxi are also widely available on Banggood and AliExpress.

Credit for this particular lens cap CPL concept goes to @Harsh who recently did essentially the same thing for a 12mm lens he is using. Here the approach works a little better in a way just because the 24mm CPL rear bezel happens to be almost the exact same diameter as the modified Maxi lens cap and so is a better fit for this lens than Harsh's 12mm telephoto.

So, simply cut the front out of a rubberized plastic Maxi lens cap with a sharp X-Acto (craft) knife. ( I cleaned it up afterwards with a Dremel tool) and glue the CPL onto the "collar" that is created from the lens cap. Done.

I used UV cement which is working for now but it remains to be seen how well it holds to the lens cap material long term.

This method provides an easy to install, adjust and remove CPL for the Maxi that is also very easy to make. K.I.S.S.

Once the CPL is "tuned-in". I will mark the position of the CPL and lens just as I do with the CPL I have installed on my varifocal.

Edit: Oh, BTW, I did a little testing and this CPL method causes zero vignetting.
maxi_cpl_a.jpg

max1_cpl_b2.jpg

maxicpl-c.jpg
 
Last edited:
I have seen cpl's listed for other dashcams and action cams but they typically do not give the size of the cpl filter or the i.d. of the mount that allows measurements to compare what else it could fit..

The problem I see with your version would be limited to dashcam use. Many mobius (any version) are found located behind the rear view mirror or another discrete location that is not easily seen by the driver. Many times when trying to install a cpl the installation would be placed off center a few degrees without an alignment tool being added. That is why the flat piece was added to the top of the mockup. If I understand correctly a cpl being off just 3 degrees loses effectiveness.

EDIT: You could glue on a (mostly) flat bar to your current cpl setip and have what I am talking about.

I'm definitely not a fan of manufacturing some sort of elaborate shroud to cover the camera just to hold a CPL nor do I see a redesign of the Maxi slide-in cradle being practical (or likely to happen anytime soon.) The 24mm CPL designed for the mini-0906 is widely available on eBay and AliExpress for about $8 or $9 USD.

The 24mm CPL rear bezel happens to be almost the exact same diameter as the modified Maxi lens cap. This method provides an easy to install, adjust and remove CPL for the Maxi that is also very easy to make. Once the CPL is "tuned-in". I will mark the position of the CPL and lens just as I do with the CPL I have installed on my varifocal.

View attachment 41840
 
Last edited:
I have seen cpl's listed for other dashcams and action cams but they typically do not give the size of the cpl filter or the i.d. of the mount that allows measurements to compare what else it could fit..

The problem I see with your version would be limited to dashcam use. Many mobius (any version) are found located behind the rear view mirror or another discrete location that is not easily seen by the driver. Many times when trying to install a cpl the installation would be placed off center a few degrees without an alignment tool being added. That is why the flat piece was added to the top of the mockup. If I understand correctly a cpl being off just 3 degrees loses effectiveness.

EDIT: You could glue on a (mostly) flat bar to your current cpl setip and have what I am talking about.

As for purchasing a CPL for an aftermarket DIY purpose the best thing to do is look at the standard specs such as filter diameter and lens thread dimensions.

So, why would my Maxi CPL be limited to dash cam use? I don't see your point. The only challenge to using it for another purpose other than dash cam use would be adjusting it properly for the type of reflections you want to eliminate or effect you want to achieve since you don't have a screen. Personally, I have no interest on using a CPL on an action camera like the Mobius if it is not being used as a dash cam.

As for dash cam use once you adjust and mark the proper setting for the CPL you can accurately return to that setting very easily. If you remove the CPL from the camera and then reinstall it all you would need to do is make sure the adjustment marks are aligned. This can be accomplished with the camera in your hand or installed in its mount. I don't find it to be much of an issue. I've done that periodically with the rotatable CPL I have installed on my varifocal Mobius. @Harsh marked his lens cap CPL and lens with small aligned pieces of tape and his approach appears to make it very easy to accurately set his filter. If the camera is behind the rear view mirror, place the markings on the bottom of the lens so you can see it from below for the moment or so it takes to twist the lens cap into alignment.

As for what you believe to "understand correctly" about how CPLs work, especially with dash cams I would suggest obtaining some actual hands on experience which it sounds like you don't really have much of here. You are starting to sound quite a lot like c4rc4m who hands out advice and "suggestions" for others to pursue that he only has vicarious experiences with.

As for adding a "flat piece" to your, umm, "mock-up" it sounds like you want to create some sort of contraption. K.I.S.S. To be honest I don't really know quite what to make of what you posted. What exactly is sloppily wrapping a camera in a piece a paper supposed to be conveying here? I don't get the idea of presenting a photo like that and then suggesting it as a "design" that could possibly be created, "if anyone wanted to make it happen". If you feel you have a solid concept for a DIY project you should make it actually happen yourself or do an adequate proof of concept and show us how it would work. That's how it's done around here.

As for gluing some sort of flat bar to the CPL I've created here, I have no interest in doing such a thing. I don't see it as a good idea or in any way necessary. It also would complicate a simply workable design. But, please, be my guest and make your own working verison of this CPL and show us how your idea is supposed to function.
 
Last edited:
It is too easy to forget changing your CPL for the upcoming driving conditions, so most people simply make a choice to use or not use, then leave alone from there on. I can visualize several ways to make a movable CPL with positive positioning. One would be a "sliding" CPL holder which doesn't turn. Another would be on an "axle" perpendicular to the lens with a fixed projection to stop it in the correct place when swung in. Both could be close to the windshield and easily operated. But you'd likely forget to reset these too, just the same as using a slip-on CPL. Maybe the best solution is using 2 cams, one with CPL and one without. You get the vids you want no matter the lighting, and you get a back-up camera should one or the other fail in use.

And remember: Where there's a Phil, there's a way :cool:
Phil
 
It is too easy to forget changing your CPL for the upcoming driving conditions, so most people simply make a choice to use or not use, then leave alone from there on. I can visualize several ways to make a movable CPL with positive positioning. One would be a "sliding" CPL holder which doesn't turn. Another would be on an "axle" perpendicular to the lens with a fixed projection to stop it in the correct place when swung in. Both could be close to the windshield and easily operated. But you'd likely forget to reset these too, just the same as using a slip-on CPL. Maybe the best solution is using 2 cams, one with CPL and one without. You get the vids you want no matter the lighting, and you get a back-up camera should one or the other fail in use.

And remember: Where there's a Phil, there's a way:cool:
Phil

A simple method for accomplishing what you are talking about, assuming one wanted to use the lens cap concept or other slip on design would be to put a notch or slot on the back end of the lens cap that would meet up with a stop on the lens bezel. Of course the CPL would have to be adjusted for optimal reflection reduction before determining where to place the stop. For a DIY CPL project like this the stop could be a tiny screw or dab of epoxy.

Really, though from my experience using the 6-22mm varifocal with it's rotatable CPL, it's just no big deal to reach up and adjust the filter to the marks I've placed on the filter bezel and lens bezel after setting it to its optimal position. For the most part I rarely even need to adjust it but when I need to it can be done quite easily and accurately. The only thing that tends to move the filter away from its set adjustment occasionally is removing the DIY lens cap I made to cover the 30mm filter. (I'll post something about DIY lens caps soon.)
 
Last edited:

I agree. I am a great fan in the KISS approach. However, the one failing here is you have to remember to take the CPL off every time it does dusk, plus avoid putting fingerprints or grease on it as you do so.

It is too easy to forget changing your CPL for the upcoming driving conditions, so most people simply make a choice to use or not use, then leave alone from there on. I can visualize several ways to make a movable CPL with positive positioning. One would be a "sliding" CPL holder which doesn't turn.

This also occurred to me Phil, although rather than getting involved with sliding mechanisms, it might simply be easier to have a folding hinged design that's you mount so it hinges to the side. So long as it goes beyond 180 degrees, there shouldn't be any issue provided the hinge is tight enough to stop it hinging itself back. As most hinges are screwed together, it's usually only a matter of keeping the screw tight enough to ensure enough friction to allow it to stay open / shut, but not too much as to make it hard to open / wear excessively. When you think about it, spectacles are exactly like this and a successful design for hundreds of years.

Dashmallow does have a point about distance to the screen, although I think many people's cameras are further away than 30mm. The sliding concept certainly alleviates that issue. What worries me with sliding things, is the fact they slide! It's far too easy for G's in a corner or even cambers and vibration to slide the CPL lens partially back into place and then you have the lens holder partially obscuring the picture. Whereas hinges can move, there the friction of the hinge to stop it.

There's a guy that made sun flippies.... For Mobius 1, maybe it can work for Maxi?

https://dashcamtalk.com/forum/threa...e-shades-anti-glare-filter.17674/#post-229580

Whereas it's great to see people DIY'ing it. It's all a bit horrid- in quality. When we have a 3D printed holder design with the printer instructions to download, it only needs one of us or a manufacturer who can adjust the dimensions to meet our needs, to download it, adjust the print instructions for the printer and then print these out. Potentially, you'll have what you see in that thread, but with a professionally made quality.
 
I agree. I am a great fan in the KISS approach. However, the one failing here is you have to remember to take the CPL off every time it does dusk, plus avoid putting fingerprints or grease on it as you do so.
No, I don't agree that you have to take off the CPL every time it gets dark outside. Yes, if you do that then you might want some kind of mechanism to easily 'flip' the CPL in and out of the way. But I think most people just leave the CPL on all the time. I will be leaving mine on 24/7 until sometime around November when my daily drive to and from work is in darkness.
 
I agree. I am a great fan in the KISS approach. However, the one failing here is you have to remember to take the CPL off every time it does dusk, plus avoid putting fingerprints or grease on it as you do so.

Well, you'd also have to remember to flip down the hinged design just like removing a lens cap and this would be just as easy to forget, no? Recently, you mentioned forgetting to remove the lens cap in the first place, right? (I've done it too. :banghead:)

Dashmallow does have a point about distance to the screen, although I think many people's cameras are further away than 30mm. The sliding concept certainly alleviates that issue. What worries me with sliding things, is the fact they slide! It's far too easy for G's in a corner or even cambers and vibration to slide the CPL lens partially back into place and then you have the lens holder partially obscuring the picture. Whereas hinges can move, there the friction of the hinge to stop it.

The aftermarket lens cap on the DIY CPL above has quite a snug fit. It's definitely not going to shift position or fall off from "Gs" or bumpy roads. This is another one of those examples of reaching a conclusion based on what you may "see" on the internet but don't have actual hands-on experience with. Also, what's to keep the hinged design from flapping around unexpectedly when going over bumps in the road, especially after repeated use and break in? Yet another example of something that would require hands-on experience and testing, no?.

Whereas it's great to see people DIY'ing it. It's all a bit horrid- in quality. When we have a 3D printed holder design with the printer instructions to download, it only needs one of us or a manufacturer who can adjust the dimensions to meet our needs, to download it, adjust the print instructions for the printer and then print these out. Potentially, you'll have what you see in that thread, but with a professionally made quality.

Many of the custom 3D printed items I've seen, especially those involving multiple smaller parts that need assembly are often rather rough and crudely made. Only those made on a very high quality precision printer would really be suitable.

As I've mentioned, I know for a fact that Mobius at one point considered a CPL for the M2 and was shown some results of the efforts, so perhaps they may yet introduce one for the Maxi.

By the way, the quality of my DIY CPL is quite nice actually. It's really the sloppy glue job that is detracting from the appearance, but that can be remedied. Ultimately, we're primarily after functionality here unless one is some sort of compulsive fussbudget who worries that a CPL holder may not look abolutely perfect up there back behind the rearview mirror.
 
Last edited:
@Dashmellow

How far up did you cut the cap? I remember getting major vignetting with the one I made.

Looking at cap again, there's a lip which stops the cap from touching the lens, I'll slice that off and try again.
 
@Dashmellow

How far up did you cut the cap? I remember getting major vignetting with the one I made.

Looking at cap again, there's a lip which stops the cap from touching the lens, I'll slice that off and try again.

It was a rainy day yesterday and I only did some quick testing in my office. I'm going to double check for vignetting again later today and see what results I get after re-reading your initial post about the problem.

I didn't cut the length of the lens cap at all. I took my time and very carefully and slowly ran the craft knife around the periphery of the front edge of the lens cap only removing the front part. Of course even with my best efforts I ended up with some rough edges so I went over it using a little drum sander attachment on a Dremel tool. In doing so, I removed some of that lip around the inside edge of the lens cap and so it pushes farther onto the lens bezel. I think that may be why this appears to be working better. I'll inspect everything with greater scrutiny later today and report back.
 
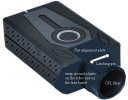
This demonstration model was put together using microsoft digital image suite 2006 that I picked up at a yard sale for $1.
My cpl mounting solution is simple. It is feasible.. It could be placed into production once a mold is made and the proper cpl is sourced.
Take note, this does not block any cooling holes in the mobius maxi case.
Should this include a second plate underneath? Testing would prove if it is needed or not.
I propose adding 2 holes that go through the top alignment plate for a plastic c clip to hold the cpl assembly in place for rc users.
I presume a metal c-clip would damage the cases coating.
This should hold up to the g forces created by most drones as long as the plastic is thick enough.
I would include an internal layer of a softer substance like rubber to protect the lens barrel from wear.

Mobius Maxi proposed cpl filter1.jpg

Where exactly does a (plastic) c clip for use as a latching pin fit? Right between the arrows.
You might think this attachment has been planned for based on the cases design.
Although you could use a c-clip above the maxi's body on the lens itself placing any additional strain on the cases mini screws should be avoided
mobius cpl clip.jpg
Simple, easy to align, and would look very professional once it was installed..
 
No, I don't agree that you have to take off the CPL every time it gets dark outside. Yes, if you do that then you might want some kind of mechanism to easily 'flip' the CPL in and out of the way. But I think most people just leave the CPL on all the time. I will be leaving mine on 24/7 until sometime around November when my daily drive to and from work is in darkness.

From what I've seen of the Maxi, the sensor is better than most high resolution sensors out there in low light. However, it's not as good as the best. In my opinion, the 2 stops of light you lose from leaving the CPL on will probably degrade the quality of the night picture significantly. We'll only know for definite when one or two people get one on and start testing, espcially in sub urban low light and roads with no lighting.

The aftermarket lens cap on the DIY CPL above has quite a snug fit. It's definitely not going to shift position or fall off from "Gs" or bumpy roads. This is another one of those examples of reaching a conclusion based on what you may "see" on the internet but don't have actual hands-on experience with. Also, what's to keep the hinged design from flapping up and down unexpectedly when going over bumps in the road, especially after repeated use and break in? Yet another example of something that would require hands-on experience and testing, no?.

I think you've misread my post. My reference to the CPL potentially shifting was for a sliding bracket design. A lens cap based CPL isn't going to shift and a hinged design probably highly unlikely over all but the severest of bumps (The 3D printed design looks like it might have a catch to hold it closed), open may be a different matter, but most bump acceleration in a car is vertical in nature so a side hinged bracket would be unlikely to experience the same level of force in the direction of opening / closing.
 
Back
Top