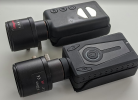
Mobius Varifocal Zoom IR

BTW, @TonyM, I seem to recall someone saying they had success connecting the Maxi to a Windows box for web cam mode using VLC (Open Capture Device). On the Mac I can't get that to work at all because VLC doesn't see the camera even though it sees the built in web cam. Maybe it's worth a try on your Windows computer running VLC though. Or perhaps some other software?
 
Last edited:
BTW, @TonyM, I seem to recall someone saying they had success connecting the Maxi to a Windows box for web cam mode using VLC (Open Capture Device). On the Mac I can't get that to work at all because VLC doesn't see the camera even though it sees the built in web cam. Maybe it's worth a try on your Windows computer running VLC though. Or perhaps some other software?
It's worth a go with VLC or another app, perhaps Amcap. I'll try some options later. If I press the shutter button I can access the Maxi via mSetup.

I have some decent results from a drive earlier today, which I will compare to a drive tonight in different lighting conditions.
 
Last edited:
I have been experimenting with colour-correction when using a varifocal lens without an IR-cut filter. Using a custom WB with the latest Mobius Maxi FW (V2.40), I have followed a similar approach as that demonstrated by @Dashmellow at the start of this thread.

My initial camera settings are: 1080p60, Superfine bitrate, Custom WB(R=64, G=64, B=100)
This configuration was good when I set the WB in overcast conditions at home before driving. Whilst driving, these images have come out a bit too blue. The van in the first image is white.
20200615_114619.MP4_20200615_215747.251.jpg

20200615_120319.MP4_20200615_220054.887.jpg

20200615_124837.MP4_20200615_220344.941.jpg
 
Last edited:
My replacement IR-cut filters arrived today, so that's the end of this little IR experiment for me.
 
I thought the "Mods and Rockers" thing was done for long ago (pic3) :ROFLMAO:

There's nothing in the world that I more like
than a burn-up
with a birdie
on me bike :cool:

Phil
 
My replacement IR-cut filters arrived today, so that's the end of this little IR experiment for me.

Why not hold off a bit with the IR-cut filters and continue with some RGB - White Balance adjustment experimentation? Might be fun and interesting and once you install the IR filters that opportunity will be lost.
Looks like the color balance could be improved with much more aggressive RGB alterations than your initial modest adjustments. As with my IR experiments with the M1 and the 2.8 -12mm varifocal lens you will probably need to alter the RGB values in the multiple three digit range, perhaps something more like the last screen shot I posted of 1 RGB values I used back on the first page of this thread, although your values will be different for this sensor and lens combination.
 
Last edited:
Looks like the color balance could be improved with much more aggressive RGB alterations than your initial modest adjustments. As with my IR experiments with the M1 and the 2.8 -12mm varifocal lens you will probably need to alter the RGB values in the multiple three digit range, perhaps something more like the last screen shot I posted of 1 RGB values I used back on the first page of this thread, although your values will be different for this sensor and lens combination.
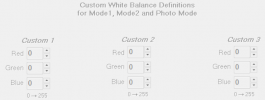
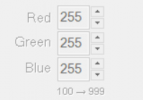
The Maxi has a different Custom WB adjustment range to the M1. The Maxi is 0-255, with default R=64, G=50, R=64. The M1 is 100-999, with default 255.

Maxi
1592346268131.png

Mobius 1
1592346546823.png
 
The Maxi has a different Custom WB adjustment range to the M1. The Maxi is 0-255, with default R=64, G=50, R=64. The M1 is 100-999, with default 255.

Maxi
View attachment 52173

Mobius 1
View attachment 52174

You make a good point about the way the Mobius 1 parses the RGB values, although they do happen to default to the 255 step standard as you noted. As I mentioned in my post on Sunday, I haven't spent much time yet experimenting with the white balance RBG values on the Maxi so I wasn't thinking about the differences between the cameras. Having not made these kinds of RGB adjustments on the Mobius for two years now, I forgot. Sorry for the oversight.

I'm not sure why the Mobius 1 uses 899 RGB (100-999) increments for the values but the fact that the Maxi uses 255 values is actually better and should make things easier to adjust and experiment with because 255 steps is indeed the decimal standard for RGB values used everywhere but on the Mobius 1.

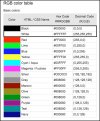
So, as you can see in this standard chart of the hexadecimal (html) and decimal (digital) RGB tables BLACK is 0,0,0 and WHITE is 255,255,255. Everything else falls in between in some combination of these values. The 255 steps are a CLUT (Color Look-Up Table) of 8 bits in three color channels with values of 0–255, otherwise known as 24 bit color.
So, forget what I said earlier about the numbers I used on the M1 and just go with the standard 255 step RGB values on the Maxi.
My basic point was that I think you can dial in much better white balance than you achieved with your first stab at it but it will require more aggressive settings (higher or lower across the range). Once you get somewhere close to pure white or middle grey, if you can get gray to look gray (grey?) in an image with as little color cast as possible, you've won the battle. Find a white or grey object in your image and try to get it as neutral as possible with your RGB adjustments and all the other colors should begin to fall accurately into place. (or at least as much as reasonably possible without an actual IR-cut filter). Note that on the chart below middle grey is 128,128,128 - all three digit values and all basically at the center of the 255 step range. Again. that's what you are striving for. Middle gray in your color corrections.

rgb_values.jpg

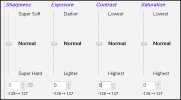
You'll note that the Mobius Maxi uses a 255 step range for all the other adjustments
between min and max and this matches the 255 step RGB standard. 128+127=255

Maxi
settings.jpg

Interestingly, despite the 100-999 RGB steps on the Mobius 1 it uses a similar but slightly different 256 steps
between min and max for the other exposure settings. 128+128=256. (0-256 which is basically a different representation of the same thing)

Mobius 1
mobi1values.jpg
 
Last edited:
Thanks for your explanation and some reminders about how these camera adjustments work.

From my days of testing the Maxi FW, I recall some quirks about how the custom RGB values are set. Initially there were 4 parameters to set: R, Gr, Gb, and B. It was felt that this may be too complicated for most users, so this was simplified to R, G and B. Behind the scenes, the FW applies the G value to both Gr and Gb.

The G value is by default lower than R and B. From memory, although I can't find the detail right now, I think this is because our eyes are more sensitive to green light.

I did a fair amount of testing to reach the custom WB settings used for the video frames above (R=64, G=64, B=100). Since it is possible with the Maxi to set different custom WB values for Video modes 1 and 2, I found that I could shoot the same scene twice with slightly different settings and compare the output. The ability to retain one reference setting and test a variable setting made visual comparisons fairly easy.

When I settled on those values, the ambient lighting was almost uniform dull grey. The white pvc window frames of my house appeared white in the test video. By the time I captured the test dashcam video the lighting had changed - to my eye I would say it was warmer, with more sunlight and less cloud.
 
From my days of testing the Maxi FW, I recall some quirks about how the custom RGB values are set. Initially there were 4 parameters to set: R, Gr, Gb, and B. It was felt that this may be too complicated for most users, so this was simplified to R, G and B. Behind the scenes, the FW applies the G value to both Gr and Gb.

Most consumers who purchase cameras have no idea what RGB even means, much less R, Gr, Gb, and B or the finer points of separate green channels within Bayer filtering in imaging sensors (Gr, Gb). And most people who own a digital camera have heard the term "white balance" but have no understanding about what that even means. Of course, most digital cameras have settings like "auto", daylight, "cloudy, "flash" fluorescent", and "tungsten" and that's enough and it works well for most everyone, even professionals. Even if the user doesn't understand what is happening under the hood they can figure out or at least see what results they get.

The Mobius is unique however in that it is an enthusiast/hobbyist's camera and thus it provides granular RGB control over each color channel. For some of us geeks things like Gr, and Gn green sub color channel separation would be cool to have control over but keeping it simple at RGB makes more sense for most hobbyists who want to mess with such things.

Nevertheless, the fact that you can have granular control to adjust the individual 255 step range of each Red, Green and Blue channel is one of THE things that make the Mobius the amazing, unique camera platform that it is. There is literally no other small consumer camera on the market that can do what the Mobius does. The IR-cut filter free adjusted images seen in this thread are a real testament to that.

It's true what you mentioned about how our eyes are more sensitive to green light. The "R, Gr, Gb, and B" color balance thing is actually about how modern imaging sensors render more accurate color using Bayer filtering to better mimic the physiology of the human eye through the use of those separate Gr and Gb green sub channels.
 
Last edited:
Mobius 1 & Maxi - Custom WB without IR-cut filters

I have a Mobius 1 with the same 2.8-14mm varifocal lens discussed in this thread. I also have a Mobius Maxi with a 6-22mm varifocal lens.
Both lenses are set to around the same zoom (i.e. similar field of view) at approx 8mm or so.
Both lenses do not have an IR-cut filter installed.
I have them installed side-by-side to enable comparative testing.
1592771937938.png 1592772041153.png

On the M1, I used the custom WB settings posted by @Dashmellow HERE (R=210, G=225, B=300)
On the Maxi, I used my own custom WB (R=64, G=64, B=90) that I derived after a series of iterations adjusting each RGB value up/down until I was somewhat happy. Note that the range of values for RGB adjustment is different on the M1 to the Maxi, so they are not comparable at all. Try as I might, I simply cannot get rid of the green tinge on the Maxi video!

Sample images (M1 left, Maxi right):
M1IR01.mp4_20200621_203749.957.jpg MXIR01.mp4_20200621_203746.134.jpg

M1IR01.mp4_20200621_204018.705.jpg MXIR01.mp4_20200621_204012.175.jpg
 
Last edited:
Those look pretty cool Tony! Interesting to see the two cameras compared.

I don't have much time at the moment but I took the liberty of doing a quick down and dirty color correction on your top right hand Maxi screen shot so I can demonstrate a further correction I'd like to suggest on the Maxi RGB settings.

The image is obviously far too CYAN. You'll need to increase RED and decrease GREEN and BLUE. Doing so should give you results closer to the color corrections achieved on the Mobius 1.

Here is your original image.
MXIR01.mp4.jpg

Here is the same image with slightly increased RED and decreased GREEN and BLUE.

Of course, I did this in Photoshop which makes it all much easier. On the Maxi, as mentioned above you'll need to use the BLUE settings along with RED & GREEN to decrease the CYAN tint but I think this may help you with what direction to take from here.

MXIR01.mp4_a.jpg

Think of the three circles of RGB in this standard graphic and imagine slowly, incrementally moving the three circles towards or away from the center of the graphic to alter the different color values.

Notice the intersection of where GREEN and BLUE create CYAN. Moving the GREEN and BLUE away from the center will decrease CYAN and moving the RED towards the center (slightly) will add a touch more MAGENTA. These corrections will make everything more WHITE (more neutral - i.e. white balance). This concept should help guide you when you enter numerical RGB values.

Edit: Oh, as I always like to point out, when you get the corrections right, gray will look gray and white will look white and that is why they call it "White Balance". Note how in this better color corrected version I've posted the pavement looks more properly "gray" as do the traffic light poles and the white lines painted in the road look more accurately white. WHITE at the center of the graphic is the perfect numerical balance of RED - GREEN - BLUE values (white balance). Note that the sky and clouds look more neutral gray as well. (still a bit too RED/MAGENTA though but since it is an IR image there is only so much that can be fixed without optical filtration.)

RGB.jpg
 
Last edited:
I don't have much time at the moment but I took the liberty of doing a quick down and dirty color correction on your top right hand Maxi screen shot so I can demonstrate a further correction I'd like to suggest on the Maxi RGB settings.

The image is obviously far too CYAN. You'll need to increase RED and decrease Green and BLUE. Doing so should give you results closer to the color corrections achieved on the Mobius 1.
Sorry I don't have much time to reply right now. I'm about to go out on an 8 hour round trip to London. I'll say more later about the colour adjustment process I'm using, and consider whether there's a better way to do it.

Many thanks for the pointer for which direction to take the RGB adjustment. I'll try to find some time later this week to fine tune the video.
 
Last edited:
You're welcome!

As evidenced by the corrections I tried here, I think what I said previously in regard to your original stab at the Maxi IR color correction still applies. Within the 255 increments of RGB corrections it still needs steeper corrections than what you first tried. It will be interesting to see what RGB numbers these actually translate to in mSetup compared to just quickly messing around with the values in Photoshop for demonstration purposes.

My basic point was that I think you can dial in much better white balance than you achieved with your first stab at it but it will require more aggressive settings (higher or lower across the range).
 
Last edited:
@Dashmellow what do you aim your camera at when you are working out the RGB values? A colour chart with neutral gray tones?

So far I've been aiming my camera outside at what I think is a good range of tones and colours, including white pvc guttering and window frames.

The Maxi stores up to 3 custom WB settings. Video profiles 1 and 2 are completely independent, so they can have different custom WB.

My adjustment process so far is to set both modes 1 and 2 the same, with just one value (R, G or B) different. Then take a few seconds of video with each one. Playback both of them side by side, and decide which one looks better (neutral). Then repeat the process for R, G and B until I'm done. I do wonder if there's a better way to do this...?

When I was doing the IR color corrections on the M1 I would film any old thing and simply wing it with eyeballed evaluations based on what looked good to me over-all about the color balance of the images. Sometimes, I would just come home and look at road footage from the day and make assessments based upon objects in the footage such as gray pavement, white cars and other random neutral gray colored objects like the aluminum light posts. I've been doing visual color corrections as part of my career for a very long time so it comes as second nature to me. I may talk more about that in another post so I don't obfuscate my answer to your questions here but I first got into doing color corrections a couple of decades ago when I had a lab specializing in high end commercial and fine art custom color printing using the C-41 process and other photochemical processes which employed the CMYK (subtractive) color model, later applying those skills to computer pre-press in the CMYK web offset printing industry (ink).

In any event, I don't recommend the color correction process you are using where you adjust one single RED - GREEN or BLUE channel and compare the results side by side. I mean, you can do that to some degree and it might even be a good place to start but it doesn't really give you the full picture and may skew the results you are after. The reason, as I tried to explain above is that the RGB color space is an additive process and all three colors work in concert to create the full spectrum of colors in an image. That is why I used the concept I described above of moving the three R-G-B color circles towards or away from the white center of the graphical representation of the color space.

So below, here's that RGB chart again. What's important to understand is that if you reduce only one parameter, say BLUE, you are also, simultaneously increasing YELLOW, GREEN and RED (to some degree). Therefore, in the example above where I color corrected your Maxi image, the goal was primarily to reduce CYAN. If I had reduced BLUE only it would not have achieved the desired result and if I didn't have the knowledge and experience I do the result would probably have been confusing to me.

The colors RED-GREEN-BLUE are considered "primary" colors. Combining them produces the "secondary" colors of YELLOW - MAGENTA and CYAN.

So, it is important to pay close attention to those secondary colors and gain an understanding of how they are affected by how much of the primary colors are available to create each of them. It is not a perfect process, especially on the Mobius which is relatively primitive but that's how it works. The fact that we are trying to color correct an INFRA-RED image makes the whole process even more challenging!

Since the Maxi stores three custom RGB color profiles, I think I would leave one at the default as a control, adjust the second one slightly with your best guess regarding what combination of colors should be changed modestly to improve the image and then use the third profile adjusting the same color adjustments, only more extreme than the first adjustment. Then I would compare all three. Always record the settings you used so you can go back and reproduce them in case you really screw the whole thing up but don't be afraid to really push the limits. That's how you can learn what is happening.

I recall with my efforts to adjust the M1 IR colors I made my best guess and then sat with the result for a day. Then I would go back and make another incremental adjustment and see if I got closer to what I was after. One thing I've learned over the years is that your eyes can play subtle tricks on you when you work with color adjustments for long periods. It is a good idea to go away and leave your work alone and come back to it later when you have fresh eyes to see with. You will often be suprised by how different things look. What seemed to be nearly perfect at the time can reveal itself to be way off the next time you see it. Anyway, I always would make a screen shot of the mSetup GUI as a record of the adjustments and I kept a folder of them with the dates of each screen shot to refer to. There were a few blind alleys and doing this with a Mobius can be a tedious, time consuming process of fiddling with subtle adjustments to get it as close as possible to a "normal" color balance with IR but as long as I could revert to what I had done previously I could try different settings until I got what I was after. As a hobby pursuit it can be a fun puzzle to solve.

To review what I said above, look at the RED-GREEN-BLUE in the color space chart below. These are primary colors.
When you blend the adjacent primary colors RED-BLUE - BLUE-GREEN and GREEN-RED you get the secondary colors MAGENTA, CYAN and YELLOW.
The mix of all three primary colors RED-GREEN-BLUE in the proper amounts gives you WHITE (white balance).

Over time, you'll begin to notice in virtually ALL of your videos, IR or normal full color, when you have a problematic off color tint or hue shift in the video image it will almost always be one of the secondary colors that is manifesting, not the primary R-G-B colors alone or separately from each other. Only in a few very rare instances have I seen a primary color shift on dash or action camera video.

RGB.jpg
 
Last edited:
So I think I'm getting closer to a half-decent colour balance. Part of the challenge now is that I have been adjusting the RGB settings at my desk overlooking the garden, viewed through clear glass. My car windscreen however has a slight tint which is apparent in these screenshots.

Unfortunately, Mobius did not add Custom WB to the latest mobile app, so I will have to bring the laptop out to the car if I want to do any further fine tuning. I have not yet decided whether I will do that, or install the IR-cut filter and revert to Auto WB.

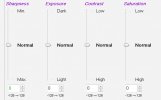
For info, my custom settings are (R=73, G=60, B=95, Sharpness +16, EV=0, Contrast -16, Saturation=0)

20200704_140633.MP4_20200704_145119.228.jpg

These were the 'actual colours', cropped from 4K video recorded by an A129 Pro with a CPL fitted:
20200704_140639_00009F.MP4_20200704_151117.342 (2).jpg
 
Last edited:
Very good images apart from the color (y) I'm sure you'll get it worked out in time but lacking the range of controls of the M1 it may never be as perfect as it could be.

Phil
 
Really interested in this setup you have going on the tripod and separate cam viewer. How are the pictures for dark sky viewing?
 
Back
Top