Review: Dome D201 Ambarella A12 2560x1440p HDR GPS Dashcam (Gearbest.com)

I exchanged my Rove. Waiting for the replacement and then I'll test for audio noise.

Sent from my XT1575 using Tapatalk
 
So you think it was defective? I never did hear that whine. Weird. How did you make out with the "wabble"?
 
I think it was defective. The wobble was fixed by tightening the mount with a lot of force

Sent from my XT1575 using Tapatalk
 
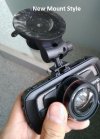
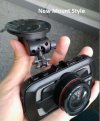
The DAB205 used to have the same mount as the DAB201 but they recently started making them with a different mount style. New style slides in and clicks in place.
 
The DAB205 used to have the same mount as the DAB201 but they recently started making them with a different mount style. New style slides in and clicks in place.
When do you think these new mounts will be on sale? Or if they are already available on market, where can we buy the "new" Dab205?
 
The ones I carry have the new mount style, but there are probably lots of the old style still out there for sale. You'd just have to ask the seller which one they are selling.
 
New Dome DAB205 with custom mount and a CPL.

Purchased a Dome DAB205 with GPS module from Capture Your Action for $119.98 delivered. I considered the cheaper Rove (DAB201), but some bad reviews and no GPS module bothered me. Mark @CYA shipped on Friday, the same day I ordered, and it was delivered Monday, well packed, and with 2386 firmware already installed. My month old a118c moved to the back as a rear-facing camera.

Mount: I fabricated a custom mount pictured below from 1/8" Lexan using a jig saw, heat gun, dremel, and several grits of sandpaper. Added a small bolt and epoxy'd on a nut for additional support and to allow fine tuning the angle, painted it flat black, and mounted to the top edge of the windshield with 3M automotive molding tape. A 2.5mm TRS M/F right-angle adapter keeps the camera as close to the roof as possible. Two 1" slits in the headliner about 5" apart allowed a small portion of the front edge to be rolled back enough to permit attaching and detaching the camera. This location makes it easy to deal with the camera, doesn't impair my vision, is at the high point of a wiper arc, and at the edge of the dark tint which shades the camera. The rearview mirror area on my vehicle was already consumed by the lane departure camera and my custom mounted Escort RedLine.

CPL: A 43mm Vivitar Filter Kit is used to reduce dash reflections. I drilled and broke-out the ND8 lens to have a recessed screw-on mount for the CPL. About 6 layers of 3M black vinyl tape wrapped around the outer portion of the lens barrel provided a tight push-on/screw-on fit for the lens-less ND8 filter ring. To keep it from moving, I put several tiny drops of epoxy between the back edge of the filter ring and the tape. Now I can just screw on or off the CPL filter. Keeping the CPL as close to the camera lens as possible avoided reducing the FOV. This kit claims to feature high quality optics that are multi-coated. I have not tried, and probably don't need, the UV filter, but the kit also includes a decent case to store the CPL if I remove it, and to hold spare micro-sd cards.

Notes: The shiny portions of my DAB205 are coated with black permanent marker to make it stealthly, and alcohol will remove this if I need to. I used the Blackvue Power Magic Pro BDP and a couple Add-a-Circuit micro2 Fuse Taps. These two items provided the biggest installation challenges. The Blackvue unit turned out to be DOA and the Fuse-Taps included 5 amp fuses that looked OK, one wasn't. These two problems wasted an hour or so trouble shooting. A Silcon Power 128GB USH-1 card with standard exFAT is working fine.

Comments: DAB205's video performance (1440p 30fps hdr) is better than my decent a118c (1080p 30fps wdr), especially at night. Build quality is good, and the firmware appears solid, but options are limited. I am testing the 2385 brightness enhanced firmware by Falsificator, and look forward to a new version with an increased bitrate. If I could find a copy of the A12 sdk, I'd give it a shot myself. The form factor of the DAB205 is not the best. The perimiter buttons make the camera ackward to control and handle, and the recessed sd-card slot requires long finger nails or a tool. Lastly, the fact that this camera uses a battery concerns me regarding heat durability, and battery life. Yesterday we had an early rare 85F day, and my heat gun measured the camera at 150F (not running, closed car, direct sun).

DAB205_Install.jpg
 
Last edited:
That's a lot of custom work. Nice work.

Yeah, the sd card slot is a little more inset on these than on the DAB202's. They do vary a little bit from camera to camera though. Some are easy to release the card, some are a little harder.

I'm working on a CPL filter kit that will fit the DAB202 and DAB205 cameras now. If it works out as I hope, I should have them up on the website in a couple of weeks.
 
New Dome DAB205 with custom mount and a CPL.

Purchased a Dome DAB205 with GPS module from Capture Your Action for $119.98 delivered. I considered the cheaper Rove (DAB201), but some bad reviews and no GPS module bothered me. Mark @CYA shipped on Friday, the same day I ordered, and it was delivered Monday, well packed, and with 2386 firmware already installed. My month old a118c moved to the back as a rear-facing camera.

Mount: I fabricated a custom mount pictured below from 1/8" Lexan using a jig saw, heat gun, dremel, and several grits of sandpaper. Added a small bolt and epoxy'd on a nut for additional support and to allow fine tuning the angle, painted it flat black, and mounted to the top edge of the windshield with 3M automotive molding tape. A 2.5mm TRS M/F right-angle adapter keeps the camera as close to the roof as possible. Two 1" slits in the headliner about 5" apart allowed a small portion of the front edge to be rolled back enough to permit attaching and detaching the camera. This location makes it easy to deal with the camera, doesn't impair my vision, is at the high point of a wiper arc, and at the edge of the dark tint which shades the camera. The rearview mirror area on my vehicle was already consumed by the lane departure camera and my custom mounted Escort RedLine.

CPL: A 43mm Vivitar Filter Kit is used to reduce dash reflections. I drilled and broke-out the ND8 lens to have a recessed screw-on mount for the CPL. About 6 layers of 3M black vinyl tape wrapped around the outer portion of the lens barrel provided a tight push-on/screw-on fit for the lens-less ND8 filter ring. To keep it from moving, I put several tiny drops of epoxy between the back edge of the filter ring and the tape. Now I can just screw on or off the CPL filter. Keeping the CPL as close to the camera lens as possible avoided reducing the FOV. This kit claims to feature high quality optics that are multi-coated. I have not tried, and probably don't need, the UV filter, but the kit also includes a decent case to store the CPL if I remove it, and to hold spare micro-sd cards.

Notes: The shiny portions of my DAB205 are coated with black permanent marker to make it stealthly, and alcohol will remove this if I need to. I used the Blackvue Power Magic Pro BDP and a couple Add-a-Circuit micro2 Fuse Taps. These two items provided the biggest installation challenges. The Blackvue unit turned out to be DOA and the Fuse-Taps included 5 amp fuses that looked OK, one wasn't. These two problems wasted an hour or so trouble shooting. A Silcon Power 128GB USH-1 card with standard exFAT is working fine.

Comments: DAB205's video performance (1440p 30fps hdr) is better than my decent a118c (1080p 30fps wdr), especially at night. Build quality is good, and the firmware appears solid, but options are limited. I am testing the 2385 brightness enhanced firmware by Falsificator, and look forward to a new version with an increased bitrate. If I could find a copy of the A12 sdk, I'd give it a shot myself. The form factor of the DAB205 is not the best. The perimiter buttons make the camera ackward to control and handle, and the recessed sd-card slot requires long finger nails or a tool. Lastly, the fact that this camera uses a battery concerns me regarding heat durability, and battery life. Yesterday we had an early rare 85F day, and my heat gun measured the camera at 150F (not running, closed car, direct sun).
DAB205_Install.jpg

Good review. To be able to understand the added value of filter, we hope to see your day/night videos on youtube. Thank you.
 
Thanks for your comment.

The purpose of the CPL is to reduce reflections. Even though my dash top is relatively flat black and textured, the rake of the windshield, camera location, and some bright trim cause noticeable reflections.

I'll try to get some daytime pictures posted later today, with and without the filter. Videos will follow next week after I finish my next project this weekend. I'm planning to add led indicator lights for turn signals, brake lights, and headlights that will be just within the lower FOV of my front camera.
 
This is the new mount style for the DAB205. It used to be like the style on the DAB201. Those are not my hands. :)
Mount Pic 1.jpg Mount pic A.jpg
 
Any one else having this issue with poor built quality? The part of the body that has the mount opening molded in is made of piss poor plastic and it keeps cracking open due to weight of the camera. Wonder who thought that it would be a good idea to make 70% of the body with metal, having weight of a dying star, and building the mounting bit of the chassis out of ****ty recycled plastic.

I have gone through my original and the replacement camera with it not lasting more than a few hours at first and a few days on the second one, see attached pictures of both. There is 0 error on user part, the camera is getting mounted properly, with just the power wire being fed from the top and nothing else. Its not going in a race car with harsh suspension or anything, if anything its going in a vag1na mobile (a minivan) with ride quality that would put a plush couch to shame.

To say I am thoroughly disappointed and upset would be an understatement, the seller keeps promising me to replace it within 14 days but wouldnt issue me my refund so I could invest my money somewhere else rather than this POS.

Goes without saying: BUYER BEWARE.

Sorry, just venting due to frustration.
 

Attachments

  • bc3028def499422f9e3d5ce4409708356b7cb8a750edc88fa52440f1e0515d53_full.jpg
    bc3028def499422f9e3d5ce4409708356b7cb8a750edc88fa52440f1e0515d53_full.jpg
    71.3 KB · Views: 39
  • 5b63d5ebef972245601526ca2f2e148639919476f0d957c6e548d9174359e852_full.jpg
    5b63d5ebef972245601526ca2f2e148639919476f0d957c6e548d9174359e852_full.jpg
    91 KB · Views: 38
The mount on the DAB201 has a slight wedge shape on the suction part of the mount. It's meant to cause a tight friction fit. If you insert it backward and force it in, it could possibly cause the cracking issue. Unfortunately the manual doesn't mention this.
 
Delayed pictures with and without CPL requested by barisg, and more customization.

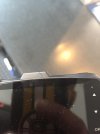
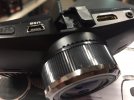
Because of another annoyance with my 2 week old DAB205, I had to fabricate a lever to be able to take pictures. Dome strangely chose to make a short push of the on/off button the trigger for photos. They also provided a nice right angle mini-USB power supply cable. Unfortunately, this puts the power cord directly above the on/off switch, and in combination with my custom mount that puts my camera tight up against the windshield/roof/headliner meeting point, I couldn't push the on/off switch with the camera mounted. I made the lever shown below and attached it with a small piece of 3M automotive mounting tape around the mini-USB port.

DAB205_Top_Front__Mount_On-Off_Lever.JPG

DAB205_Top_Back__Mount_On-Off_Lever.JPG

DAB205_Top_Side__Mount_On-Off_Lever.JPG


Note: The DAB205 mount is different than the DAB201, and the screw-on mount of the DAB202 also. I've slid the provided suction-cup mount, and particularly my custom mount, in and out of the slot well over 100 times in the two weeks I've had it. The plastic that forms the slot seems somewhat flexible, and is showing no signs of cracking or wear.

Finally the pictures with and without the CPL, now that I have a way of taking them with my lever in place.

Without CPL using Falsificator's brightness enhanced firmware at ~11:00 AM facing east.
10575100_Falsificator_NO_CPL.JPG

With CPL using Falsificator's brightness enhanced firmware at ~11:00 AM facing east.
10593400_Falsificator_WITH_CPL.JPG


Less dash reflections with the CPL in place and rotated to best position. However, Falsificator's firmware modifications to v.2385 seem to "posterize" the clouds, so I headed home to flash with the straight Dome v2386 firmware, and went back to the same spot within an hour or so.

Without CPL using Dome's v.2386 firmware at ~ 12:00 noon, facing east.
12042000_NO_CPL.JPG

With CPL using Dome's v.2386 firmware at ~ 12:00 noon, facing east.
12032800_WITH+_CPL.JPG


The dash reflections are considerably reduced, but the yellowish tone is not desirable. These pictures don't show the capability of this camera in better conditions. The detail of the sides of the cars facing the camera are in shadow, and I have too much bright sky in the frame for these conditions. The dark upper corners are partially caused by the camera's close proximity to the edge of the dark tint on my windshield.
 
Last edited:
Sorry, but for some reason all the iCloud links failed. I just edited it, re-pasted the links, and think it's OK now.
 
Interesting work around with the picture button. Since you mounted it so close to the roof line, it sounds like you would have had more of an issue if it was a vertical power cable connection instead of the 90 degree it came with. One nice feature of the picture button is that it allows you to take a picture while the camera is still recording. I don't think that too common among dash cameras.

The clouds with the modified firmware are cartoonish. Definitely not worth the added brightness in my opinion. The CPL does a nice job on the reflections. The slight yellowness is a worthy trade off. It maybe a common effect with the cheaper CPL filters.
 
while you're working away on mods you might want to focus your lens

not a good result from the custom firmware
 
Back
Top