You are using an out of date browser. It may not display this or other websites correctly.
You should upgrade or use an alternative browser.
You should upgrade or use an alternative browser.
Reviewing and Testing the 3-ch Viofo A329T
- Thread starter EricSan
- Start date
OP
OP
EricSan
Well-Known Member
- Joined
- Dec 28, 2023
- Messages
- 1,446
- Reaction score
- 1,099
- Location
- Central PA
- Country
- United States
- Dash Cam
- There are ALWAYS user serviceable parts inside!
Ha, I actually have the ability to test that as I have two remotes 😉. I bought one for my son a while ago for his Viofo camera and he never installed it, and ai have the one the Viofo sent with the camera. I suspect it wont work, but I’ll try.
TonyM
Well-Known Member
- Joined
- Jul 30, 2013
- Messages
- 6,737
- Reaction score
- 6,816
- Country
- United Kingdom
- Dash Cam
- Many dashcams over many years
I did the same and it seems to work well so farAnother interesting feature allows you to control the front telephoto camera is turned on or off. The setting that makes the most sense for me is to have the front camera enabled only while driving
OP
OP
EricSan
Well-Known Member
- Joined
- Dec 28, 2023
- Messages
- 1,446
- Reaction score
- 1,099
- Location
- Central PA
- Country
- United States
- Dash Cam
- There are ALWAYS user serviceable parts inside!
Super Cool! Just installed the BTR200 Remote Control and programmed one of the buttons for "take a photo" and the other for "power off." The Power Off function works nearly instantly. No more holding for 3 seconds to activate the menu and then 2 more seconds for power off. Just press the side button and the unit shuts down! I'm REALLY appreciating that function as I have multiple cameras connected to my DIY parking battery, so I need to make sure that I turn off each of them when I leave my car in the garage. 👍
Update: the BTR200 remote can only turn the camera off while the main camera is in drive mode. If the camera is in parking mode, the remote will not turn it off.
Update: the BTR200 remote can only turn the camera off while the main camera is in drive mode. If the camera is in parking mode, the remote will not turn it off.
Last edited:
OP
OP
EricSan
Well-Known Member
- Joined
- Dec 28, 2023
- Messages
- 1,446
- Reaction score
- 1,099
- Location
- Central PA
- Country
- United States
- Dash Cam
- There are ALWAYS user serviceable parts inside!
Captures from the A329T rear camera are pretty nice. The rear facing camera is fitted with a polarizer and the HDR function is set to timer so it activates at night, not during the day. In all but one of these captures, the plates are readable.
Scene 1: both cars moving, total speed differential is about 35-40mph with the plate in the full sun:

and the 250% crop on the rear of the car. That's a readable plate:

Scene 2: a few seconds later, but this time in the partial shade, total speed differential is about 40 mph

And here is the 250% zoom, also a readable plate:

Scene 3: in this one, the other car is stationary, parked a full lane over to the side, and in the full shade. I'm moving at about 20mph:

And the 250% zoom - this plate is not readable:

Scene 4: just a few seconds later, this car is parked on my side of the road as I go by at about 20mph

and the 250% crop that produces another readable plate:

Scene 1: both cars moving, total speed differential is about 35-40mph with the plate in the full sun:
and the 250% crop on the rear of the car. That's a readable plate:
Scene 2: a few seconds later, but this time in the partial shade, total speed differential is about 40 mph
And here is the 250% zoom, also a readable plate:
Scene 3: in this one, the other car is stationary, parked a full lane over to the side, and in the full shade. I'm moving at about 20mph:
And the 250% zoom - this plate is not readable:
Scene 4: just a few seconds later, this car is parked on my side of the road as I go by at about 20mph
and the 250% crop that produces another readable plate:
Last edited:
I am ready to buy a dash cam for my 2021 Jeep Grand Cherokee. I have the VIOFO A329S 2CH loaded in my cart at VioFor.com.
The rear window of this SUV is fairly flat - not a lot of slope. Do you know if the rear cam will rotate enough on the rear glass?
The rear window of this SUV is fairly flat - not a lot of slope. Do you know if the rear cam will rotate enough on the rear glass?
OP
OP
EricSan
Well-Known Member
- Joined
- Dec 28, 2023
- Messages
- 1,446
- Reaction score
- 1,099
- Location
- Central PA
- Country
- United States
- Dash Cam
- There are ALWAYS user serviceable parts inside!
Yes, absolutely! See post #4 above. Check the first image - the camera comes out of the package aligned perfectly for a vertical window install!
Finnegan
Active Member
- Joined
- Jun 29, 2025
- Messages
- 252
- Reaction score
- 208
- Location
- Pennsylvania
- Country
- United States
- Dash Cam
- Viofo A329s 3CH, FNT/RR/INT, HK6
OP
OP
EricSan
Well-Known Member
- Joined
- Dec 28, 2023
- Messages
- 1,446
- Reaction score
- 1,099
- Location
- Central PA
- Country
- United States
- Dash Cam
- There are ALWAYS user serviceable parts inside!
Here is another series of plate captures that I made with the A329T camera to compare the 4k front camera and the 2k front telephoto camera with HDR turned off. My previous set of image s had HDR enabled, so this is a different comparison. Both cameras performed quite impressively! Here is the overall scene from the 4k camera. Firmware version is listed in the frame below. With apologies to our European friends, I need to "fix" the date format in the video 😉

I focused on the back of the car in the right hand side of the frame that was passing by at about 35-40mph while I was stationary at a turn light. I started with the video from the main 4k camera and advanced frame by frame until the rear wheels of the car were just past the white line in the road (just a few frames earlier than shown in the overall screen cap shown above).
And here is a comparison of 250% zooms of the plate itself, captured by the 4k main camera at the following times:
1) the first frame where the rear wheels are past the thick white line on the road (first image on left below)
2) then advanced by 5 frames (second image from left)
3) then advanced by 5 more frames for a total of 10 frames difference from the first image (third image from left below)
4) then advanced by 5 more frames for a total of 15 frames difference (0.5 sec) from the first image (image below on the right)

Then, I switched to analysis of the video from the front 2k 4x telephoto camera for comparison and follow up of detail analysis. Here is the first frame that I zoomed in - I had to wait for the car to travel a bit further so it would be in the frame of the telephoto camera. I started again with the first frame that showed the rear wheels just past the second white line of the cross walk (new reference point) as shown below. This positions the car almost all of the way through the intersection as seen below.

Then, I advanced the video frame by frame in order to make some new comparisons of the telephoto camera. Due to the 4x greater telephoto factor, the frame spacing of these screen captures is greater to highlight the differences. Using the image directly above as the reference point, the below images were made at the following points in time:
1) scene directly above advanced by 10 more frames and zoomed by 250% (image on the left below) - still readable
2) advanced by 10 more frames (total of 20 frames elapsed from the image above (center image below) - still readable
3) advanced by 10 more frames (total of 30 frames elapsed from the image above (image on the right below). This is one full second (30 frames per second) later and the plate is still largely readable (but getting more difficult). At this point the car is well past the intersection!

Switching back to the view from the 4k main camera and advancing by the same number of frames to match the time period when the image above on the right was made (30 frames beyond the end of the crosswalk) reveals the following scene:

Wow - that's a pretty long distance to still have a readable plate on a vehicle moving at about 35 mph!
All of the images in this post were made with a polarizer installed on both the main camera and the telephoto camera. HDR was disabled.
I focused on the back of the car in the right hand side of the frame that was passing by at about 35-40mph while I was stationary at a turn light. I started with the video from the main 4k camera and advanced frame by frame until the rear wheels of the car were just past the white line in the road (just a few frames earlier than shown in the overall screen cap shown above).
And here is a comparison of 250% zooms of the plate itself, captured by the 4k main camera at the following times:
1) the first frame where the rear wheels are past the thick white line on the road (first image on left below)
2) then advanced by 5 frames (second image from left)
3) then advanced by 5 more frames for a total of 10 frames difference from the first image (third image from left below)
4) then advanced by 5 more frames for a total of 15 frames difference (0.5 sec) from the first image (image below on the right)
Then, I switched to analysis of the video from the front 2k 4x telephoto camera for comparison and follow up of detail analysis. Here is the first frame that I zoomed in - I had to wait for the car to travel a bit further so it would be in the frame of the telephoto camera. I started again with the first frame that showed the rear wheels just past the second white line of the cross walk (new reference point) as shown below. This positions the car almost all of the way through the intersection as seen below.
Then, I advanced the video frame by frame in order to make some new comparisons of the telephoto camera. Due to the 4x greater telephoto factor, the frame spacing of these screen captures is greater to highlight the differences. Using the image directly above as the reference point, the below images were made at the following points in time:
1) scene directly above advanced by 10 more frames and zoomed by 250% (image on the left below) - still readable
2) advanced by 10 more frames (total of 20 frames elapsed from the image above (center image below) - still readable
3) advanced by 10 more frames (total of 30 frames elapsed from the image above (image on the right below). This is one full second (30 frames per second) later and the plate is still largely readable (but getting more difficult). At this point the car is well past the intersection!
Switching back to the view from the 4k main camera and advancing by the same number of frames to match the time period when the image above on the right was made (30 frames beyond the end of the crosswalk) reveals the following scene:
Wow - that's a pretty long distance to still have a readable plate on a vehicle moving at about 35 mph!
All of the images in this post were made with a polarizer installed on both the main camera and the telephoto camera. HDR was disabled.
Last edited:
OP
OP
EricSan
Well-Known Member
- Joined
- Dec 28, 2023
- Messages
- 1,446
- Reaction score
- 1,099
- Location
- Central PA
- Country
- United States
- Dash Cam
- There are ALWAYS user serviceable parts inside!
In addition to the awesome video resolution and capabilities of the Viofo A329T dashcam, the next most obvious feature is the very extensive set of menus and settings that control the functionality of the camera. So, here is my effort to document the feature set that is available in the menu system. The top-level menu scrolls for four full screens worth of settings! Here are all of the top-level settings:


OP
OP
EricSan
Well-Known Member
- Joined
- Dec 28, 2023
- Messages
- 1,446
- Reaction score
- 1,099
- Location
- Central PA
- Country
- United States
- Dash Cam
- There are ALWAYS user serviceable parts inside!
Here is the first set of sub-menus under the "Video Settings" header:
Video resolution setting with all three cameras attached


There are three settings for Exposure Value: one for the Front Camera, one for the Front Telephoto Camera (or Cabin Camera if you have that installed), and one for the Rear Camera. All are adjustable from EV= -2.0 to +2.0 in 0.3 increments:

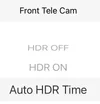
Top Level HDR Menu - each camera has independently controllable HDR (on/off/auto). There is a single timer that applies to all cameras that set to "Auto HDR" (See below):

Each camera has three settings, so I'll just show the settings for the front telephoto camera. The others are exactly identical:

And if you choose "Auto HDR Time" for any of the cameras you can then set the time at which they all will turn on and off. A single timer controls all cameras that are set to "Auto HDR Time" so that HDR goes on and off at the same time for all selected cameras.

I've left the A329T set to its default "Medium sensitivity" setting and haven't noticed it being overly sensitive over the past few weeks.

You can even change the color of the text across the bottom of the video:

You can also adjust the overall bitrate that is encoded into the MP4 files (I prefer the Maxium setting, but this will consume more SD card space):

And the final entry in the Video Settings menu section is for Time-Lapse Recording (which is incompatible with having Parking Mode enabled):

Video resolution setting with all three cameras attached
There are three settings for Exposure Value: one for the Front Camera, one for the Front Telephoto Camera (or Cabin Camera if you have that installed), and one for the Rear Camera. All are adjustable from EV= -2.0 to +2.0 in 0.3 increments:
Top Level HDR Menu - each camera has independently controllable HDR (on/off/auto). There is a single timer that applies to all cameras that set to "Auto HDR" (See below):
Each camera has three settings, so I'll just show the settings for the front telephoto camera. The others are exactly identical:
And if you choose "Auto HDR Time" for any of the cameras you can then set the time at which they all will turn on and off. A single timer controls all cameras that are set to "Auto HDR Time" so that HDR goes on and off at the same time for all selected cameras.
I've left the A329T set to its default "Medium sensitivity" setting and haven't noticed it being overly sensitive over the past few weeks.
You can even change the color of the text across the bottom of the video:
You can also adjust the overall bitrate that is encoded into the MP4 files (I prefer the Maxium setting, but this will consume more SD card space):
And the final entry in the Video Settings menu section is for Time-Lapse Recording (which is incompatible with having Parking Mode enabled):
Last edited:
speedingcheetah
Well-Known Member
- Joined
- Nov 15, 2016
- Messages
- 462
- Reaction score
- 254
- Location
- Twin Cities, MN
- Country
- United States
- Dash Cam
- VIOFO A329T 3CH (F+T+R) + Sandisk Extreme 1TB external SSD
Really would like them to implement being able to set each cams resolution independently.Here is the first set of sub-menus under the "Video Settings" header:
Video resolution setting with all three cameras attached
View attachment 85544
Or, at least, be able to adjust the aspect ratio resolution aspect, not have it locked to all cams.
Using 21:9 on the front camera is beneficial as it crops out unnecessary dash and sky, but detrimental to telephoto camera as that crop results in loss of actual useable and desired image.
(maybe they can figure out how to make a resolution exception for the tele cam to have it be full frame 16:9 while the other cams are 21:9.)
SC@AU
Active Member
So can each camera have independent HDR Timer settings….? I thought I had read that the HDR timer was a global setting, or has that changed now…? Good if so – handy for the Internal fisheye, where you might want it on opposite time to the other cameras…Top Level HDR Menu - each camera is independently controllable:
View attachment 85546
Each camera has three settings:
View attachment 85547
And if you choose "Auto HDR Time" you can then set when it turns on and off:
View attachment 85548
OP
OP
EricSan
Well-Known Member
- Joined
- Dec 28, 2023
- Messages
- 1,446
- Reaction score
- 1,099
- Location
- Central PA
- Country
- United States
- Dash Cam
- There are ALWAYS user serviceable parts inside!
Uh oh - that was not what I meant. You can independently control whether each cameras is HDR on/ HDR off/or HDR Timer, but one timer function applies to all cameras. There is only a single timer. I will edit my post above for clarity. Good catch!
Last edited:
SC@AU
Active Member
Doh! – I preferred it when I thought you meant each camera had its own HDR timer..!but the timer function applies to all cameras. There is only a single timer.
@viofo @VIOFO-Support – Could this be implemented in a future firmware..?
OP
OP
EricSan
Well-Known Member
- Joined
- Dec 28, 2023
- Messages
- 1,446
- Reaction score
- 1,099
- Location
- Central PA
- Country
- United States
- Dash Cam
- There are ALWAYS user serviceable parts inside!
And here is a start at exploring the sub-menus that exist under the "System Settings" section of the main menu:

You can also set when the front Telephoto camera is active:

This is the menu that allows you to control the status of the various LED indicators while in normal drive mode. There are three sub-menus here, presented below.

Here is the sub-menu for the LEDs on the main camera unit:

Sub-menu for the LEDs on the rear camera. This sub-menu is repeated for the telephoto camera as well, so I won't show that one here.

The above set of LED settings for Normal Mode is repeated for Parking Mode, as shown below, but I won't repeat the set of sub-menus - they are identical to those shown above

The Manage SSD Storage menu has two sub-menus associated with it (shown next):

Here is the first sub-menu for the SD card:

And the second sub-menu for the SSD files:

You can also set when the front Telephoto camera is active:
This is the menu that allows you to control the status of the various LED indicators while in normal drive mode. There are three sub-menus here, presented below.
Here is the sub-menu for the LEDs on the main camera unit:
Sub-menu for the LEDs on the rear camera. This sub-menu is repeated for the telephoto camera as well, so I won't show that one here.
The above set of LED settings for Normal Mode is repeated for Parking Mode, as shown below, but I won't repeat the set of sub-menus - they are identical to those shown above
The Manage SSD Storage menu has two sub-menus associated with it (shown next):
Here is the first sub-menu for the SD card:
And the second sub-menu for the SSD files:
Attachments
Last edited:
OP
OP
EricSan
Well-Known Member
- Joined
- Dec 28, 2023
- Messages
- 1,446
- Reaction score
- 1,099
- Location
- Central PA
- Country
- United States
- Dash Cam
- There are ALWAYS user serviceable parts inside!
Continuing down the menu structure...

The Parking Mode setting has a large number of options to select from, so two screen captures are required to show all of the options:


Continuing down the set of main menu functions, we have settings for protecting the vehicle main battery:

There are 11 options for the Cut-off Time setting - they span the two images below from Continuous to 48 hours:


This is the Cut-Off Voltage selection sub-menu. A nice feature is the "OFF" setting, which on the HK3-C hardwire kit was a special "by request" item from the forum members here that Viofo created. Way to go!

I presume the Enter Parking Mode Timer is to prevent unnecessary locking of videos that would happen when you close the driver's door after parking.

The Parking Mode setting has a large number of options to select from, so two screen captures are required to show all of the options:
Continuing down the set of main menu functions, we have settings for protecting the vehicle main battery:
There are 11 options for the Cut-off Time setting - they span the two images below from Continuous to 48 hours:
This is the Cut-Off Voltage selection sub-menu. A nice feature is the "OFF" setting, which on the HK3-C hardwire kit was a special "by request" item from the forum members here that Viofo created. Way to go!
I presume the Enter Parking Mode Timer is to prevent unnecessary locking of videos that would happen when you close the driver's door after parking.
Last edited:
OP
OP
EricSan
Well-Known Member
- Joined
- Dec 28, 2023
- Messages
- 1,446
- Reaction score
- 1,099
- Location
- Central PA
- Country
- United States
- Dash Cam
- There are ALWAYS user serviceable parts inside!
And still continuing down the main menu:

This is the threshold for parking mode to wake the camera and start recording:

You can select where the videos from Parking Mode are stored:

This setting allows you to keep the MP4 files from each camera distinct or to merge them into a single file:


These are the voice commands that you can use to control the dashcam:

This setting controls what you see on the screen of the main camera:

This is the threshold for parking mode to wake the camera and start recording:
You can select where the videos from Parking Mode are stored:
This setting allows you to keep the MP4 files from each camera distinct or to merge them into a single file:
These are the voice commands that you can use to control the dashcam:
This setting controls what you see on the screen of the main camera:
Viofo.com is having a sale through Sept 29. And PETROL329 is a valid coupon at checkout.
Sale price alone I got $30 off a VIOFO A329S 2CH 4K. Coupon saved another $22.14. I also bought a HK6 ACC Hardwire Kit and an CPL-600 Rear Filter.
Nice savings direct from Viofo.
Sale price alone I got $30 off a VIOFO A329S 2CH 4K. Coupon saved another $22.14. I also bought a HK6 ACC Hardwire Kit and an CPL-600 Rear Filter.
Nice savings direct from Viofo.