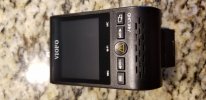
Viofo A129 Pro Dual Dashcam - 4K Front + 1080 Rear

I bumped the EV down a little bit and also used a CPL. It significantly decreased the light halos or glares even with a dirty windshield.
Sounds good! What value did you end up using for your front EV?

I have fitted a CPL today on the front so I shall get some footage and do some testing.
 
Sounds good! What value did you end up using for your front EV?

I have fitted a CPL today on the front so I shall get some footage and do some testing.

I think I used -1/3. There are still halos/glares but it's not as bad before I installed the CPL and bringing it down to -1/3 w/ the CPL matched the brightness of A119 v3.

Try the CPL first without bringing the EV down.
 
Last edited:
A129 Pro (top) v A119 V3 (bottom) in full darkness.

This is the central "1080" section of the A119 V3 video, so full detail visible on a 1080 monitor but not full field of view, and the same field of view from the A129 Pro, so you won't see full A129 Pro detail on a 1080 monitor, it has been scaled down, although given the dark there is not much missing. Then I have halved their heights and stacked them.

The A129 Pro image has more noise, but it also has more detail, better colour, and slightly less motion blur (10% less from measuring the width of the sign post)...

Both have overexposed the number plate, but I was using EV 0 on the A129 Pro, if I had set EV -1/3rd like most people then it would probably have won on the number plate, it is only overexposure that was an issue, not resolution or motion blur. Also, the A129 Pro has a slight disadvantage from being centrally mounted so gets the full reflection of the headlights, while the A119V3 is mounted to it's right.


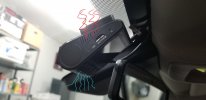
Mounting, don't normally see them hiding in the cool under the tint, but the low sun at this time of year lit them up. From image left to right: A119 V3, A129 Pro, A129 IR:
y4mXuijNoVhD2QeYIFuIiKsSUNnLfw_xyudBBWMP1RdaecIg1kq4OumcbcpxlZCbg8SPLf7nQe2YYflB55dA3aLTiNfgOsQTixnQFYIN7EZDvhh_qbSZzP3bDnV1GY9Kg2pqvgm7SISnr5OHoLH7odTo7DZ_5cHeFU4nBbjIrB_mSVJMdiB010sYBc_wYg5n9Jd


Wonder what YouTube will do with it... doesn't always like dark videos, gives them low bitrates...
 
Wow,you gone wild the last part of the clip after little car gets out of the way :ROFLMAO::ROFLMAO::ROFLMAO:
 
Wow,you gone wild the last part of the clip after little car gets out of the way :ROFLMAO::ROFLMAO::ROFLMAO:
The GPS got down to 11 MPH in 1st gear behind the little car, the latter bit was relatively fast, but only got up to 55 MPH, it looks faster due to being zoomed in, and maybe sounds fast because I only synchronized the videos to the nearest frame, not the nearest piston firing, so with A119 on the left channel and A129 on the right I have twice as many pistons as normal, sometimes that works really well but this time it produced a bit of a drone!
 
Last night I ran into a YouTube video posted from someone who just purchased a new A129 Pro Duo showing an flickering issue with his rear cam and he was asking if his unit is defective. He mentioned that the issue is only present while WDR is enabled. To verify that, I drove my SUV at dark tonight to test my a129 pro duo in low light conditions with the WDR enabled and noticed something interesting, something very similar to what his video shows . The camera seems to be switching back and forth, I guess WDR kicking in and out as the amount of light changes. Is this to be expected or is it a bug with the firmware?
I’m now running the V1.1 build 20191015
Here is my recording showing the front unit first then the rear.
yep got the same with WDR enabled here...
 
yep got the same with WDR enabled here...
Report it on the firmware thread then, this thread is not for bugs.
I guess it is just the new firmware, I haven't seen this before, although I haven't tested WDR in the dark since beta firmware.
 
Report it on the firmware thread then, this thread is not for bugs.
I guess it is just the new firmware, I haven't seen this before, although I haven't tested WDR in the dark since beta firmware.
Didn't know if it was firmware or not, it was doing it the day I got it with factory firmware. Streetlights tend to trigger it, on back streets. I didn't notice it on the main roads here. The main roads have more powerful and more frequent lights.
But yeah I'll go capture some footage of this and upload and share on the firmware thread. I'm hesitant to change to WDR right now because I'm trying to nail down the parking mode beeping missing footage feature mine seems to have right now. So I'll do that when I've ruled out anything else ha.
 
Last edited:
Didn't know if it was firmware or not,
It is an undesirable, and the firmware thread is a good place to make sure that Viofo is aware of undesirables so that they get sorted, they won't read this thread very often.
Personally I would call it a bug since it is more than just a slight annoyance.
 
I will report it to the firmware tread.
 
I tried hardwiring the A129 pro but even though I turned on the parking mode in the settings, it just records normally (doesn't switch to parking mode) when I switch the ignition off. I suspect that it's the accessory part.. Can I connect the ACC part to the fuse box without connecting the Battery/Constant to test if the ACC part is working? Is there another way to test the ACC?
 
I tried hardwiring the A129 pro but even though I turned on the parking mode in the settings, it just records normally (doesn't switch to parking mode) when I switch the ignition off. I suspect that it's the accessory part.. Can I connect the ACC part to the fuse box without connecting the Battery/Constant to test if the ACC part is working? Is there another way to test the ACC?
Both red and yellow wires need to be connected. Try another accessory fuse. You should test with a meter to ensure if power is there or not.
 
Both red and yellow wires need to be connected. Try another accessory fuse. You should test with a meter to ensure if power is there or not.

I checked 2 accessory fuse using multimeter and confirmed that they are working fine (only has voltage when ignition is on). I also checked the fuses and the fuse taps using multimeter.
 
Also, I've got my dashcam set to low-bitrate recording in parking mode but it turns off after about an hour in the hot Aussie sun. What about yours? Does it remain on?

Yep, my camera keeps shutting off when my car is parked in the hot sun after about an hour of low-bitrate recording. If its parked in the shade, it's fine.

Does anyone else experience the same?
 
Yep, my camera keeps shutting off when my car is parked in the hot sun after about an hour of low-bitrate recording. If its parked in the shade, it's fine.

Does anyone else experience the same?

Had a very hot day today in my city. A 30 minute drive posed no issue to the cam even though it was certainly rather hot. I haven’t used parking mode for any length of time on the A129 Pro Duo but I suspect your issue is just a limitation of 4K cameras. They get hot and they overheat in parking mode under the hot sun.
 
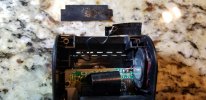
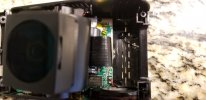
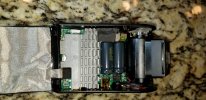
DO IT AT YOUR OWN RISK!!!!!! And do not attempt unless you not longer care about your products guaranty as this procedure will automatically void it and there is a risk you end up damaging your device.

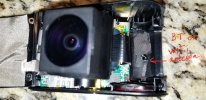
I'm person who has some basic to moderate experience with electronics and I'm confident following this procedure, but before I proceeded I asked myself this question. Why does the manufacturer choose to add this tape in this place (*follow the pictures bellow for reference) knowing that this camera runs at higher temperatures and proper ventilation for cooling is critical. Perhaps there is a valid reason behind and would be nice to learn about it.20191102_220309.jpg
Hot air generates a vacuum effect pulling cool air from bottom but in this case the lower holes are covered by piece of tape holding one of the antennas.
20191102_195148.jpg
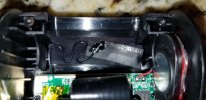
I carefully pulled the tape hit tweezers and detached the antenna from the tape once I got it off from the case.20191102_165655.jpg20191102_170318.jpg20191102_170646.jpg
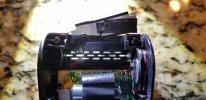
The antenna still have some glue remaining and I carefully replaced it on top of the vent holes. It fits perfectly without obstructing the vent holes. I ensured the antenna wire had some clearance away from the camera barrel prior assembly.
20191102_170919.jpg
20191102_172221.jpg
20191102_172729.jpg
Now this may not resolve the issue entirely but certainly should help and wanted to present this modification for consideration. Personally I haven't had any issues with overheating in this camera since I have had it for just a bit over a week and we are heading to cooler weather as winter approaches but It will defineitelly will get over 110 deg farenheit in the summer. Viofo, please take this as constructive criticism and please let us know your thoughts abut this, such as, if you think this will make any difference.
 
Perhaps there is a valid reason behind and would be nice to learn about it.
Maybe you make the mistake of thinking that those vents are functional vents and not just decoration on what would otherwise be a rather boring looking piece of visible plastic. Opening them up may even have a negative effect on the carefully designed and tested air flow within the camera and definitely destroys your warrantee!

Note that there is also a vent at the front bottom (assuming lens is at the front), which on mine does appear functional, presumably cool air is supposed to go in that one and over the components behind it, rather than in the one you have uncovered, uncovering the bottom rear vent may result in the cool air not passing over certain important components. Also note that there is no vent at the top where you might expect one to let the hot air out - the cooling system on this camera is not quite as simple as people might expect. Also moving the antenna may affect operation, maybe the vent was allowing the radio waves out and the antenna is now behind RF shielding? Plain plastic isn't always simple plain plastic! Or maybe since you have now moved the antenna relative to the sensor which it is very close to, you will now get RF interference on the image.

Since it was already working 100%, there will be no way of knowing if you have improved the cooling or had no effect, and if it now dies then we will have to assume that your changes had a negative result!

I think it is a mistake to think that the piece of tape you have removed was not functional in some way, clearly it was not there just for sticking the antenna to.
 
Last edited:
Note that there is also a vent at the front bottom (assuming lens is at the front), which on mine does appear functional, presumably cool air is supposed to go in that one and over the components behind it, rather than in the one you have uncovered,
Umm the vent he has uncovered is front bottom, is it not? Looks like he had to remove the imaging sensor and lens assembly to get to it.
 
Umm the vent he has uncovered is front bottom, is it not? Looks like he had to remove the imaging sensor and lens assembly to get to it.
It is on the same side as the LCD screen and buttons, which I guess has to be called the back.
 
Back
Top