tchavei
Active Member
Yes but further down in your post you said the A139 Pro is making 1.3gb files on 3 min loop. Mine is doing 300mb less for some reason
Oh, OK.Yes but further down in your post you said the A139 Pro is making 1.3gb files on 3 min loop. Mine is doing 300mb less for some reason
Everything is very simple. 😉 Look under the spoiler:I don't know how to do that. lol
I'm so sorry.Please respect forum members. 🙂


“Procrastination is like masturbation, it feels good in the beginning but then you realize you f*cked yourself”
-Dalai Lama
After 7 lazy months I got around to testing the maximum power output of the new & improved Hardwire Kit specifically designed for the A139 Pro.
In this post I will attempt to confirm & verify the listed power output specifications of hardwire kits that were sent with the following cameras;
6/14/22 A119 Mini 1
7/23/22 A229
11/29/22 A139 Pro
5/12/23 A119 Mini 2
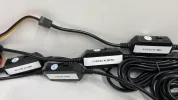
All three HK4 kits have an identical UPC code of 94044-00061.
The HK3-C that was sent with the A139 Pro has a UPC code of 94044-00048.
All hardwire kits have a listed power output specification of 5V2A MAX.
All hardwire kits have a “Quality Control” date code sticker indicating when it was manufactured.
The indicated dates of manufacturer correspond when I received the cameras.
Now, this is where it gets interesting.
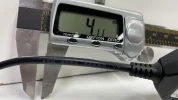
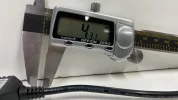
The HK4 kits I received with the A119 Mini 1 & A229 are constructed using 24AWG gauge wire.
The HK3-C & HK4 kits I received with the A139 Pro & A119 Mini 2 are constructed using “20AWG+24AWG” gauge wire, (see attached photos).
The diameter of the 24AWG gauge wire is 4.11mm.
The diameter of the 20AWG+24AWG gauge wire is 4.31mm.
What is going on here?
Is @viofo trying to save a few pennies by using 20AWG wire for constant hot positive & ground wires, and using smaller 24AWG wire for the switched ignition positive wire? (just use 20AWG for everything guys)
To obtain the maximum power output of each hardwire kit I’ll be using my;
1.) WANPTEK Power Supply set at 12.60 Volts @ 5 Amps.
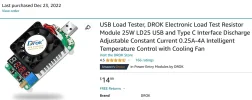
2.) DROK USB Load Tester set at 5.00 Volts, and I will crank up the Amperage Load until I hear the hardwire kits say; “Uncle!”
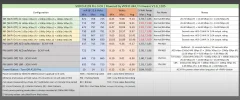
Both 24AWG kits have an identical maximum power output of 2.3 Amps @ 5.0 Volts = 11.5 Watts
Both 20AWG+24AWG kits have an identical maximum power output of 3.5 Amps @ 5.0 Volts = 17.5 Watts.
This means the new & improved 20AWG+24AWG kits have an increased power output of 6 Watts, (that’s a lot!).
What does all this nonsense mean?
1.)
If a consumer already had an existing A139, A139 2-channel, A139 3-channel installed in their car with the “old” hardwire kit, and upgraded the front main camera to the A139 Pro they will most certainly experience malfunctions due to power starvation from the old hardwire kit being unable to supply sufficient power to the camera.
Endless boot loop (start up & shut down).
Recording malfunctions
Dropping 2nd & 3rd channels
SD Card file corruption
The list goes on.
2.)
If a new first time buyer purchased an A139 Pro, A139 Pro 2-channel, A139 Pro 3-channel from a retailer other than the Official Viofo website like Amazon, and also purchased a hardwire kit, they may have been supplied with the “old” 24AWG hardwire kit.
Long story short if I would have performed these tests 7 months ago when I opened this testing thread I may have saved hundreds of hours of wasted consumer time dealing with recording malfunctions, tech support inquiry, diagnosis, etc.
I’m a failure. lol
@rcg530
@Vortex Radar
@safedrivesolutions
-Chuck
Here’s videos performing the power output tests;
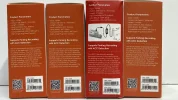
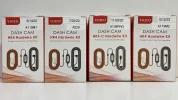
It appears to be possible to check by looking at the box. If the two photos attached – "Side Mug Shot" and "The Usual Suspects" – shows the boxes in the same left-to-right order... as it appears they are... then the third box from the left in the "Usual Suspects" photo is labeled A139 Pro in the photo. Thus the third box from the left in the "Side Mug Shot" photo has a diagram of the A139 and the Hardware Kit on the side panel. So if you still have your Hardware Kit box, you should be able to confirm whether you have that version of the Hardware Kit.Any way of knowing by checking the box or only byy dismounting the car again (I'll pass)
If it ain't broke, don't fix it. lolOn one hand, I'd expect to be sent the latest back in Feb/March (I ordered from Viofo Benelux)
Thank you for actually reading my post. lolIt appears to be possible to check by looking at the box. If the two photos attached – "Side Mug Shot" and "The Usual Suspects"
It appears to be possible to check by looking at the box. If the two photos attached – "Side Mug Shot" and "The Usual Suspects" – shows the boxes in the same left-to-right order... as it appears they are... then the third box from the left in the "Usual Suspects" photo is labeled A139 Pro in the photo. Thus the third box from the left in the "Side Mug Shot" photo has a diagram of the A139 and the Hardware Kit on the side panel. So if you still have your Hardware Kit box, you should be able to confirm whether you have that version of the Hardware Kit.
BTW, FWIW, I ordered my A139 Pro and HK3-C kit directly from Viofo in April and the version they sent to me has the same box as the third from the left in the @Panzer Platform photos (with the diagram).
If it ain't broke, don't fix it. lol
Well I just checked my box. It has the schematic but no idea if it's the new or old
Thanks for the data. Just to clarify, am I right that there isn't an "old" or "new" A139 Pro kit? There is just the one recommended HK3-C? Have Viofo ever recommended the HK4 kit for the A139 Pro?I tested the maximum power output of the new & improved Hardwire Kit specifically designed for the A139 Pro.
In this post I will attempt to confirm & verify the listed power output specifications of hardwire kits that were sent with the following cameras, see attached photos;
6/14/22 A119 Mini 1
7/23/22 A229
11/29/22 A139 Pro
5/12/23 A119 Mini 2
The reason Viofo recommends the HK3-C Kit is because it has the straight Type-C connector instead of the right angle of the HK4.There is just the one recommended HK3-C? Have Viofo ever recommended the HK4 kit for the A139 Pro?
The G-sensor has not been triggered by the impact of the basketball actually. If such a level of impact can trigger the G-sensor, then the camera will lock the videos when your car is bumping due to the rugged load while driving.Did my full test on parking mode.
One thing I found weird is an impact while in parking mode does not save to a locked file. It only saves to parking mode.
That is something that in my opinion should be changed. Thinkware, IROAD, GNET, all save impacts while parked to an event folder.
That seems confusing. So throwing a basketball at the windshield will not set off the G sensor? But yet the Thinkware, dash cameras next to it U3000, and U1000 both pick it up as impact.The G-sensor has not been triggered by the impact of the basketball actually. If such a level of impact can trigger the G-sensor, then the camera will lock the videos when your car is bumping due to the rugged load while driving.
That seems confusing. So throwing a basketball at the windshield will not set off the G sensor? But yet the Thinkware, dash cameras next to it U3000, and U1000 both pick it up as impact.
 License & insurance info was then exchanged.)