Mtrev
Active Member
A couple of weeks ago I hardwired the A139 into my BMW and thought I would just do a bit of a write up as it may help others with hardwiring their cameras especially given the issues that are sometimes encountered as a result of the battery management systems on modern vehicles.
For the hardwire I used Viofo's HK3-C hardwire kit.
For the fuse information I loosely followed the BMW instructions for their own dash cam product as this specifies a Permanent 12V (Terminal 30) ACC/ignition (Terminal 15) and an earth point (Terminal 31) A 2019 version of these is available here Advanced Car Eye PDF. My thinking for this is that it should then avoid issues from the power management.
BMW have played around a little with the terminal designations so now have Terminal 30, 30B and 30F as well as the usual 15.
Terminal 30B is what the lighter socket is connected to, this is powered for about 3 minutes after locking the vehicle then goes to sleep. If the car is woken this will then be activated again.
I decided to use a terminal 30B feed for the ACC instead of a terminal 15, this means that if someone was to wake up the vehicle such as triggering the alarm, the camera would be activated and power itself up. This means I can use a 1-2 hour parking mode or even turn the camera off when parked overnight but an intruder could potentially be captured by it.
For the power feeds the fuses advised are in the fuse box under the bonnet, this is less of a problem than it first appears as the fuse box seals to the bulk head so the hole to pass the loom through allows the wires to pass very easily rather than needing to squeeze them through any tight rubber grommets etc.
The fuse box on RHD cars is on the LH side at the very back of the engine bay, against the bulk head. Access is gained by removing a small cover held on by 3 90 degree twist 10mm heads. The fuse box is then underneath a small black lid which unclips. This is all opposite for LHD cars.

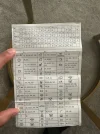
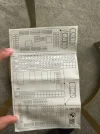
For the Permanent 12V I opted for Fuse 18 Shown at the top with the blue 15A fuse in, there was actually nothing connected to this fuse and this is the one advised in the instructions.
For the ACC wire, I used fuse 35 shown at the bottom which was empty. You could use fuse taps in these fuses to add the wires to them, because they were empty I crimped the terminals onto the wires as per the BMW instructions and inserted them in the plug connections on the rear. I then fitted a 5A fuse to each when I had finished wiring the kit in.

The correct terminals for this fuse box are BMW part number 6113 1378906


To route the kit I removed the passengers footwell under trim, the glovebox and lower A pillar trim. I removed the LH dash end panel that has the airbag switch in, if you disconnect the switch it will store an airbag DTC so leave it plugged in or disconnect the battery negative terminal unless you have something to clear DTC's with.
I also removed the upper A pillar trim, this unclips away slightly then pulls up to release its final clip.
To allow me to run the cable along the front of the headliner removed the LH sun visor and the LH mount of the RH sun visor, these are just held in by 1 TX 20 screw at each point so simple to remove. The front of the headlining is clipped to the roof above the interior light assembly but to make access easier I also lowered the light assembly as this is also quite simple as shown in the pics.
The black cover unclips to leave the assembly as seen in the first pic, there are then 2 metal clips (circled) and shown better in the second pic, this can be released with a small flat screwdriver allowing the assembly to be lowered.


This then left me in the position to start routing the wires. I started in the LHF footwell, with the carpet pulled back to give me access to an earth point and also some ducting to run the earth wire down as in the second picture.


I mounted the HK3-C box on the wiring harness underneath the glove box as shown and ran the red and yellow cables along the loom then through into the fuse box area, the pass through hole is shown in the second pic. Mounting the HK3-C box there means I only have to remove 2 10mm bolts to take the under panel off and I can access it easily if I need to.


I then crimped the connectors to the red and yellow wires and fitted them into the fuse box connections as shown earlier, fitted the fuses and did a test run of the camera to make sure it all powered as planned.
It is then just a case of tidily routing the USB-C cable to the A pillar, up the A-pillar and across the roof lining to the camera. I did this loosely then secured the cable starting at the camera so that any loose wiring ended up back near the wiring harness and HK3-C box as it is easier to secure it there than behind the headlining.
For the hardwire I used Viofo's HK3-C hardwire kit.
For the fuse information I loosely followed the BMW instructions for their own dash cam product as this specifies a Permanent 12V (Terminal 30) ACC/ignition (Terminal 15) and an earth point (Terminal 31) A 2019 version of these is available here Advanced Car Eye PDF. My thinking for this is that it should then avoid issues from the power management.
BMW have played around a little with the terminal designations so now have Terminal 30, 30B and 30F as well as the usual 15.
Terminal 30B is what the lighter socket is connected to, this is powered for about 3 minutes after locking the vehicle then goes to sleep. If the car is woken this will then be activated again.
I decided to use a terminal 30B feed for the ACC instead of a terminal 15, this means that if someone was to wake up the vehicle such as triggering the alarm, the camera would be activated and power itself up. This means I can use a 1-2 hour parking mode or even turn the camera off when parked overnight but an intruder could potentially be captured by it.
For the power feeds the fuses advised are in the fuse box under the bonnet, this is less of a problem than it first appears as the fuse box seals to the bulk head so the hole to pass the loom through allows the wires to pass very easily rather than needing to squeeze them through any tight rubber grommets etc.
The fuse box on RHD cars is on the LH side at the very back of the engine bay, against the bulk head. Access is gained by removing a small cover held on by 3 90 degree twist 10mm heads. The fuse box is then underneath a small black lid which unclips. This is all opposite for LHD cars.
For the Permanent 12V I opted for Fuse 18 Shown at the top with the blue 15A fuse in, there was actually nothing connected to this fuse and this is the one advised in the instructions.
For the ACC wire, I used fuse 35 shown at the bottom which was empty. You could use fuse taps in these fuses to add the wires to them, because they were empty I crimped the terminals onto the wires as per the BMW instructions and inserted them in the plug connections on the rear. I then fitted a 5A fuse to each when I had finished wiring the kit in.
The correct terminals for this fuse box are BMW part number 6113 1378906
To route the kit I removed the passengers footwell under trim, the glovebox and lower A pillar trim. I removed the LH dash end panel that has the airbag switch in, if you disconnect the switch it will store an airbag DTC so leave it plugged in or disconnect the battery negative terminal unless you have something to clear DTC's with.
I also removed the upper A pillar trim, this unclips away slightly then pulls up to release its final clip.
To allow me to run the cable along the front of the headliner removed the LH sun visor and the LH mount of the RH sun visor, these are just held in by 1 TX 20 screw at each point so simple to remove. The front of the headlining is clipped to the roof above the interior light assembly but to make access easier I also lowered the light assembly as this is also quite simple as shown in the pics.
The black cover unclips to leave the assembly as seen in the first pic, there are then 2 metal clips (circled) and shown better in the second pic, this can be released with a small flat screwdriver allowing the assembly to be lowered.
This then left me in the position to start routing the wires. I started in the LHF footwell, with the carpet pulled back to give me access to an earth point and also some ducting to run the earth wire down as in the second picture.
I mounted the HK3-C box on the wiring harness underneath the glove box as shown and ran the red and yellow cables along the loom then through into the fuse box area, the pass through hole is shown in the second pic. Mounting the HK3-C box there means I only have to remove 2 10mm bolts to take the under panel off and I can access it easily if I need to.
I then crimped the connectors to the red and yellow wires and fitted them into the fuse box connections as shown earlier, fitted the fuses and did a test run of the camera to make sure it all powered as planned.
It is then just a case of tidily routing the USB-C cable to the A pillar, up the A-pillar and across the roof lining to the camera. I did this loosely then secured the cable starting at the camera so that any loose wiring ended up back near the wiring harness and HK3-C box as it is easier to secure it there than behind the headlining.