Dashmellow
Well-Known Member
- Joined
- Sep 22, 2013
- Messages
- 18,810
- Reaction score
- 19,441
- Location
- Uncanny Valley (●_●)
- Country
- United States
- Dash Cam
- Umpteen
I am planning to mount the lens on an extension lead, my question is, is it ok to attach an angled bracket (probably Aluminium) using the two screws in the rear of the lens? I could then mount the camera out of sight between mirror and rain sensor dotted section on top of screen. This may also act as a heatsink if needed. I will use a super capacitor instead of a battery.
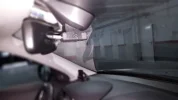
I would be inclined to leave the two screws on the back of the lens module alone as you risk throwing the sensor out of alignment with the lens which was a problem on some modules. Instead, I would suggest epoxy mounting a modified 1/4-20 threaded T-mount on top of the module like in the photo below which provides for secure mounting possibilities using a tripod thread mount or any DIY 1/4-20 threaded scheme.