SGDCHW for SG9663DC (3-wire hardwire kit to enable PARKING MODE function) Timed & Low Battery Discharge Prevention

I'm extremely new to dash cams so please pardon my ignorance. How does one tell which fuse type is correct for their car? I drive a 2016 Mazda 3 GX sedan and I plan on having someone else install the hard wire kit.

The best way is to pull a fuse from your interior fuse box and look at it. It is most likely under your drivers side dash. There is likely a fuse puller in your engine compartment fuse box (at least one of them if there is multiple fuse boxes).

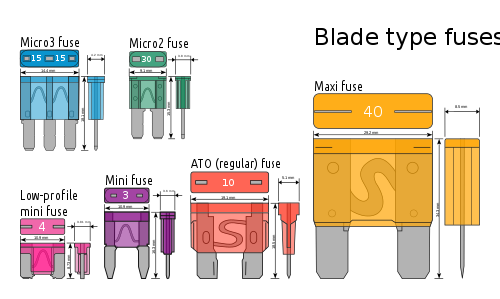
It probably uses low profile mini, but always best to double check.

Edit: Of course put the fuse box after checking. :)

 
Hey guys, I was hoping you could double check the kind of fuses my 2016 Subaru Forester (2.5 version) uses? I was looking online and found a few good resources and believe it should be the mini ATO, but am not so sure how to tell if my vehicles has one fuse type for the accessory switch, and another [fuse type] for the battery constant power. I want to have the DC dashcam running while the car is off, but switch to "normal use" at a higher FPS recording rate when the car is turned on. How do I figure out the best fuse to tap into for my purposes? How do you know if you need a ground? Have never done this before and am still confused even after reading through all the links below.

Website that shows how to replace fuses for my car.

GIF from the website above that shows type of fuse (Mini ATO?)

Forum post where someone was asking what specific fuse to tap into for permanent power (specific to Subaru Foresters)

Forum post where someone posted a how-to guide for hard-wiring (OP has same year car as me)
 
Yes that fuse in the GIF look to be the mini type ( like my car also use ) though my car also have a handful of the larger fuses for some things.
And as shown a needle nosed plies are fine for dealing with these little suckers, just dont clamp down on the sucker with all your might. ( there are sometimes i little plastic tweezers looking thing to pull fuses with inside the fuse box )
When doing this last year on my car i found that the first 5 or so fuses i tried was actually live all the time, got to a point i was thinking " damn isent any of the fuses here switched" i used a cheap measuring devise and had my friend turn the key when i asked as my fuse box are in a place where you have to be a very good contortionist just to get in there let alone turn the key too.

This is in general the same in all cars, only change might be the fuse type and location of fuse box, and then of course identifying what fuses are always live or switched.
 
The following sites are helpful to determine which fuses to use, but they don't tell you the blade types, unfortunately. You still need to pull a few out and compare them to the photos.
http://www.autogenius.info
https://fuse-box.info/
http://fusesdiagram.com/

Yes, I found the page specific for 2016 Subaru Forester fuses but am not sure how to determine the configuration for "fuse 1" and "fuse 2" type. Do I get Mini ATO for both fuse 1 and fuse 2, or is there more to this? In other words, do I look for the specific fuse that has constant power (i.e. fuse #3 for door locking, or do I look for an empty slot like #2, #23, or #30?) and double check to see if that is also Mini ATO? Or would all of the fuses be the same type (Mini ATO)? The hard-wiring product page is very hard to understand for someone who has never hard wired anything in their car.
 
It are easy to see the mini ATO and Mini/low profile, but the mini/low profile have much less plastic, the mini ATO also have pointed connectors where its sibling the mini ATO low profile have not.
MINI ATO are the only ones with pointy connectors.

Where as the MICRO ATO the 2 connectors are much closer together.

500px-Electrical_fuses%2C_blade_type.svg.png
 
not sure how to determine the configuration for "fuse 1" and "fuse 2" type.

I think thats there as you might need to install say a mini ATO for the switched connection and maybe have a regular ATO for the Always on.

I think selecting both to be mini ATO will be safe for you @jkxs
 
I think thats there as you might need to install say a mini ATO for the switched / ACC connection and maybe have a regular ATO for the Always on.

I think selecting both to be mini ATO will be safe for you @jkxs

Ah thank you, @kamkar1 . I think the issue is that I have no idea how switches are connected to devices (at this moment) and so it is confusing as to why you might need two different switch types for one power adapter. Just placed the pre-order on the USA site.
 
Last edited:
In the old days with a 3 wire hard wire kit when driving the camera was powered via the switched connector, when you then turn off your car the source for the +12 V switch over to the always on connection. ( ground / negative 12 V are always shared )

Today it might work like this, so the switched connector are more or less just a sensor telling if the camera have to be in parking mode or regular mode ( engine stopped no key in it Vs engine running key turned )
Either way the camera always draw power from the always on connection, the smarts in the new hardware kits then know from the switched connector what to do and signal to camera to go into normal mode or parking mode.

Either way its a 3 wire kit old fashioned or like i guess they might work in modern kits ( and id partly why older hard wire kits might not work with the new cameras )

By switched i mean fuses or wires that are only live / powered when your car are started or the key in one of the forward positions at least, where as the always on fuses / wires are always powered no matter if you or your car key are anywhere near your car.
 
We are looking to slowly build a wiki database or separate post to help people determine which fuse blade type they need based on previous customers who have shared their experiences. I have some notes on various vehicles so far. (but nothing for Sabaru's yet)

As always, we suggest seeking out your local car audio installer who are experts in hard wiring these and removing the trim to run the wires etc. (if need be)

The hardwire system tells the dashcam if you're driving or parked based on the power that is detected.
Red = Accessory Switched Power (only hot when the engine is started)
Yellow = Constant Unswitched always hot connection (battery)

So if the DC cam is hardwired into an "always on fuse" (battery), the REC button on the DC camera will blink yellow instead of the usual red? Did I understand that correctly?
 
The links you dropped above dont mention Suzuki, dont they sell cars over there, i know other makers of small cars do.
 
So if the DC cam is hardwired into an "always on fuse" (battery), the REC button on the DC camera will blink yellow instead of the usual red? Did I understand that correctly?

No I was referring to the physical color of the wire on the SGDCHW itsself
 
No i think he mean red and yellow wires to add fuses, the REC light in the camera only can do red,,,,,, i think.

The botton pice of the wires to the two addin fuses do seem to be red, but i bet the remainder of the 2 wires are red and yellow, also marked with labels it seem
 
MY guess is that the red wire are to the always on connection, and the yellow one for the switched connection,,,,,,, but i am guessing here, either way labels on said wires will tell what is what too.
 
The links you dropped above dont mention Suzuki, dont they sell cars over there, i know other makers of small cars do.

My car is a Subaru, not a Suzuki. The links I posted are specific to my car year (2016) and model (Forester).

I was wondering if you might have some suggestions on adjusting the exposure settings on the DC cam? Is it based on trial and error from reviewing footage? I saw one of your videos on the DC menus. My rear camera footage is darker than I would like at night and it is probably due to the CPL on it (I have a CPL on both the front and the rear), but I wasn't sure if I should just take off the rear camera CPL, or if I should try messing around with exposure with the rear CPL on first before moving onto testing exposure with the CPL off.

During the day, rear camera footage is fine, but it seems like the rear footage is too dark at night so there will have to be some changes made. Removing and replacing the rear CPL daily is not an option.
 
MY guess is that the red wire are to the always on connection, and the yellow one for the switched connection,,,,,,, but i am guessing here, either way labels on said wires will tell what is what too.

RED = Accessory (switched power source that turns on with engine start)
YELLOW = Battery (unswitched constant power that's always hot)
Black = Ground (Connected to the bare metal frame of the vehicle)

(Note that Street Guardian has followed industry standard RED/YELLOW descriptions where some other products on the market RED/YELLOW are opposite of what they should be)
 
My car is a Subaru, not a Suzuki. The links I posted are specific to my car year (2016) and model (Forester).

I was wondering if you might have some suggestions on adjusting the exposure settings on the DC cam? Is it based on trial and error from reviewing footage? I saw one of your videos on the DC menus. My rear camera footage is darker than I would like at night and it is probably due to the CPL on it (I have a CPL on both the front and the rear), but I wasn't sure if I should just take off the rear camera CPL, or if I should try messing around with exposure with the rear CPL on first before moving onto testing exposure with the CPL off.

During the day, rear camera footage is fine, but it seems like the rear footage is too dark at night so there will have to be some changes made. Removing and replacing the rear CPL daily is not an option.

Please post non SGDCHW questions in another thread if possible, would like to keep this thread specific to SGDCHW questions if possible.
https://dashcamtalk.com/forum/forums/sg9663dc.234/
Update to the latest firmware first from the support section of our website for starters. Then check EV settings.
 
I know, i cant afford to drive such a fine car, i drive one of the cheapest cars Suzuki make, but most likely paid the same for that little car as you did for your forrester.

No i have not looked into adjusting the EV value in any way, if you have tint in the rear then you will want to adjust the EV for your rear camera, but really no set standard here you will just have to experiment on what suit you and your car best.

Yes the rear footage from the DC are a little leggin as its not the same sensor as in the front camera, still i find it just fine for the work back there.
When i drive it only take 5 - 10 minutes and then i am out of town and its only darkness out there on the highways, and in town i think its alright.

No CPL filter for the rear camera in the DC kit, i just used a surplus one i had from a GC model camera.

A CPL filter do block some light, so if you find it a tad dark you can compensate with the EV value for that camera.
 
Last edited:
Most won't need a CPL for the rear camera, but if you do we sell a 2nd CPL as an accessory. Serach for SGCPL on our main site or Amazon.
 
I am using to filter reflections,,,,,, in the windscreen of the car behind me.
I do get some reflections in my vertical and much flat rear window too, but only really seen at night as its the headlights of oncoming cars.

I see my color guessing skills are as good as my lotto winning skills :rolleyes:
 
Back
Top