SGDCHW Add-A-Fuse Micro 2’s Don’t Fit Ford F150

DashCamOnBoard

Active Member
Joined
May 17, 2015
Messages
166
Reaction score
48
Country
United States
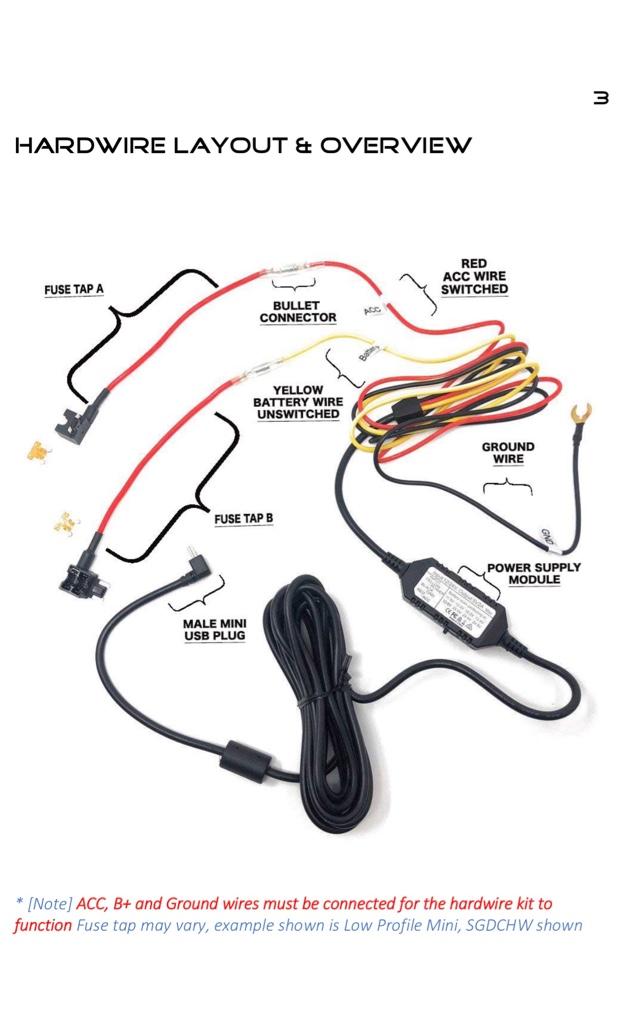
Well, I have a SG9663DCPRO installed and working good on a 2020 F150 using a cigarette plug. Today I just received the SGDCHW hardwire kit that includes all the different fuse sizes but ran into a problem. The Micro 2 plastic housing is just a little too big and wouldn’t go in to the fuse slot in the fuse box.

49953794851_1684325154_o.jpg


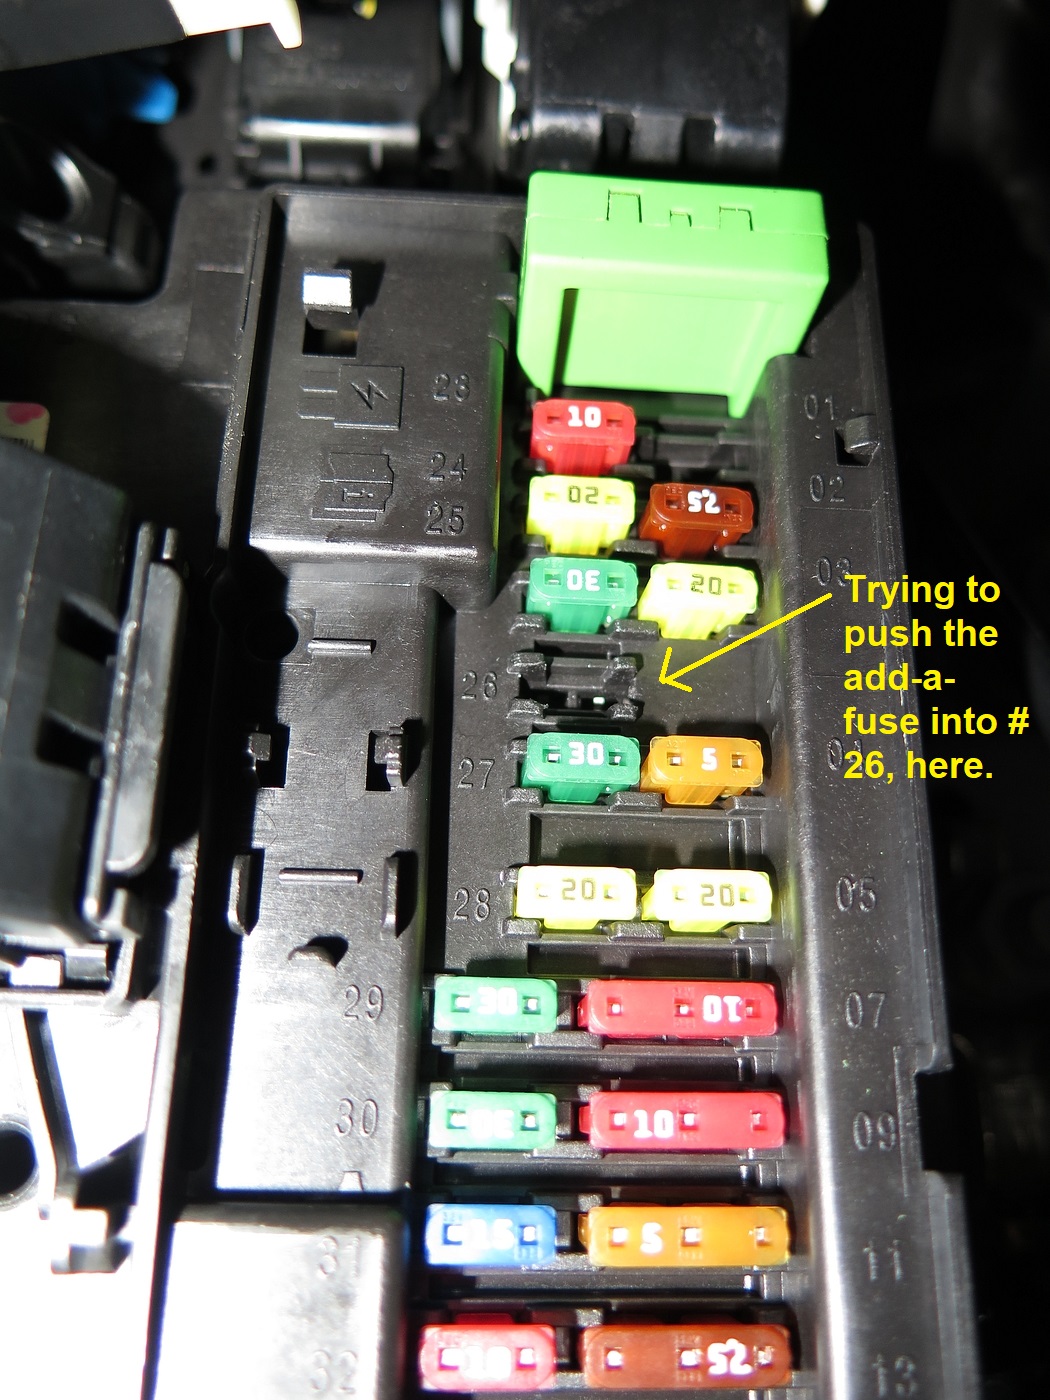
Here's a photo where I tried to push one of the add-a-fuses in, but it wouldn’t go.

49953794826_8ffef0e77b_o.jpg


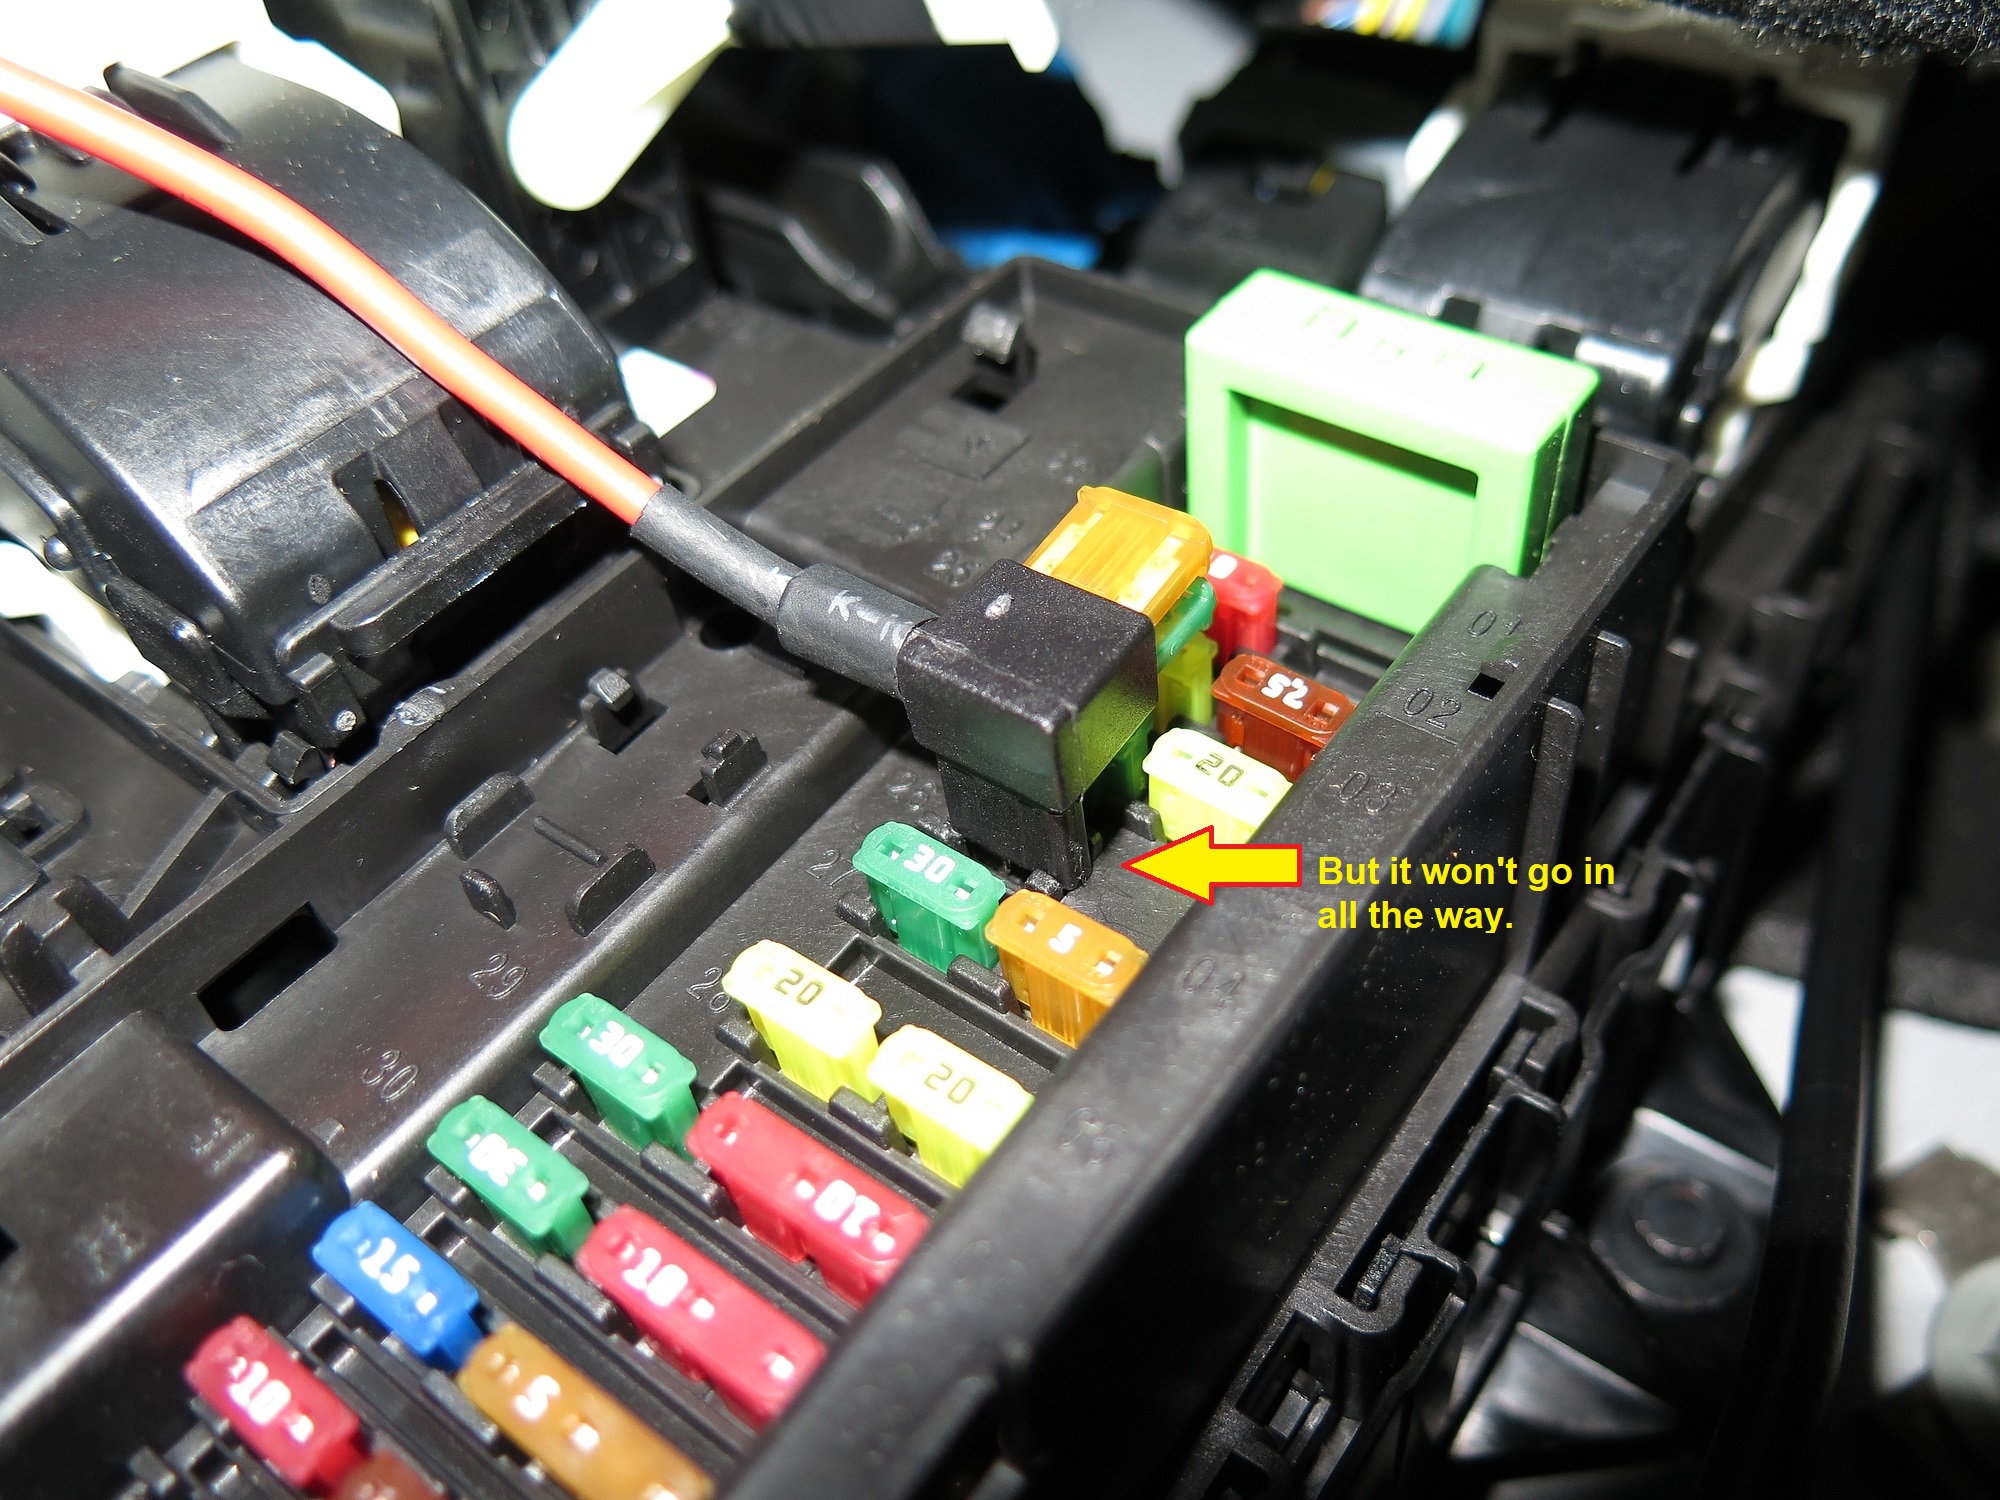
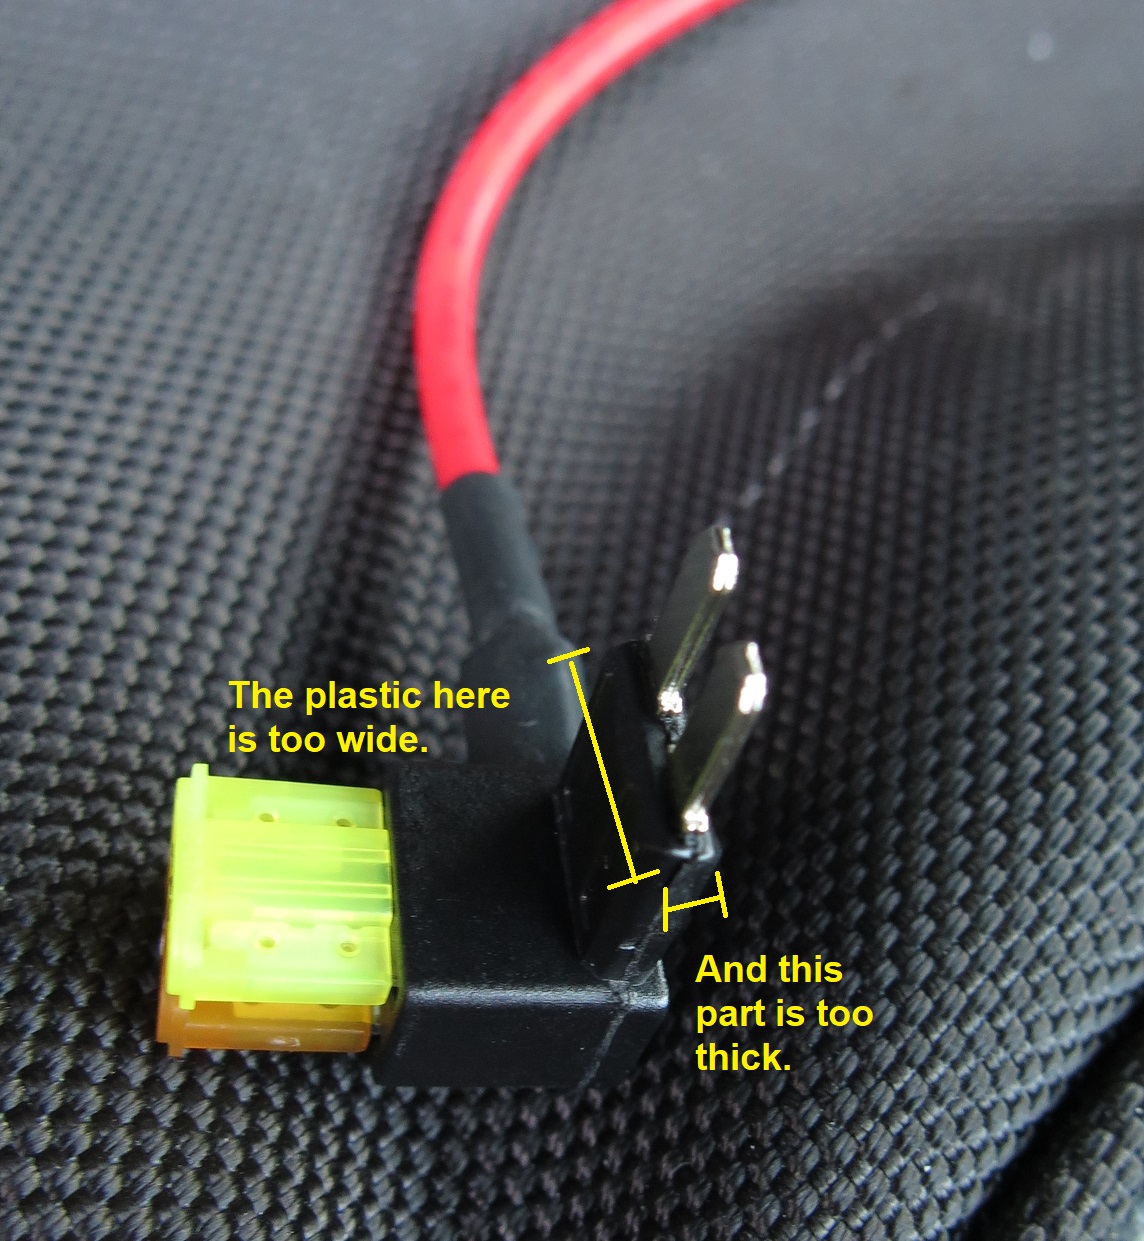
Here’s a closer-up shot where you can see how the plastic part is just a little too wide and won’t go down enough, so I couldn’t get it to plug in.

49954080112_e4ae86e403_o.jpg


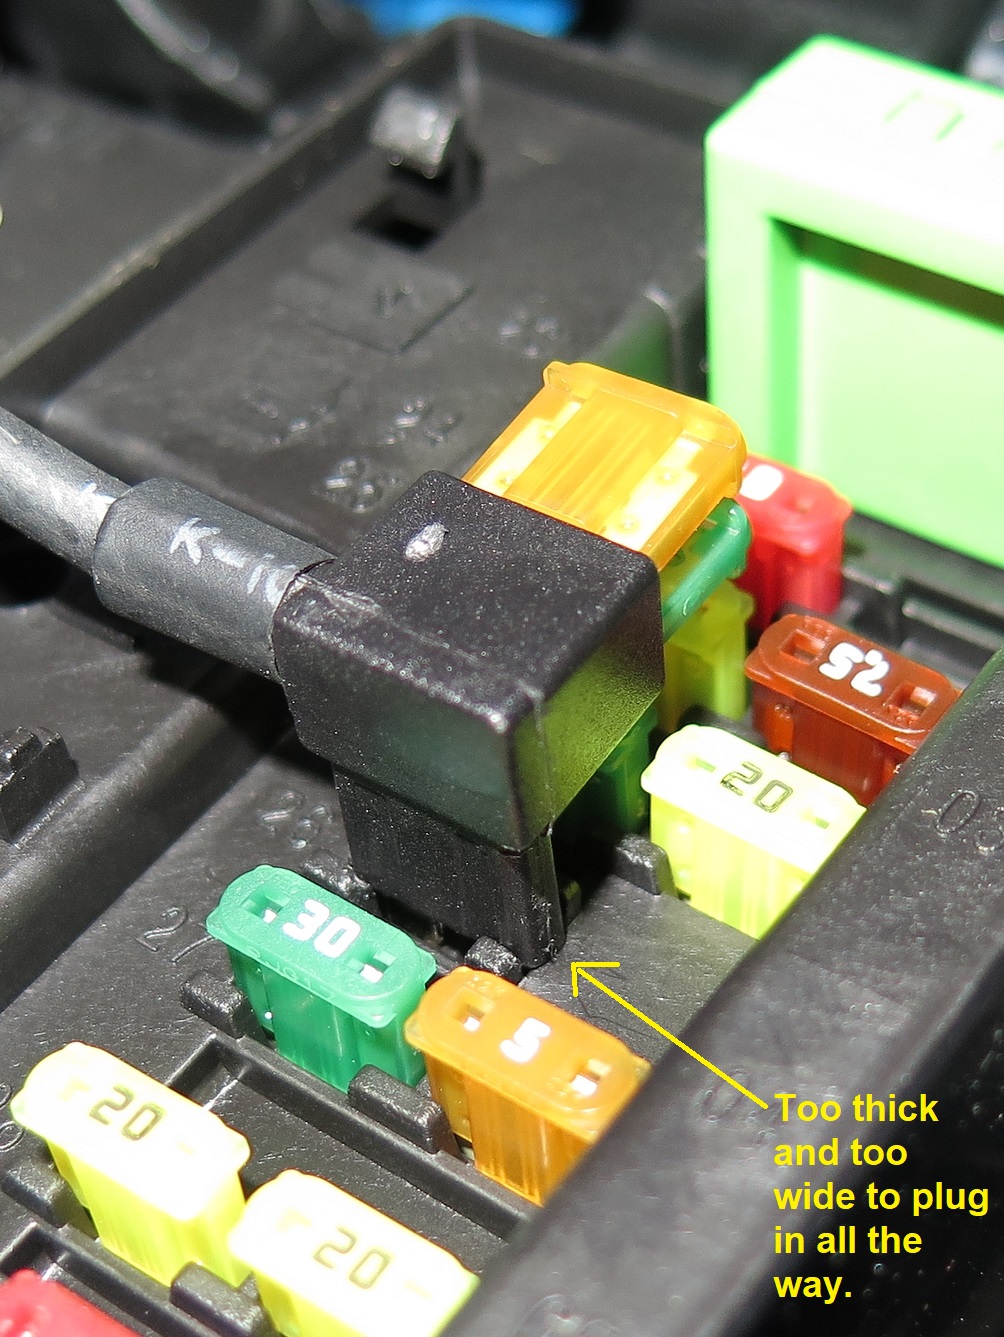
So unfortunately, I wasn’t able to do the install and will use the cigarette plug for now. I think I’m going to shop around for another Micro 2 sized add-a-fuse and see if I can find one that fits. I thought I’d pass this along as an FYI in case anyone else runs into a similar issue. Maybe future versions could make the plastic casing skinnier so it’ll push in all the way.

49953296388_97d5599ae7_o.jpg


Something else I should mention, it is awfully hard to push the 2 fuses into these add-a-fuses. I had to squeeze ‘em with pliers to get ‘em in all the way. Perhaps they could be made with a little more tolerance so they’re not so overly tight.
 
Last edited:
had similar feedback from a Mustang owner recently, seems Ford may have changed the fuse panel plastic surround at some time, the taps are the same ones we've always used and it hasn't come up as an issue in earlier model model Ford vehicles, or in other vehicle brands that use Micro2 fuses, I'll pass this info to the supplier of the taps anyway and see if it's something they can adjust for future productions to accommodate whatever has changed, appreciate the high quality pictures, that will help
 
Daum. it still look as if the fuses them self have some wiggle room :unsure:
You will probably have to remove some material from the fuse adapter

You probably should not tell some Chevy fan, wit the Ford / Chevy bantering going on.
 
Well, that's a great idea. Didn't even think of that. Sometimes it's the simplest things you don't even think of, so thanks for the advice. So I went ahead and put both add-a-fuses on a vice and shaved down the plastic with a kitchen knife. Well guess what? Now they both fit in and the hardwiring is all done. Now I just need to drive around, test it out, and try out the parking mode. Very glad to get this done.

And evidently, this is s Ford problem after all. I'm seeing some other forum postings and Amazon reviews where people are having the same issue with their F150s. Well, at least now we'll have this thread on here as a future reference with photos that can be found in a search (I've added Ford F150 to the title).
 
So, question about parking mode. What type of file is generated? .jpg, .gif, .png, .bmp? Now that I have the hardwire kit installed, I'm still only getting .mp4's.
 
So how do we tell which files are regular recordings and which ones are parking mode? All my .mp4's look like regular video recordings. So I suspect the dashcam may not be going into parking mode. Do parking mode mp4's just have still images? I have set mine to 2 fps, but I'm not finding any files that look like a 2 fps frame rate.

An example of a filename I have is 2020_0531_155159_292B.MP4

I'm assuming this means May 31, 2020, at time 15:51:59 , but I'm not sure what the next "292B" part means. Do you know what this is, and is there a way to tell by the filenames which ones are from parking mode? Thanks.
 
if you look at the file sizes you'll see that the parking mode files are much smaller in size

the camera will double beep and there will be a clock icon on the display when it changes to parking mode
 
Crap. It looks like mine's not going into parking mode. I do know that when I was using the cigarette plug before I got the hardwire kit, the cigarette plug would stay powered on for about an hour or so after shutting off the ignition and removing the car key. It is tricky how these modern vehicles operate. I used the 2 fuse locations from post #10 in this thread:

https://www.f150forum.com/f118/where-wire-dash-cam-445159/#post6177417

But dang it, it looks like that may not work for parking mode, and I'll need to spend some more time troubleshooting this. I don't know why it seems to work for others in that thread. The problem with fuse box documentation is they never tell you which fuses become powered on when, with each partial turn of the ignition key. So this project isn't done yet after all. A dash cam is proving to be a hard thing to install after all.

Just a suggestion either take a picture of the fuse box layout in your manual or post the manual page here with a schematic of the fuse box. Red wire is ACC, meaning it needs to go to an ignition powered system (activates when car is started) - Examples may be 12V Socket, heated Seats, etc. NEVER and I REPEAT NEVER tie into critical systems (Airbag, safety systems, etc). Battery = What powers camera once car is off. Yellow Wire. I tied into my power seats. These are active even when car is shut off.

Black is grounding....

If you post your manual we can maybe take a better look and give suggestions on proper fuses to use.
 
Last edited:
Yes it is MP4, while time lapse if you choose that it is video time lapse not photo time lapse, personally i am going to go with low bitrate constant recording as it have audio too.

At least i think so, a great deal of experimenting will have to be done in this regard when i get around to test this feature in a SG product.
 
Yellow is B+, red is ACC

Well your wiring is different than Viofo's where yellow is acc and red is battery...??? That's what I have written down in the guide / notes I made when I installed. My Camera works perfectly with parking mode. Ill take another gander at my setup but I'm pretty damn certain Viofo has yellow as ACC.
 
Industry colors are what Street Guardian uses for wiring. Many generic China companies have been doing it backwards for many years now. It’s very split out there now. Just be sure to follow our hardwire user manual instructions. Best not to make any assumptions from other products.
 
Industry colors are what Street Guardian uses for wiring. Many generic China companies have been doing it backwards for many years now. It’s very split out there now. Just be sure to follow our hardwire user manual instructions. Best not to make any assumptions from other products.

Well count me embarassed. I didn't know the wiring wasn't standard among products. I kind of assumed, and wrongfully, that companies would be using the same configuration. Viofo clearly has yellow as ACC and Red battery. Found it on their documentation and BlackBoxMyCar

https://www.blackboxmycar.com/pages/setup-viofo-3-wire-hardwire-kit


Use a circuit tester or equivalent to test which fuse is constant and which is ignition-switched. A fuse that is constant will stay on when the car is off and vice versa for the ignition-switched fuse. A proper ground bolt should only be metal and not be attached to other materials such as plastic. Once the proper fuses have been selected, connect one wire from your hardwiring kit to a constant fuse (typically red), whereas the other wire will go into an ACC/ignition-switched fuse (typically yellow). Your last wire (in the shape of a ring or a C) will go to the metal ground bolt. It's best to read the labels carefully prior to proceeding.
 
I know its not popular, but always read the manual ;)
 
Back
Top