A139 (Pro) Telephoto Remote Camera

w

im going to start with the varifocal but if I find I’m keeping at a certain setting then I’ll just get a prime lens in that mm.

It will be a good way to figure out the distance I want the most.

Sounds like a good plan.

Keep in mind though that since these varifocal lenses have no calibration markings for focus or zoom and were never designed to be fitted to dash cams it is very difficult to know for certain what focal length in mm they are actual set at. One can only approximate.
 
im going to start with the varifocal but if I find I’m keeping at a certain setting then I’ll just get a prime lens in that mm.

It will be a good way to figure out the distance I want the most.
If you have any results as images or videos please share them.
With the variofocal lens you have the advantage to try different levels of zoom easily.
 
any way to cut or make custom sized CPL filters for different lens sizes?
 
any way to cut or make custom sized CPL filters for different lens sizes?

No, it is not practical to cut IR filters or even doable. You just need to purchase the correct size for the rear diameter of the lens you want to install it on.
 
Im gonna be purchasing this lense for A139 interior cam as recommended here. https://m.aliexpress.us/item/225580...etail&spider=y&gatewayAdapt=glo2usa4itemAdapt
Do i need to buy anything else like CPL or custom make a wedge?
The main thing is the IR filter - but this one looks like it comes with one. Without the IR filter the colors won’t be acccurate.

Also I’d just order from Amazon- much faster. Search “M12 lens” they are also listed as “raspberry pi lens” “cctv board lens”. Make sure to get one with an IR filter. It can be a pain to install your own- you can accidentally get glue/epoxy on the lens or it can fall off over time.
 
any way to cut or make custom sized CPL filters for different lens sizes?
I made a DIY CPL for the varifocal lenses by cutting a circular hole in the lens cap then gluing on a CPL that I extracted from an old rectangular Viofo CPL.
y4mY9OJkMBzqAIBNMbRK_T6x2btP3RDO7iY5RUah6SqmlEFVTc1KHTRPHPSr61oX3RqCC55jHWsB9I31OHstD8IiZSPBqBKXPlGl1rxmcD8j1-2VDgnDTbfbJMFzVvr0GdLV5ytlWXbyFcOmTKYP1ffg4lixjv9sYbU1gSExOO9YBO8fMBBEAD-_LjskZ3Tqk3tq4lAAaRs0ZcmCe46Izov3g


Other users have attached a 28-30 or 28-37 step-up ring and a threaded CPL which allows for easier fine-tuning of the filter.

sw2-jpg.50729
 
Hi All,

It’s been *suprisingly* difficult finding a wedge setup that will hold the main body camera with a zoom lens. I’ve tried many different setups and the common issue is the VHB does not stick to most furniture wedges- part of the reason being that they are “textured”.

I’ve tried covering the wedge in JB weld for plastic, but that eventually peels off from the heat etc. I’ve tried melting the textured parts of the wedge to become smooth- still won’t stick.

The best I’ve done is had it stick up there for a few days- but it always slowly starts to peel off. The VHB is rating for 40lbs so that shouldn’t be the issue. I just need a wedge that VHB will stick to.

I’m open to all ideas to make this work.

I have not had that problem with these wedges. I currently have a camera that has been attached to a custom mount with nylon furniture wedges for several years. (but you do have a bigger, heavier camera and you've mounted a heavy lens on it) If you can't get it to work I would recommend finding a friend or acquaintance who has a woodworking shop and have him make a wedge to your exact specifications. Anyone with basic woodworking skills and the proper tools should probably be able to knock out what you need within a few minutes. This would provide something that should work better for you. I would recommend using hardwood such as maple or oak.

Another option is to find a 3D print shop and they can make a wedge to your specs out of a material that VHB tape should adhere to better. (You'll need to provide the specs and angle you need.)
 
Last edited:
The VHB is rating for 40lbs so that shouldn’t be the issue
There are different types of 3m vhb tape.
Some are better for specific types of material. I don't know the exact type you used.
I use VHB GPH-110GF for many things. This holds on to any material combination I tried so far.
Maybe you can test this.
 
There are different types of 3m vhb tape.
Some are better for specific types of material. I don't know the exact type you used.
I use VHB GPH-110GF for many things. This holds on to any material combination I tried so far.
Maybe you can test this.

You make a good point. The typical black 3M VHB tape that comes with dash cams is type #5952. I find that the gray VHB tape #4941 works very well on plastics and is eventually easier to remove easily without leaving a residue.

Another important factor is proper surface preparation before applying the tape as well as giving the tape enough time to fully bond before applying weight to it and this can take up to 72 hours.

In certain situations you may need an adhesion promoter designed for the specific surface you are attaching to - (see the surface prep page below)

Surface Preparation for 3M™ VHB™ Tape Applications


VHB Tapes Product Information
 
Last edited:
There are different types of 3m vhb tape.
Some are better for specific types of material. I don't know the exact type you used.
I use VHB GPH-110GF for many things. This holds on to any material combination I tried so far.
Maybe you can test this.
Could this be the light at the end of my tunnel? haha.

Thank you. Definitely going to try it out. I didn't know there were different types.

and I also ordered some wooden wedges to try out.
 
Could this be the light at the end of my tunnel? haha.

Thank you. Definitely going to try it out. I didn't know there were different types.

Try it and let us know if this fixes your issue.
 
I am using a thin wedge as a spacer under the telephoto camera so that the CPL does not hit the window.

1679324039019.png
I'm struggling to get my remote camera with a small telephoto to stay in place on the 3d-printed wedge. I've tried both 5952VHB and dual-lock, but both start peeling away from the wedge after a few days. My northern UK climate is far from 'hot'. Part of the problem is the offset mount, another is the very small mount foot. I wonder if I could 'weld' around the mount foot with a strong glue?

BTW, I noticed that the cabin camera emits IR from the LEDs even if they are set to off in the app. My standard rear camera picks up a strong purple tint reflecting off the glass and particularly the rear window heating elements.
Sorry I did ask this elsewhere but this thread seems more well followed.

Is there anyway to get the rear camera (no IR) with the short coaxial cable? Curious why most are using the IR camera for the telephoto and not the rear camera.
 
Curious why most are using the IR camera for the telephoto and not the rear camera.
Assuming the A139 was bought as a 3CH camera, if you keep the front and rear cameras as-intended, you can re-purpose the IR camera as a front-facing telephoto.
 
I'm struggling to get my remote camera with a small telephoto to stay in place on the 3d-printed wedge. I've tried both 5952VHB and dual-lock, but both start peeling away from the wedge after a few days. My northern UK climate is far from 'hot'. Part of the problem is the offset mount, another is the very small mount foot. I wonder if I could 'weld' around the mount foot with a strong glue?

The 3D printed wedge usually has a glossy finish. Roughing it up a bit with sand paper worked for me.
 
The 3D printed wedge usually has a glossy finish. Roughing it up a bit with sand paper worked for me.

I've had mixed results with that technique but I think it depends on the type of material you want the tape to adhere to. I recall when everyone was complaining that the VHB tape Street Guardian was supplying with their mounts was peeling off the mount in warm conditions but sticking well to the glass they recommended sanding the plastic but that didn't work at all for me. Using aftermarket 3M VHB tape I purchased elsewhere did the trick. - Plus good prep and surface cleaning.

Then again, 3M recommends abrasion as a technique to try on their Surface Prep page.

I guess if that doesn't work, then go with one of their primers or adhesion promoters but they can be pricey unless you are doing a lot of installations.

abrasion.jpg
 
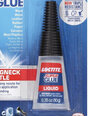
This may not be an option for you, but when I’ve found VHB failing, adding some Loctite super glue really helps. VHB helps fill in crevices and moldable and the super glue helps with staying power:

IMG_8183.jpeg
 
Back
Top