Hacking Q3H (allwinner v3 - Camdroid)

Seems you have to desolder the flash chip to get a full dump from it.

not really, just DD all of the partitions from the nand and place them in the appropriate spots inside any full_img.fex.
If you have a friend with the camera you are golden.

ı cant find tool for allwinner
Phoenix suite does that. You have image format to unpack and repack, all v3 images have the same layout so far.
 
I also removed some of the glue, but didn't managed to move the lens yet.

Here is the difference after heating:
View attachment 24975

I removed 95% of the glue all around, slowly and carefully, then it started turning. There is still enough grip to keep it still.

Today I tried the camera for a few minutes and it worked just fine.

Here's a sample after 5 minutes 2.7K recording
 

Attachments

  • sample-2.7k.png
    sample-2.7k.png
    1.9 MB · Views: 62
Hey so I found something new, I can run arm binaries off the SD card. Its possible to raid allwinner tablet images for things like busybox. Unfortunately the busybox I have is over 1MB so adding it might be a no go. I wouldn't mind adding libstagefright and trying some command line recorders which would bypass the SDV application in theory. Thoughts?

I was able to shrink some more unused wav files and add busybox.. but no symbolic links.
So you can now type busybox dmesg and get dmesg :)

http://www.megafileupload.com/o4px/OldModNewFWBusyBox.img

The binary was straight off the busybox site targeted at armv7. I had nano running too but it couldn't open the terminal in windows so a bit useless.

If someone can find (or build) a v4l2-ctl from v4l-tools we can record what we want and turn off auto exposure, etc.

Unpack the kernel: http://forum.xda-developers.com/redmi-1s/general/guide-unpack-repack-kernel-t2908458

Additional libraries can be loaded from debug_lib on the SD card, I can probably add a bin folder to the path as well and have programs running off of there too.
 
Last edited:
I took the time to copy the modes from both the old and new module:

Code:
    Size          Input  Rate SensorRegs
New Module

3264x2448 - 0x0       - 30 - 8m30
3264x2448 - 0x0       - 15 - 8m15
3264x1836 - 0x0       - 25 - 8m25
3264x1836 - 0x0       - 22 - 8m25
3264x1836 - 0x0       - 15 - 8m25
3264x1800 - 3264x1836 - 25 - 8m25
2688x1520 - 3264x1836 - 30 - 8m30
2448x2448 - 0x0       - 30 - 8m30
2048x2048 - 2448x2448 - 30 - 8m30
1920x1088 - 3168x1792 - 30 - full16x9
1920x1080 - 3168x1792 - 30 - full16x9
1520x1008 - 0x0       - 60 - fullbin60
1440x1440 - 2448x2448 - 30 - 8m30
1232x1232 - 0x0       - 60 - squareBin
1280x720  - 3168x1792 - 30 - full16x9
1280x720  - 1776x1008 - 60 - fullbin60
1280x720  - 1776x1008 - 90 - binning90
1280x720  - 1344x756 - 120 - binning120
1072x1072 - 2448x2448 - 30 - 8m30
1072x1072 - 1232x1232 - 60 - squareBin
756x756   - 0x0      - 120 - binning120
720x720   - 756x756  - 120 - binning120


Old Module

3264x2448 - 0x0       - 30 - 8m30
3264x2448 - 0x0       - 15 - 8m15
3264x2448 - 0x0       - 25 - 8m25
3264x2448 - 0x0       - 15 - 8m25
2688x1520 - 3264x1836 - 30 - 8m30
2448x2448 - 0x0       - 30 - 8m30
2048x2048 - 2448x2448 - 30 - 8m30
1920x1088 - 3168x1792 - 30 - full16x9
1920x1080 - 3168x1792 - 30 - full16x9
1776x1008 - 0x0       - 60 - fullbin60
1440x1440 - 2448x2448 - 30 - 8m30
1232x1232 - 0x0       - 60 - sqareBin
1280x720  - 3168x1792 - 30 - full16x9
1280x720  - 1776x1008 - 60 - fullbin60
1280x720  - 1776x1008 - 90 - binning90
1280x720  - 1344x756 - 120 - binning120
1072x1072 - 2448x2448 - 30 - 8m30
1072x1072 - 2448x2448 - 60 - sqareBin
756x756   - 0x0      - 120 - binning120
720x720   - 756x756  - 120 - binning120

Putting full16x9 regs for 2k creates ~50fps 100Mbps footage even when the rate is capped at 50.
 
Is it possible for you to make a small guide on how to enable these profiles? I'm a little confused. Thanks a lot for sharing info.
 
The modes are selected by the application, I can't edit which one is picked yet. The only guide I can give is open up the module in IDA and look at the data sections it exports. Then you can hex edit the parameters in ida and apply the patches to the input file. You move that back to your extracted squashfs and repack it. Now you can just replace the squash file in full_img.fex and reflash. I can give you some diff files of where the hex edits were performed but it won't mean much until you have a representation of the data in a human readable format.

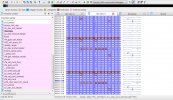
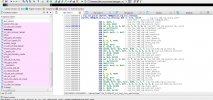
So right now I tried to edit exposure and contrast for 1080P30. This is what it looks like editing imx179s.ko:
idaHex.jpg idaData.jpg
 
The modes are selected by the application, I can't edit which one is picked yet. The only guide I can give is open up the module in IDA and look at the data sections it exports. Then you can hex edit the parameters in ida and apply the patches to the input file. You move that back to your extracted squashfs and repack it. Now you can just replace the squash file in full_img.fex and reflash. I can give you some diff files of where the hex edits were performed but it won't mean much until you have a representation of the data in a human readable format.

So right now I tried to edit exposure and contrast for 1080P30. This is what it looks like editing imx179s.ko:
View attachment 25044 View attachment 25045
Is the full_img.fex flash the only option? Wouldn't a dd write of the squashfs be enough?
 
Yea, that worked a few times for me. Unfortunately it can screw up since some of those files are in use. Replacing the squashfs inside the full image and repacking it to .IMG has been the most consistent method.
 
Ok thanks, got it. Last question, does full_img.fex contain all the partitions contained in the PROM? Like is it possibile to create a full recovery image from the backupped mtd blocks using the .fex file as a guideline for memory offsets?
 
full_img.fex doesn't have all the stuff in the IMG but its pretty much all the partitions put together. The img I posted seems to ONLY flash full_img.fex. If you change rootfs or anything else as its separated the changes won't apply. You can totally copy the whole rom and build a full_img.fex from the MTD partitions and I'm not sure you'll have to do much trimming.
 
I finished trying all the full_image.fex found on this thread, to no avail, still get white screen, and were produced various tombstone files, looks like it crashes at different places. I got diverse boot sounds, so I knew the packing and upgrade works, but bad luck :-(
Hi Plutonio, I might be of help. I've just bought an Elecam Explorer 4k which does come with the OV4689 sensor. I'll try to make a dump of the file system and provide it to you tomorrow.
As for you other folk: does anybody know how or what protocol does the camera use for the wifi remote? All of the apps on google play seem to work fine only on android 5 for some reason.
 
The camera uses an HTTP server to interact with the app.
 
Firmware backup script for Allwinner V3 action cams. Requires a PC and a working cam with ADB driver.
 

Attachments

  • backup-script.zip
    683.9 KB · Views: 196
Firmware backup script for Allwinner V3 action cams. Requires a PC and a working cam with ADB driver.

Thanks, I was going to make a shell script of this but you beat me to it and saved me some time. Hopefully more people can post FW now.
 
Seems like resulting full_img.fex file can't be flashed with in-cam routine. I don't know the reason yet. But anyway one can still integrate this file into an .img a flash it with PhoenixSuit (uncheck all blocks but 'System').
 
ok I used Firmware backup script for Allwinner and I get images
0-uboot.img
2-system.img
3-config.img
4-blogo.img
5-slogo.img
6-env.img
full_img.fex
but what can I flash it to bricked cam
 
Back
Top