You are using an out of date browser. It may not display this or other websites correctly.
You should upgrade or use an alternative browser.
You should upgrade or use an alternative browser.
Mobius mounting solutions
- Thread starter Mtz
- Start date
Tom Butler
Well-Known Member
- Joined
- Oct 9, 2013
- Messages
- 295
- Reaction score
- 273
- Location
- Manchester
- Country
- United Kingdom
- Dash Cam
- Street Guardian SG9665GC v3 & Mobius (rear facing)
Hey all, I just finished creating an open source, 3D printed Mobius mount that attaches directly to the Honda Insight mirror. I'm now looking to adapt the design to other vehicles. If you'd like a custom, open source mount for your vehicle, post up with the existing mirror trim piece dimensions and your windshield's angle from parallel to ground and I'll create you a custom, open source part. If you don't know these dimensions and don't mind sending me your rear view mirror assembly for a week, I'll dimension it myself and then ship it back.
dino
Active Member
- Joined
- May 21, 2014
- Messages
- 113
- Reaction score
- 87
- Country
- Sweden
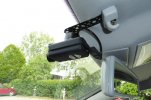
This is my mounting in a 2010 Seat Altea XL. It took me a couple attempts of trial and error, mostly because the guys at Seat had tried to re-invent the vipers (thread about that issue HERE). This is my setup. First off, the front camera:
I had an old cheap GPS-navigator mount dissected, the ball part was sawed off with just enough material left to work with. A small hole got drilled and with a screw I attached it to a piece of metal band, originally meant for construction purposes. The remaining joint, a little bit trimmed off, was united to the mobius base plate mount thanks to my best friend Mr Super Glue
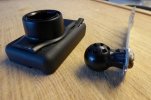
A touch of black paint later - Voilà! The locking pins has been bent upwards, don't need them, Mobius stay firm as it is anyway.
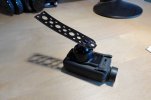
Off to the car! The metal tongue has been inserted under the sunshade locking clip. The stupid plastic lid covering its screws did put up a serious struggle and obviously didn't want to come off at all, but with enough desperation and rough language I managed to peal it away. Sitting like this the camera is low enough to be just within the wiped area of the windscreen, yet not distracting the driver. The usb cable and adaptor seen in the picture has later been changed to a more suitable home made up-angle one (about that DYI-project HERE) The cable runs invisible inside the ceiling panel, down the A-pillar and inside the door rubber to the fuse box located below the steering wheel. I did purposely save the ball joint. Like this the camera can easily be aimed or turned sideways to record any police interaction if I'm pulled over, or I can swiftly have the camera out of the car if needed. Later the metal tongue proved itself to sometimes produce slight vibrations depending on the quality of the roads and has been changed to a more sturdy one without all those little holes.
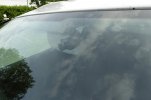
View from the outside. If it wasn't for the beige mirror mobius would have been even more stealthy. I thought about painting the mirror black to reduce the contrasts, but as it is a high-spec dimming one with sensors and buttons and indicator lights I think it's probably a wise idea to skip that project.
Lets walk over to the back of the car, which is a hatchback btw.
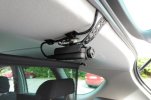
Using the same type of metal band, I bent it to something resembling a clip. One part (about 10cm long) is tugged in over the ceiling, the rest comes out like this. A nice little curve at the end makes it all work like a spring. It sits beautifully, the view is perfect and with the hatch closed it all locks up, there's no wobbling or vibration whatsoever.
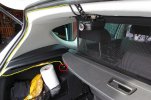
Last picture: The usb cable goes under the rubber / inside the panel, and is connected to a 12V socket I never use anyway. The window is quite tinted making the camera virtually impossible to spot when I close it all up, yet the image seems unaffected. Perfect!
That's it.
(edit: fixed some typos. edit2: uploaded the pictures to dct server)
I had an old cheap GPS-navigator mount dissected, the ball part was sawed off with just enough material left to work with. A small hole got drilled and with a screw I attached it to a piece of metal band, originally meant for construction purposes. The remaining joint, a little bit trimmed off, was united to the mobius base plate mount thanks to my best friend Mr Super Glue

A touch of black paint later - Voilà! The locking pins has been bent upwards, don't need them, Mobius stay firm as it is anyway.

Off to the car! The metal tongue has been inserted under the sunshade locking clip. The stupid plastic lid covering its screws did put up a serious struggle and obviously didn't want to come off at all, but with enough desperation and rough language I managed to peal it away. Sitting like this the camera is low enough to be just within the wiped area of the windscreen, yet not distracting the driver. The usb cable and adaptor seen in the picture has later been changed to a more suitable home made up-angle one (about that DYI-project HERE) The cable runs invisible inside the ceiling panel, down the A-pillar and inside the door rubber to the fuse box located below the steering wheel. I did purposely save the ball joint. Like this the camera can easily be aimed or turned sideways to record any police interaction if I'm pulled over, or I can swiftly have the camera out of the car if needed. Later the metal tongue proved itself to sometimes produce slight vibrations depending on the quality of the roads and has been changed to a more sturdy one without all those little holes.

View from the outside. If it wasn't for the beige mirror mobius would have been even more stealthy. I thought about painting the mirror black to reduce the contrasts, but as it is a high-spec dimming one with sensors and buttons and indicator lights I think it's probably a wise idea to skip that project.

Lets walk over to the back of the car, which is a hatchback btw.
Using the same type of metal band, I bent it to something resembling a clip. One part (about 10cm long) is tugged in over the ceiling, the rest comes out like this. A nice little curve at the end makes it all work like a spring. It sits beautifully, the view is perfect and with the hatch closed it all locks up, there's no wobbling or vibration whatsoever.

Last picture: The usb cable goes under the rubber / inside the panel, and is connected to a 12V socket I never use anyway. The window is quite tinted making the camera virtually impossible to spot when I close it all up, yet the image seems unaffected. Perfect!

That's it.
(edit: fixed some typos. edit2: uploaded the pictures to dct server)
Last edited by a moderator:
I just joined this forum to post my solution I just put up tonight. I had an angled piece of ABS plastic 3D printed to fit onto my Honda Civic rear view mirror mount. The mount is extremely solid, and through moving the mirror, I can finely adjust the angle and direction that the camera points (I see it as an advantage, others might see it as a disadvantage).
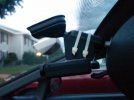
I have it hard wired via a fuse tap to an unused fuse (#8 I believe, as a power source that is only on when the ignition is on) that runs through the weather stripping and held in place with the springiness of the headboard. I of course used a 7805 voltage regulator to obtain the 5V needed.
The only thing I want to change immediately is the white zip ties. I will try to find a black set of the same width.
I can send anybody the STL file for the 3D printed piece (which has a 20 degree slope and was fitted to a 0.75 inch diameter rod to mount to).
The zip ties are the only part that appears visible from the outside. The only part visible to me while driving is the wire going up to the ceiling.
I used a right-angle mini usb adapter to put the cord off to the side instead of straight back. I wouldn't mind changing that to a vertical adapter, but I haven't found one yet. In the mean time, I have this: http://amzn.to/1iiF1EU
It works just fine. It is nice because I can easily connect my laptop to the camera to extract video without moving my mirror or the camera. The only disadvantage is that the cord is about 2" away going vertically up. Not a deal breaker, but something to keep in mind.
dino
Active Member
- Joined
- May 21, 2014
- Messages
- 113
- Reaction score
- 87
- Country
- Sweden
The zip ties are the only part that appears visible from the outside.
Nice and easy. Hope you'll find a couple of black zip ties. Maybe a black marker will do the same thing?
I ended up getting black ties, which I thought were identical, but they were slightly larger. So I had to improvise, which I think may have been a fine decision in the end. It will be a bit tougher to remove, but it will be a ton easier to put back on without having to find special sized zip ties.Nice and easy. Hope you'll find a couple of black zip ties. Maybe a black marker will do the same thing?
Edit: It has one zip tie going through each hole, then a zip tie linking onto that tie to wrap around over the mirror mount.

Last edited:
Timelapse
New Member
- Joined
- Apr 14, 2014
- Messages
- 29
- Reaction score
- 22
- Country
- Denmark
- Dash Cam
- 3 x Mobius FW 2.29 (2xA-lens & 1xB-lens). VIOFO A119
I opted for a more stealth solution using the 8 inch extension cable. Using hot-glue I mounted the A lens on the mirror-post which is stationary so when the driver adjust the mirror it won't affect the POV. The recorder is mounted in front of the mirror but on the blackened section of the windshield, making it invisible from the outside and out of direct sunlight. It runs with motion detect enabled through a Power Magic Pro, 24/7 and records to a 64GB Kingston card. I have replaced the battery with a Super Capacitor.
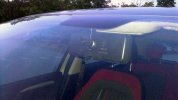
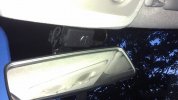


Timelapse
New Member
- Joined
- Apr 14, 2014
- Messages
- 29
- Reaction score
- 22
- Country
- Denmark
- Dash Cam
- 3 x Mobius FW 2.29 (2xA-lens & 1xB-lens). VIOFO A119
I buy all my Mobius accessory from the manufacturer Eletoponline365 
Great! Thanks! Would appreciate any more pics you can snap of how the Lens was mounted also.I buy all my Mobius accessory from the manufacturer Eletoponline365
Timelapse
New Member
- Joined
- Apr 14, 2014
- Messages
- 29
- Reaction score
- 22
- Country
- Denmark
- Dash Cam
- 3 x Mobius FW 2.29 (2xA-lens & 1xB-lens). VIOFO A119
zs77706
Active Member
- Joined
- Oct 21, 2013
- Messages
- 105
- Reaction score
- 96
- Country
- Germany
- Dash Cam
- DCTEAM, A119-GV, A119S-V2, Mobius-V1
that is a good but easy method.
in germany is a new law that says that dashcams are illegal because of personalityrights from the people which are filmed but dont know about that.
thats one of the reasons why i make my mobius so stealth as possible.
in germany is a new law that says that dashcams are illegal because of personalityrights from the people which are filmed but dont know about that.
thats one of the reasons why i make my mobius so stealth as possible.
- Joined
- Jan 27, 2013
- Messages
- 52,470
- Reaction score
- 30,344
- Location
- Sydney, Australia ~ Shenzhen, China
- Country
- Australia
- Dash Cam
- Too many ¯\_(ツ)_/¯
that is a good but easy method.
in germany is a new law that says that dashcams are illegal because of personalityrights from the people which are filmed but dont know about that.
.
you got a link to anything about this?
monty
New Member
- Joined
- Nov 6, 2013
- Messages
- 24
- Reaction score
- 5
- Country
- United States
Yes, I would like to read about it as well. I have found nothing online about this.you got a link to anything about this?
zs77706
Active Member
- Joined
- Oct 21, 2013
- Messages
- 105
- Reaction score
- 96
- Country
- Germany
- Dash Cam
- DCTEAM, A119-GV, A119S-V2, Mobius-V1
i have make a mistake. sorry for that.
in austria they are illegal... in germany its not legal but also not illegal... it is a twilight zone...
http://de.wikipedia.org/wiki/Dashcam
in austria they are illegal... in germany its not legal but also not illegal... it is a twilight zone...
http://de.wikipedia.org/wiki/Dashcam
- Joined
- Jan 27, 2013
- Messages
- 52,470
- Reaction score
- 30,344
- Location
- Sydney, Australia ~ Shenzhen, China
- Country
- Australia
- Dash Cam
- Too many ¯\_(ツ)_/¯
Austria I had heard it was a problem already
zs77706
Active Member
- Joined
- Oct 21, 2013
- Messages
- 105
- Reaction score
- 96
- Country
- Germany
- Dash Cam
- DCTEAM, A119-GV, A119S-V2, Mobius-V1
i mounted my mobius this way:
http://dashcamtalk.com/forum/threads/mobius-lens-extension.3224/#post-72433
and build a housing to hide the cam:
http://dashcamtalk.com/forum/threads/mobius-lens-extension.3224/page-2#post-73438
http://dashcamtalk.com/forum/threads/mobius-lens-extension.3224/#post-72433
and build a housing to hide the cam:
http://dashcamtalk.com/forum/threads/mobius-lens-extension.3224/page-2#post-73438

