Mobius mounting solutions

So I was looking around for a place to mount the Mobius, and realized there is a perfectly flat surface right below my mirror housing. So I used the included velcro tape to stick it there, the result was a perfect mounting spot. I was about to post my perfect 2 minutes install and brag about how easy it was, then the velcro lift right off the Mobius after the test drive. So much for that idea.

Then I was reading about dropping a few drops of CA to keep the velcro in place, but I didn't want to make the Velcro permanent on the Mobius. So instead I tapped 4 very small screws onto the Mobius housing and attached it to the same spot, making the Mobius removable. Here's what it looks like.
 

Attachments

  • IMG_4831.JPG
    IMG_4831.JPG
    243.6 KB · Views: 419
  • IMG_4833.JPG
    IMG_4833.JPG
    253.7 KB · Views: 415
So I was looking around for a place to mount the Mobius, and realized there is a perfectly flat surface right below my mirror housing. So I used the included velcro tape to stick it there, the result was a perfect mounting spot. I was about to post my perfect 2 minutes install and brag about how easy it was, then the velcro lift right off the Mobius after the test drive. So much for that idea.

Then I was reading about dropping a few drops of CA to keep the velcro in place, but I didn't want to make the Velcro permanent on the Mobius. So instead I tapped 4 very small screws onto the Mobius housing and attached it to the same spot, making the Mobius removable. Here's what it looks like.

Looks great as long as the angle is good and won't need to be adjusted. It may just be the picture but it appears to be looking toward the sky.
 
So I was looking around for a place to mount the Mobius, and realized there is a perfectly flat surface right below my mirror housing. So I used the included velcro tape to stick it there, the result was a perfect mounting spot. I was about to post my perfect 2 minutes install and brag about how easy it was, then the velcro lift right off the Mobius after the test drive. So much for that idea.

Then I was reading about dropping a few drops of CA to keep the velcro in place, but I didn't want to make the Velcro permanent on the Mobius. So instead I tapped 4 very small screws onto the Mobius housing and attached it to the same spot, making the Mobius removable. Here's what it looks like.

This looks like a great way to mount your Mobius in your car but Velcro is not the best solution for a number of reasons. A much better but similar product is called Dual-Lock Tape (from 3M). (also called Scotch Heavy Duty Fasteners) It is far more secure and it won't let the camera wobble or vibrate like Velcro can sometimes. Read more about it in the thread "Where do I buy Dual Lock Tape?"

Edit: The advantage of this method over screws is that the camera can easily be temporarily removed if desired yet the product is as secure as screws.

Edit #2: After taking a closer look at your photos I realize I misunderstood exactly how you mounted the camera, so ignore what I said about the dual lock tape, except that it's a good product to know about for future reference. Your method looks very good. :)
 
Last edited by a moderator:
Yeah it does look like it's pointing to the sky in the photo, but it's actually fine. The only problem I have is glare from dash, but that's a minor issue for me.

Thanks for the tip on that Dual lock tape. I thought about it but worried that the sticky back may still peel off from the Mobius' rubbery coating. I just don't want any CA/crazy glue on the casing making it a permanent thing. I figure with screws the worse I'll have are just some tiny pinholes if I decide to return to normal.
 

Attachments

  • MobiusTest.jpg
    MobiusTest.jpg
    152.8 KB · Views: 121
You may find over time that under most conditions you'll get better balanced exposure from the camera with less sky in the image. Maybe a small wedge?
 
Good point. I'll play with the aiming a bit. Thanks.
 
BTW, if you should ever decide you want to apply something like Dual Lock tape to the underside of a Mobius mounting cradle, a small amount of acetone (nail polish remover) judiciously applied, will remove the rubber coating.
 
BTW, if you should ever decide you want to apply something like Dual Lock tape to the underside of a Mobius mounting cradle, a small amount of acetone (nail polish remover) judiciously applied, will remove the rubber coating.

That's good to know! Does it remove it and leave a smooth finish, or will there be some etching or chemical melting of the plastic?
 
That's good to know! Does it remove it and leave a smooth finish, or will there be some etching or chemical melting of the plastic?

I hesitated before I posted about this in this situation because there are indeed some caveats to using acetone for removing the rubberized coating. This is why I used the words "judiciously applied" in italics. Basically, using acetone sparingly to remove some of the coating on the back of a Mobius cradle for the purpose of getting good adhesion from Dual Lock tape should be no big deal. Even if it comes out not looking quite perfect cosmetically it wouldn't really be a problem since it is on the bottom and will be covered with the tape you are applying. Removing all of the coating from a larger object like a whole camera for the purpose of refinishing is another kettle of fish entirely and can be messy and challenging. See this thread I posted several months ago for all the gory details. :)
 
Last edited by a moderator:
My Mobius arrived this week and I wasn't satisfied with the original "mini" tape mount, as it doesn't fit very well in my car. I want my dashcam stealth, both from outside and inside, so I had to do some manual work, something similar to one of Mtz's mounts.
I bought one of this (~0.25euro):
View attachment 2093 View attachment 2094
and I used the screw and nut form the tape mount:
View attachment 2095
The screw is firmly attached to the Mobius base:
View attachment 2096
So I insert the Mobius under the holder and secure it in position using the nut like this:
View attachment 2097
An this is how it looks in the car:
View attachment 2098 View attachment 2099 View attachment 2100
I have only one relevant picture from the outside:
View attachment 2101

I'm not very happy with the position as the Mobius is more visible than the 808 #16 which was in the same postion but a little bit higher. However it' not very obvious if you don't look very attentively, so for the moment I'll stick with it.
The camera is powered from the "permanent" + of the interior lamp, which actually is cut off after 20-40 minutes since locking the car. This way I have about half an hour of front parking cam.

Hi Horace,
new member here, I also have a Mk 2.5 Focus with the rain sensor housing. Interested to know how you ended up fixing the bracket to the underside of the rain sensor housing. Did you take the housing off and nut and bolt fix bracket to it, or did you use a double sided sticky pad solution?

I'm awaiting a three meter in line 12v t0 5v power converter cable that I was going to use in conjunction with a mini piggy back fuse bridge from fuse 108 passenger side fuse box, for a hardwire and forget solution.

Also thinking of mounting a Mobius action cam to the rear of the cabin, not attached to the boot lid wind screen. Either using the stock 3M mount solution with a hole cut in the head lining to accommadate the stalk of the ball joint protruding through the cabin head lining. Or maybe like you have done, a self fashioned bracket again using parts taken from the stock 3M mount affixed to the same metal frame behind the head lining.

And I was wondering how to get an ignition live to the rear of the cabin, and you have again come up trumps with the solution. I can take a feed from the rear dome light that is fed from the front interior light. Thanks a bundle friend.
 
Interested to know how you ended up fixing the bracket to the underside of the rain sensor housing. Did you take the housing off and nut and bolt fix bracket to it, or did you use a double sided sticky pad solution?
I didn't take the housing off, it was a trial and error thing (using double sided adhesive tape), then, when I was satisfied by the angle, I glued the custom bracket with some Bison solution. I'm planing to use the extension cable and mount the lens into the sensor housing but didn't have time yet. As for the rear I don't have a sollution yet, my Focus is a 4-doors sedan, everything is gray in the back, so the only stealth installation would be inside the brake light housing. But this has some disadvantages...
 
As it so happened I fixed mine with a double sided adhesive pad I had kicking about. I had the sensor cover off, to explore the nut and bolt option, but thought better of it in the end. The bracket I fashioned out of one of those blanking plates you find on the rear of PC Towers. Wife always berates me for keeping what she terms as rubbish, but thats a woman for you. It is strong enough to support the Mobius, whilst being pliable enough to be able to adjust it in situ in the vertical plane.

I considered a 20cm lense cable extension, but afixing to the underside of the sensor housing, reckoned it would look abit "Heath Robinson" and a begger to align and fix. But inside the housing, well that would be a better concealment and I reckon easier to fix and align possibly. Down side possibly is that the lense will be close up to the sensor unit, and I've read on the forums these extension applications seem to suffer in some cases from interference. Of course maybe some problems are down to faulty connections on the cable, and not interferance from other sources. I suppose it's a case of "suck it and see" in the end.

The other problem I saw was the concealment of the camera body, face on to the rear of the mirror, and the heat sinks drew my eye like a magnet when looking in to the cabin from the front. Is it possible to mask them with heat resistant paint? Possibly you could afix the camera body at right angles to the rear of the mirror.

Now concealing the rear, that is going to be a hard one. But I like your approach to both installations, in that you want to do a proper concealment job, not a half hearted bodge job. Looking forward to seeing what you come up with horace, so until then I'll refrain from drilling holes and the like in the viewable fabrics of the cabin interior for now :)
 
Last edited:
Have you seen this? There are some pictures too.
 
Last edited by a moderator:
Yes I watched that last night.......................

Darling have you seen that new bright blue sandwich box I bought you?
Yes dear it's in the car.
Well I cannot see it!
Trust me its in there, do you want me to come down there and point it out?
Hello, I'm quite capable of finding it for myself thank you..................men
 
have you see the blue box?
no darling, i think our girl lost in in school or it was stolen at my work:D
 
One man's (not me) mounting solution is the Scosche Magnetic Dash Mount for Smartphone...

https://www.amazon.co.uk/gp/B00HZYM2UA
417ef%2BEpVrL._SX425_.jpg


His Amazon Review...

"I needed a mount to fit my dashcam (Mobius camera) discreetly. This fit the bill perfectly.

For those that haven't read around, the kit comes with 2 slim magnetic pads to place in the case of, or on various devices, but may interfere with internal compass readings and magnetic storage devices (old gen ipods). Flash memory is unaffected.

The smaller magnetic pad was perfect size to pop inside the case of my Mobius camera, and it is held very firmly in place by the pad surface of this holder. The beauty of it means its easy to remove, and easy to adjust the angle of the camera.

I also think this would be the most convenient dash holder for your phone. The only downside would be the affects of the magnet on the compass feature, but if slipped between your phone and phone case, it can easily be removed.

As a note, the 3M sticky pad provided is a light grey colour. I applied it to my windscreen and there was no way it was coming off. Which was unfortunate, since it was not particularly discreet, I wanted to attach it with a black pad, and it was not easy to remove, so give some thought as to where you will place this mount."

Magnetic mounting solutions have previously been created by @niko & others. This is a ready-made solution for people who like the idea, but prefer to buy it rather than make it.
 
The Scosche Magnetic Dash Mount looks like a nicer version of a product I came across six months ago in a smaller more discreet package with a 3M tape mount instead of a suction mount. Seems pricey though but could be worth it. One of these days when I get some time I'm going to do a DIY version something like this.
 
Last edited by a moderator:
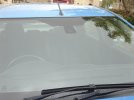
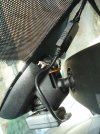
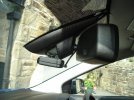
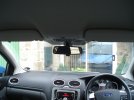
Here are the positions I finally settled on.

Though I had bought a 3M screen mount, and a suction screen mount I settled on two home made brackets I made out of some bits and bobs I had kicking about [ the same bits of "that could come in handy" bobs that my wife has an obsessive hatred of] Anybody else notice how perculiar the female variant is?

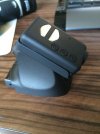
Though not used as intended the bought brackets were cannablised to afford the home made brackets adjustability on the horizontal plane. I cut the threads off the ball joints, and screwed [with a dab of super glue ]them into the camera "carriage" that comes supplied with the camera. And I also super glued the plastic thread housing to the carriage.

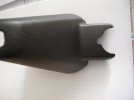
I settled on home made brackets because I felt they were more descreet. The front bracket was made from one of those blanking plates you find on PC Towers, to facilitate the adding of graphics cards and the like. The rear one needing to be longer in length , well I used a large-ish circlip I had lying about, fashiond to it's initial flat disposition with the aid of a two and a half pound lump hammer.

I must point out I got my insperation to fashion my own brackets from horaceJC's post 30 0n this thread, given we both have the same model of car, the Focus Mk2.5 with the rain sensor housing.

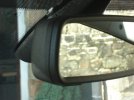
I found attempting to fit a bracket up behind the mirror, ment you caught a view of the rain sensor housing that looked like you had a massive spider trapped in the lense of the camera. I know the video would surfice as a record of an accident, but I suppose I'm a purist in that regard. Besides viewed from outside or inside of the car because the camera had to be sited away from the rain sensor the camera was by no ways "hidden"

I personally reckon it is more discreet where it is currently sited, plus the fact it is easly adjusted to catch any action happening to the immediate left or right of the passenger/ driver doors :mad: And it can be removed from the car more easily without upsetting it's angulation than if it was tucked up behind the mirror.

Though in my case given where I live, and even though the car "sleeps" outside, I leave my dash cams in situ. I also leave the rear one running when parked in supermarket car parks. The later [based on personal observations] is because primarily the multi tasking female variant that frequents such places in large numbers usually has her mind on the next task instead of the one she is currently engaged on :rolleyes:

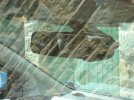
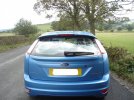
I did have an initial problem with the rear bracket in that the test video's displayed vibration. You see unlike screen mounted brackets, that are mounted directly to the screen or attached to housings themselves attached to the screens. They don't pick up road vibrations transmited via the suspension up through the body shell. Because said vibrations are dissipated on the rubber seal that sits between the body shell and the windscreen.

My rear bracket being attached directly to the body shell [ and possibly being made from a circlip didn't help] Problem solved by just super glueding a cut down rubber "grommet" the likes of which protects cables where they enter into metal socket boxes. It in it's self sits up tight against the tailgate internal trim.

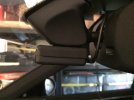
Both cams will be hardwired to the ignition , as you can see from the photo's I'm still awaiting delivery of the front cable, but will update when it is installed.

UPDATE:

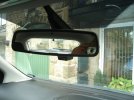
As you can see by the updates photo's the 12v to 5v hardwire cable came today for the front cam, and now both cams are hardwired, job done.

Now the amount of cable from the 12v/5v converter to the mini USB connector is actually 16 cm in length. Not long enough for me to hide the converter in the headliner and connect to the Mobius where I have it sited. So I took the top trim off that conceals the wires for the rain sensor and auto dimming mirror. Filed a slot in the bottom of the trim where it meets the mirror ball socket to facilitate the cable exiting the trim to connect to the Mobius, meaning I could conceal the converter behind the cable trim.

Pleased with the overall result, a nice and neat instal hardly noticeable from inside and out. Now whilst the rear cam is not as inconspicuous from the outside as the front cam, I still reckon its better than having a mount, cam and cabling on the rear windscreen.

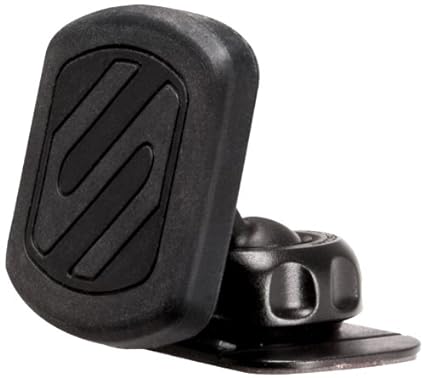
Having said that, the Scosche mount looks a tidy job if you don't mind shelling out £16. Though I cannablised a 99p suction bracket to make my rear cam bracket.
 

Attachments

  • Front and back.jpg
    Front and back.jpg
    212.2 KB · Views: 386
  • Its there.jpg
    Its there.jpg
    163.1 KB · Views: 363
  • PS 01.jpg
    PS 01.jpg
    189.5 KB · Views: 364
  • DS 02.jpg
    DS 02.jpg
    214.2 KB · Views: 365
  • Rear 02.jpg
    Rear 02.jpg
    167.6 KB · Views: 355
  • Mirror bracket trim.jpg
    Mirror bracket trim.jpg
    147.5 KB · Views: 306
  • Mirror Trim Off.jpg
    Mirror Trim Off.jpg
    208.8 KB · Views: 325
  • Front Cam.jpg
    Front Cam.jpg
    270.5 KB · Views: 341
  • Drivers side view.jpg
    Drivers side view.jpg
    248.2 KB · Views: 316
  • Rear Passenger view.jpg
    Rear Passenger view.jpg
    183.3 KB · Views: 301
Last edited:
Nice job! I did a similar headliner solution for the Mobius in the rear window of my Toyota pickup truck as the vertical glass made other mounts a challenge. I get good road coverage and the camera is fairly discreet as this seems to be.
 
Cheers Dashmellow,

it is rather discreet when viewed from the rear, obviously a tailgater should be able to see it, and if so and they back off, job done as far as I'm concerned.
 

Attachments

  • Rear 03.jpg
    Rear 03.jpg
    364.6 KB · Views: 96
Back
Top