Mobius mounting solutions

I finally received my helmet bracket and just finished completing my mods to it. I'll now be able to mount it right up to the window. It's too cold right now to install it but I did a test fit and this will work out perfect.
 

Attachments

  • IMG_0249.JPG
    IMG_0249.JPG
    74.7 KB · Views: 320
  • IMG_0250.JPG
    IMG_0250.JPG
    83 KB · Views: 313
Last edited:
Here's one from the driver's perspective ... sort of ...

View attachment 10994

Took a couple from outside the car, but reflections in the windscreen make the Mobius invisible. Now that the the wedge is 3M taped to the rooflining & to the Mobius cradle, I cannot take a photo of it alone.

Fellow Mini driver! How did you get on with tucking away the wire under the headliner etc? And is this hardwired in, or is it still going to the 12V in the floor console?

Forgive me, I haven't followed your progress. I am wanting to tuck mine away, I have had the 1metre (or whatever the default one was) just coming down from the mirror lol... I have a 3 metre cable sat around doing nothing.
 
Fellow Mini driver! How did you get on with tucking away the wire under the headliner etc? And is this hardwired in, or is it still going to the 12V in the floor console?

I'm using the Mobius-approved 3 metre power cable. It's routed behind the headlining, behind the A pillar trim & behind the driver side dash trim to the front accessory socket. It's quite easy to push the cable behind the trim ... no tools required.
 
Here are some interesting ideas I found online. I showed the web address then the supplied from google english translation.

Pictures are inside the links below.

http://www.revotech.cz/pouzdro-pro-kameru-mobius-actioncam/
(translated by google)
Today we'll look at how the big boxes from TIC-TAC vyrobyt waterproof case for camera MOBIUS ActionCam (Water resist Camera case). The housing is not waterproof diving (waterproof), but for recording in the rain, mud and dust well served. To produce the housing need 49 grams pack TIC-TAC at which the tip of the breaking knife carefully cut out the bottom. Despite bottom glue strip of translucent plastic or (1mm plexi from PhotoFrame IKEA). For gluing I used universal contact adhesive SOUDAL. The housing can be used for both versions of the Mobius camera lens Wide or Standard.


Pictures inside. http://www.revotech.cz/krabicka-na-kameru-mobius/
(translated by google)
As inspiration for owners of cameras MOBIUS ActionCam send pictures transport solutions in sturdy packaging. It's a box of servos Robbe 10g piece EPP and rubber strap 8 cm. Not only protects the lens, but the whole camera.

http://www.revotech.cz/mobius-ochrana-kamery-pred-vlhkem-a-vodou/
(translated by google)
Mobius - Camera protection against moisture and water
When I bought Cameras MOBIUS ActionCam primarily for placement in the car, but also for shooting video on my models, I have not thought about its use even in an environment that would require additional protection against any weather. So I ponder how you do it gracefully and cheaply protection that would guarantee water resistance.
I know that for a lot of handymen, this is a primitive solution, but maybe someone just netrkne, so bring your solution.
Just one surgical gloves, or anywhere else sold soft rubber gloves Cut the fingers and the tip of the finger Cut a piece of rubber to produce a small hole with a diameter of 5 mm. Then utříhnutý finger String on a finger and roll it shape for a man familiar cap. Eventually it through the camera lens hole with the lid and rolled out throughout the body kamery.Tato primitive protection serves me quite a long time and one glove to give us any more "spare parts". The camera got wet when cycling and skiing and stayed in a blizzard.

http://www.pcpro.co.uk/realworld/385069/how-to-set-up-a-diy-dashcam
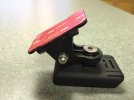
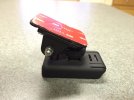
Eventually I fashioned a removable mount out of sugru, a putty similar to Play-Doh that sets as a strong, silicone rubber overnight.

It’s dead easy to make removable mounts for small gadgets using this magical material. First, cover the device – my Mobius camera, in this case – with a thin layer of cling film to prevent the sugru from sticking to it, making sure to leave a small gap between the device and the mount. Then, wrap sugru around the base of the device, overlapping the sides (but not the corners) so it’s held securely but can still be easily removed. Once the sugru has set, simply remove the camera and peel away the cling film.

I also performed this procedure around the stem that holds my car’s rearview mirror, so I now have an unobtrusive place to quickly and easily mount the Mobius.
 
My Temporary install (velcro strapped under my radar detector) not my regular car so I don’t want to permanently mount it.

Will post more pictures when I get it properly mounted in my own car.

2015-02-26%2017.33.44_zps3qq3fzvs.jpg

2015-03-01%2014.16.13_zpspbklagxl.jpg
 
My oldest Mobius just received some novelties in the form of a C lens and an extension cable, as well as a new mounting solution. In couple of weeks, after a business trip, I'll install also a capacitor and this will be the final setup.
01_rain sensor cover.jpg 02_rain sensor cover.jpg 03_rain sensor cover.jpg
04_in car driver side.jpg 05_in car driver side.jpg 06_in car passanger side.jpg
The lens is mounted using double-sided tape and the metal cover of an empty PCI slot from an old computer. This allowed me to easily adjust the incline. If I'll need to take the Mobius out of the car I'll take it together with the rain sensor cover, it's pretty easy to dismount it (there is another piece on top which will mask some of the cables).
The camera is not visible from the front seats and from the exterior it's also not very noticeable, one needs to look very attentive.
Here's some sample footage, first part is without music, but the second has some Metallica and some high revs as I wanted to check the setup for vibrations.
 
Fitted yesterday to a VW Tiguan using the mobius 3m taped sticky mount whilst waiting for the helmet mount to come, but, I didn't push the camera all the way into the holder and that's helped push the camera closer to the screen, it was held quite securely anyway but just to be sure it's been secured with some black tape. Used a 12v to 5v double usb unit which has been hard wired to the fuse box using an add-a-fuse.

View from drivers seat


Behind mirror from drivers side


Behind mirror from passenger side


And this is a still taken from a video to show its really in a pretty good location

 
Are these helmet mounts removable from your windscreen without tearing off the dots?
For example, if I wanted to move it to a different position on the windscreen or take it down for a different mounting solution.

Or simply, how stuck is that sticky stuff anyway? :)
 
They are stuck on very well! Best way to get them off is to use a piece of dental floss and "saw" it off, much easier to get any residue off that way
 
Has anyone used this type of mount to clamp onto the rear view mirror stalk? It is being sold to mount on bicycle handlebars. It should clamp onto a standard rear view mirror stalk although it might need some padding to clamp on tightly.

718c2hWoOkL._SL1500_.jpg


41wvl5B5oqL.jpg


How about using one of these for a rear facing cam to slide over the headliner? Although this is being sold as a visor mount I would think it could work to slide sideways under your headliner then moving to line it up to provide a rear mounting solution that would be fairly stealth.

710EObxf6ZL._SL1500_.jpg


31iI39iEmeL.jpg
 
Has anyone used this type of mount to clamp onto the rear view mirror stalk?

718c2hWoOkL._SL1500_.jpg
Yes. I am using one as a temporary mount in my wife's car.

It does not need extra padding for this car. It mounts securely, however it hangs too low when mounted thread down, and is all over the windscreen when mounted thread up.

I'll try to remember to take a photo in the morning.
 
They are stuck on very well! Best way to get them off is to use a piece of dental floss and "saw" it off, much easier to get any residue off that way
I wondered about how easy / difficult it would be to remove.
I suppose the sticky pad color is red as the photo shows which I think would show even through the dots on my windscreen.

Thanks for your reply!
 
The red is just the tape over the tape. The sticky itself is dark grey
 
Good to know!
I have one on the way. I should get it this week.
Thanks!
 
Where do you buy the helmet mount so that you can stick on the dots behind the mirror?
 
So do people just take off the strap and use the sticky part for mounting?
 
Back
Top