New Wifi Enabled Lukas LK-7950 WD

I had asked questions before getting the unit installed regarding using an Add-A-Cicuit as that is what seemed to be the thing to do. We were going to use a 3 amp Add-A-Circuit. Installer realized the the power assy cable. already has 2-amp fuses on each of the power leads (continuous and ACC). We did not use an Add-A-Circuit, I was not watching the installer connect the power leads to the fuse panel so don't know exactly what he did there.

Yes this is correct. You can wrap the leads around the fuse blades as shown in the lukas manual.. There is a 2amp fuse on both the battery and acc lines on the Lukas continues power kit. However we caution against and do not recommend installing and power cable this way. Someone can easily wrap the leads wires around a fuse blade and not take in to account that if any part of the leads wires touches the other side of the fuse, you are effectively defeating the purpose of the fuse you are tapping. Your camera will be fine if anything happens, however you vehicle electrical components may not be.

We always advise using a fuse tap for at home hardwire installs because it eliminates this risk. Yes the Lukas hardwire kit has its own 2AMP fuses, and the fuse tap will be adding a additional fuse that is not needed. Its best to play it safe, and double fuse it. You could fuse it with a 15 amp. Does not matter. There is still a 2 amp fuse. However its probably best to use a two amp fuse in your add-a-fuse adapter. Better safe then sorry.
 
I will go down to a couple of 2 Amp but I thought the glass ones were 3A/250. I need to check.
I still cannot capture stills off the viewer. Capture opens up the save as a .bmp but save does not create a file. Any idea how to do this?
 
I will go down to a couple of 2 Amp but I thought the glass ones were 3A/250. I need to check.
I still cannot capture stills off the viewer. Capture opens up the save as a .bmp but save does not create a file. Any idea how to do this?

My bad, you are right. The glass fuses that Lukas includes are 3amp /250v

I just tried to use the viewer to take a still and was unsuccessful as well. Must be a bug in their software. In the meantime I am sure there are other programs that will take screenshots of videos.
 
My bad, you are right. The glass fuses that Lukas includes are 3amp /250v

I just tried to use the viewer to take a still and was unsuccessful as well. Must be a bug in their software. In the meantime I am sure there are other programs that will take screenshots of videos.
I am having no problem snapping pictures with the LK viewer...
Step by step procedure:
Insert your SD into your computer
Run the Lucas Viewer
Select the Folder icon at top and select Lukas, then ok
Dbl click on an Always avi file to display/run
I paused the video, then select the camera icon at the top (on the fly works too)
Your prompted with a save-as dialog, navigate to directory and give it a file-name.
rainy day bmp.jpg
The forum wont accept the bmp format to upload, throws an error.
bmp error.jpg

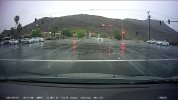
I use the Zamzar website to convert the bmp to a jpg, here is the picture I snapped.
Rainy Day.jpg
 
Hi Guys

I finally got around to fitting my Lukas 7950 and it is very, very good. I picked the Lukas 7950 for a number of reasons.

I wanted a high quality Duo front and back set up.

Although I will rarely use the parked feature it may prove useful in the future.

The Lukas can be switched On, Ignition only, or park.

It takes standard CPL & UV filters which protects the lens.

Built in vehicle battery cut -off, super-cap, GPS and a wi-fi dongle to an APP, on a smart phone.

I was also aware that many Dash Cams cause DAB radio problems but Lukas appear to be well screened.

Last but no means least, price. I bought mine from Calgary Dash Cam and saved £130 on the UK price. At £200 with CPL and 40GB it’s a bargain.

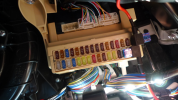
The installation in a Toyota Auris Hybrid (Corolla in some countries) was not too bad once I found the fuse box. Toyota hide it upside down behind the glove box, at the bottom of the box. The only way to see it is to lay on your back, feat in the air, in the passengers foot well (RHD). Not a position I am comfortable with. The fuses do not relate to the hand-book and are not normal mini fuses but new flush fuses. The good news is the fuses I wanted to use were at the very end of the fuse box, marked P/ Outlet, 1, always hot, and Cig,17, ignition on. The handbook says the P/ Outlet is for the luggage area but on my Hybrid Auris that outlet only works with ignition on. I wanted to use fuse taps “ add a circuit” and I needed A “Hot” and Ignition to use the camera in park mode. At first these new flush fuse looked too small to use fuse taps. After a visit to an auto electrician I was told they were the same pitch but while you can use standard mini fuses in the flush fuse holder, you cannot use mini flush fuses in the fuse tap. As the fuse taps need two fuses (one replace the used circuit and one for the added circuit) you need two mini 15Amp and two 3Amp fuses. The Lukas glass fuses are not needed so these were discarded and the bullets soldered.

upload_2015-7-20_22-8-21.png

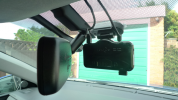
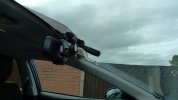
The Front camera was installed behind the mirror, the screen clip allows it to be slid out to get at the chips and I do not want any visual distractions, lights, voices or LED’s, while driving. All these features can be switched via the AP or the viewer.

The cables tucked out of the way under the headliner, across the top of the passenger A pillar and the top of the B pillar to the back. These look to be above the air bags. The power cable runs down under the weather strip into the void behind the glove box.

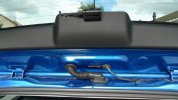
The rear camera is much smaller and is fitted to the high stop light cover. Access to the headlining can be gained by remove the three studs and the weather strip around the tailgate. The stop light plastic cover just pulls off and the cable can then be fed through the gator. The end of the gator in the tailgate is easy, but the end under the roof- lining is tricky to reseat. The hard white plastic saddle needs to be released and pushed out of the hole upwards, from under the headlining. The rubber gator fits over it and it then needs to clip back in the hole to form a tight seal. A piece of stiff wire and string may be a better way, in hindsight, but either is a bit of a fiddle.

Once into the tailgate it is all very straight forward, a slot in the cover for the cover to fit flush over the cable and job done. I could not avoid the heater wires completely
but they hardly notice.
upload_2015-7-20_22-10-21.png
 
P1010876.JPG
 

Attachments

  • P1010879.JPG
    P1010879.JPG
    928.9 KB · Views: 12
Last edited:
I am having no problem snapping pictures with the LK viewer...
Step by step procedure:
Insert your SD into your computer
Run the Lucas Viewer
Select the Folder icon at top and select Lukas, then ok
Dbl click on an Always avi file to display/run
I paused the video, then select the camera icon at the top (on the fly works too)
Your prompted with a save-as dialog, navigate to directory and give it a file-name.
View attachment 15248
The forum wont accept the bmp format to upload, throws an error.
View attachment 15249

I use the Zamzar website to convert the bmp to a jpg, here is the picture I snapped.
View attachment 15250
Thanks for writing up the Procedure @BusterDuster!! You said it much better then I ever could have haha.
My issue is probably because I have a Mac, and am running OSX 10.11 El Capitan Beta.
 
Hi Guys

I finally got around to fitting my Lukas 7950 and it is very, very good. I picked the Lukas 7950 for a number of reasons.

I wanted a high quality Duo front and back set up.

Although I will rarely use the parked feature it may prove useful in the future.

The Lukas can be switched On, Ignition only, or park.

It takes standard CPL & UV filters which protects the lens.

Built in vehicle battery cut -off, super-cap, GPS and a wi-fi dongle to an APP, on a smart phone.

I was also aware that many Dash Cams cause DAB radio problems but Lukas appear to be well screened.

Last but no means least, price. I bought mine from Calgary Dash Cam and saved £130 on the UK price. At £200 with CPL and 40GB it’s a bargain.

The installation in a Toyota Auris Hybrid (Corolla in some countries) was not too bad once I found the fuse box. Toyota hide it upside down behind the glove box, at the bottom of the box. The only way to see it is to lay on your back, feat in the air, in the passengers foot well (RHD). Not a position I am comfortable with. The fuses do not relate to the hand-book and are not normal mini fuses but new flush fuses. The good news is the fuses I wanted to use were at the very end of the fuse box, marked P/ Outlet, 1, always hot, and Cig,17, ignition on. The handbook says the P/ Outlet is for the luggage area but on my Hybrid Auris that outlet only works with ignition on. I wanted to use fuse taps “ add a circuit” and I needed A “Hot” and Ignition to use the camera in park mode. At first these new flush fuse looked too small to use fuse taps. After a visit to an auto electrician I was told they were the same pitch but while you can use standard mini fuses in the flush fuse holder, you cannot use mini flush fuses in the fuse tap. As the fuse taps need two fuses (one replace the used circuit and one for the added circuit) you need two mini 15Amp and two 3Amp fuses. The Lukas glass fuses are not needed so these were discarded and the bullets soldered.

View attachment 15251

The Front camera was installed behind the mirror, the screen clip allows it to be slid out to get at the chips and I do not want any visual distractions, lights, voices or LED’s, while driving. All these features can be switched via the AP or the viewer.

The cables tucked out of the way under the headliner, across the top of the passenger A pillar and the top of the B pillar to the back. These look to be above the air bags. The power cable runs down under the weather strip into the void behind the glove box.

The rear camera is much smaller and is fitted to the high stop light cover. Access to the headlining can be gained by remove the three studs and the weather strip around the tailgate. The stop light plastic cover just pulls off and the cable can then be fed through the gator. The end of the gator in the tailgate is easy, but the end under the roof- lining is tricky to reseat. The hard white plastic saddle needs to be released and pushed out of the hole upwards, from under the headlining. The rubber gator fits over it and it then needs to clip back in the hole to form a tight seal. A piece of stiff wire and string may be a better way, in hindsight, but either is a bit of a fiddle.

Once into the tailgate it is all very straight forward, a slot in the cover for the cover to fit flush over the cable and job done. I could not avoid the heater wires completely
but they hardly notice.
View attachment 15252


Installed like a pro would!! Great job!
I was thrilled to read this. Very glad everything came together well.
 
Last edited by a moderator:
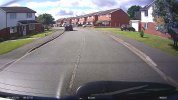
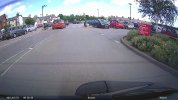
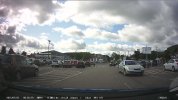
I tried BusterDuster capture but it did not work on my PC. So I ended up on VLC which works but it is not easy to find the .png file as it just puts it in your Picture directory. I then just converted it in Elements to jpg so here goes with resultsLukas Rear2.jpg Lukas Rear2.jpg Lukas Rear1.jpg Lukas Rear1.jpg Lukas Rear1.jpg Lukas front.jpg Lukas front2.jpg
 
Two are from the rear and two from front. I could not avoide the hot wires so it is easy to tel which. I am still playing with the settings so may be able to get better, but I am satisfied with these.
 
My Camera is hard-wired into the power outlet fuses I notice that the clips show the voltage, when driving, to be 14.5v. I know this is normal from the alternator but is the Lucas OK with this? It works fine.
 
My Camera is hard-wired into the power outlet fuses I notice that the clips show the voltage, when driving, to be 14.5v. I know this is normal from the alternator but is the Lucas OK with this? It works fine.
Just as Jokiin said, there is nothing to worry about :) Lukas was built for this.
 
Back
Top