Reviewing and Testing the Vantrue N4 Pro S

EricSan

Well-Known Member
Joined
Dec 28, 2023
Messages
1,408
Reaction score
1,066
Location
Central PA
Country
United States
Dash Cam
There are ALWAYS user serviceable parts inside!
I recently received a very kind invitation from Wendy at Vantrue to review their brand new Nexus 4 Pro S Dashcam. A very sincere "Thank you!" to Wendy, @Jeff_Vantrue, and the Vantrue team for entrusting me with another of their cameras for review. I was wondering how different this camera would be from the earlier N4S that I just received, but a quick look at this camera creates some unexpected excitement - this is clearly a VERY different camera. The N4 Pro S is 15mm wider (133mm overall width) and more than 25% heavier than the N4S, plus a few more fun surprises that are described below.

My other Vantrue dashcam reviews can be found here: E360, E1 Pro, N4S, S1 Pro Max, N4 Pro S, N5S
Vantrue Power (non-dashcam) Product Reviews: T800 Compressed Air Duster, TS2 Thermal Camera for iOS/Android

Features:
  • Triple STARVIS 2 Sensors (Front: IMX678, Cabin: IMX662 + 4 IR LEDs, Rear: waterproof IMX675)
  • 3-Channels: 4K+1080P+2.5K Recording
  • PlatePix™ License Plate Capture
  • Optional LTE Live Monitoring
  • 5GHz Wi-Fi & OTA Updates
  • Built-in GPS Tracking
  • Up to 1TB microSD Support
  • 24/7 Parking Mode
  • Easy to Install & Super Capacitor

Voice Commands:
- Take Photo
- Video Start
- Turn On Audio
- Turn Off Audio
- Turn On Screen
- Turn Off Screen
- Turn On WiFi
- Turn Off WiFi
- Lock The Video
- Show Front Camera
- Show Rear Camera
- Inside Video On
- Back to Homepage
I have verified that all of the voice commands work as expected.

Maximum Resolutions Are as Follows:
- Front camera: Starvis2 IMX678, 3840x2160P 30fps, 31.9Mb/s, 236,202Kb/Min file size
- Cabin Camera: Starvis2 IMX662 (with Automatic IR LEDs), 1920x1080P 30fps, 0.98Mb/s, 74,410Kb/Min file size
- Rear Camera: Starvis2 IMX678 (waterproof), 2592x1440PP 30fps, 14.3Mb/s, 107,178Kb/Min file size

All files are encoded with H.256 video codec which is claimed to produce videos with file sizes that are up to 50% smaller than those made with the H.264 codec.

When compared with the N4S, the N4 Pro S front camera is higher resolution (4k vs 2.5k), the cabin camera is lower resolution (1k vs 2.5k), and the rear camera features the same resolution (both 2.5k). There are a few surprises hiding inside the larger N4 Pro S (which appears to be the big brother of the N4S).

Taking all of the size, weight, codec, and bitrate data into account, it's looking like the N4 Pro S features the highest image quality of all of the Vantrue cameras that I've reviewed so far. It has the same front camera resolution and data rate as the excellent E1 Pro but features the more efficient H.265 codec (the E1 Pro uses H.264) and features 30% larger file sizes than the 4K S1 Pro Max. This likely makes the N4 Pro S Vantrue's flagship dash camera. Needless to say, I'm excited already and I haven't gotten very far yet...

Camera angles:
- 155 degree angle front camera
- 160 degree cabin camera
- 160 degree rear camera

User Manual and Firmware Updates:

There is support for 32GB-1TB micro SD cards as well as for the LTE module (each available separately).

Like other Vantrue dashcams, the Nexus N4 Pro S uses super capacitors that provide 3-4 seconds of runtime after power is removed from the camera.

As with the E360 Ace, E1 Pro, and N4S, and S1 Pro Max cameras that I reviewed previously, the packaging materials are excellent.
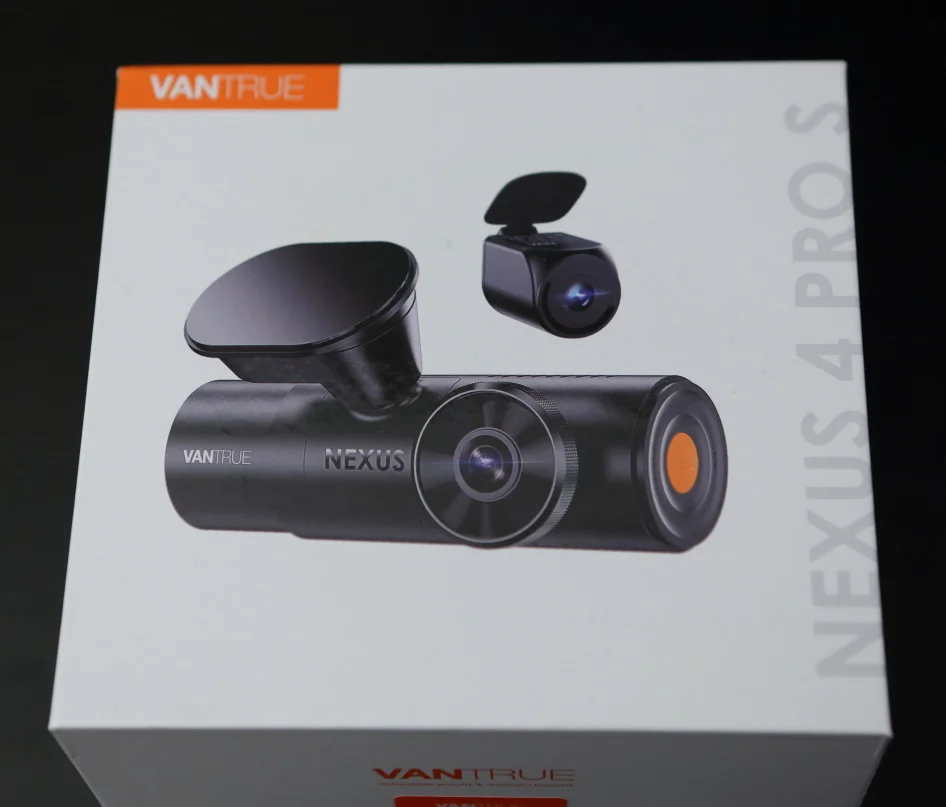
IMG_15514.webp


The usual foam inserts hold everything snugly inside the box:
IMG_15516.webp


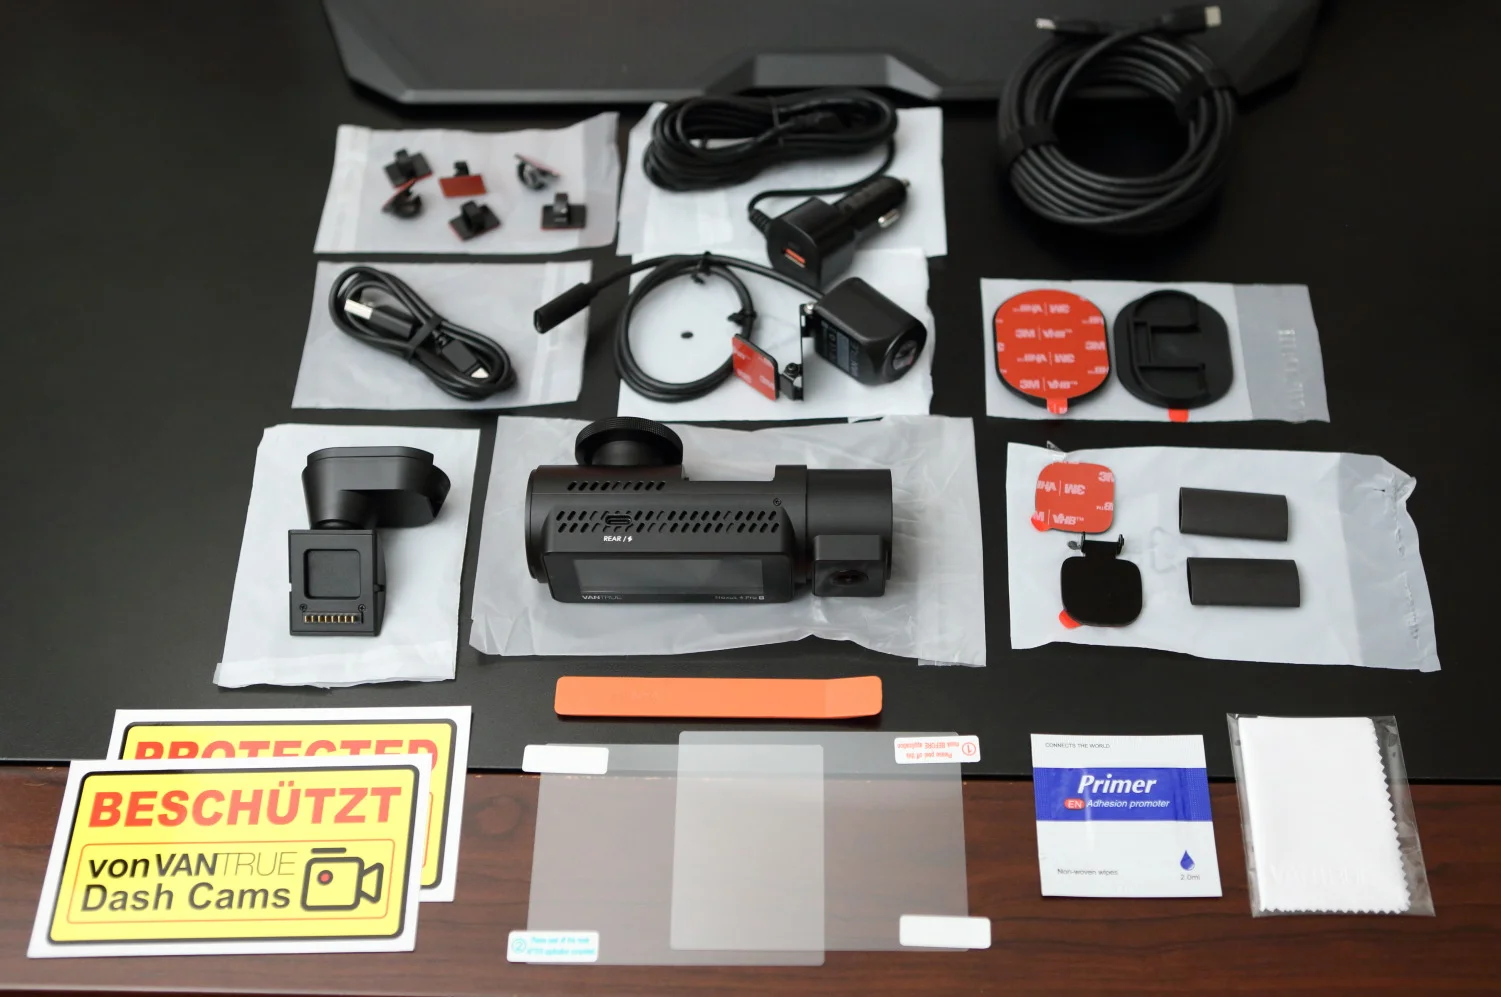
And here is everything that is included in the box. There is now a small alcohol pad included for cleaning the inside of your window before applying the static cling sheets for mounting the camera to your window. The usual 3.3ft/1m long data cable with a USB-A connector on one end and a USB-C connector on the other end is included for transferring files to your computer. The USB-C cable for the rear camera is 20ft long, has a straight USB-C male connector on one end, and a 90 degree USB-C male connector on the opposite end.
IMG_15871.webp
 
Last edited:
This is the main camera module for the Nexus 4 Pro S. The recess in the center of the front is the magnetic mounting location for the GPS/windshield mount. You can also see the trademark Vantrue bulls-eye lens. This lens is exactly the same size as the lens on the E1 Pro, S1 Pro Max, and N4S cameras, so the same 40mm circular polarizer will fit fine.

IMG_15847.webp


And here is the rear view of the camera with the lens protecting applique still in place:
IMG_15518.webp


The screen appears to be the largest screen of the Vantrue lineup, measuring 67mm wide by 26mm tall. To the left of the screen, right next to the edge, is a tiny green power on LED that is very unobtrusive, but visible enough to let you know that it is powered on. The light will blink while recording. It is VERY unobtrusive. 👍
IMG_15839.webp


The top view reveals the USB-C connector to the rear camera and lots of ventilation holes. I like that the rear camera connector comes out the top of the main camera, which allows the cable to head straight up to the headliner to keep the wires neater after installation 👍
IMG_15844.webp


The bottom view of the camera shows the usual combination of menu buttons (the screen is not a touch screen), which are more widely spaced than they are on the N4S - which I appreciate.

The button on the left toggles record stop/start with a quick press and turns the screen on/off with a long press.
The second button switches which cameras are displayed on the screen with a quick press.
The third button toggles the microphone on/off with a quick press and among the toggles drive/parking mode with a long press.
The fourth button activates the menu with a short press and toggles WiFi mode with a long press.

These buttons also serve as menu navigation. You can also see lots of ventilation holes, the microphone, and a curious little lens labelled "IR." As it turns out, this is the sensor for turning the infrared LEDs on and off when the IR LED setting in the menu is set to "Auto." I like settings and features like this that make good sense!

IR LEDs.webp


I'm guessing that I have a "Pre-release" model as there is no serial number on the bottom of the unit.

IMG_15520.webp


Left side view shows the power button (long press) which doubles with with Lock Video button (short press). There is no LED here - which I also appreciate.
IMG_15522.webp


Behind this tethered/removable end cap is a "secret" hidden panel that covers the SD card slot, the Power/Lock Video button and the Reset button. Pretty clever! As you can see, I've already tucked an SD card into the slot. Of the Vantrue cameras that I have reviewed, this one seems to be most difficult for both inserting and removing an SD card. It seems that it needs to be pushed further into the housing to lock and release the card. If you’ve just clipped your nails, you’ll struggle quite a bit with the N4 Pro S card slot.
IMG_15841.webp


The right side of the camera features the N4 Pro S logo:
IMG_15845.webp
 
Last edited:
The cabin camera is similar to that of the N4S, but the resolution is a bit lower. You can see the usual set of 4 infrared LEDs and what appears to be my thumb print on the lens already 😉

The lens on the N4 Pro S cabin camera seems to be a little bit different from the cabin camera of the N4S. On the N4S, the cabin camera lens is flush with the surface of the camera's faceplate. With the N4 Pro S, the lens protrudes a bit from the flat surface of the camera. In practice, this hardly makes any practical difference - it's just an observable difference while comparing the two cameras.

IMG_15519.webp


The N4 Pro S cabin camera rotates up and down exactly the same amount as the the cabin camera on the N4S. Both appear to rotate up by 45 degrees and down by 45 degrees, for a total range of about 90 degrees. Here are both cameras with the cabin camera rotated as far up as it will go:
IMG_15893.webp


And both cameras rotated down as far as possible:
IMG_15894.webp
 
Last edited:
The divider box contains a variety of mounting and installation hardware: TWO windshield adhesive mounts (AWESOME!) for making it easy to move the N4 Pro S camera between cars, a GPS swivel mount that attaches to the camera, a utility plug power supply (more on this below), some windshield cable retainer clips with 3M adhesive, and an alternate mounting plate for the rear camera along with some heat shrink tubing for sealing the rear camera's USB connection should you decide to mount it outside of the car's cabin.
IMG_15850.webp


The windshield mount houses the GPS unit and also has the USB-C power input adapter and features a swivel ball-joint for multi-axis movement once mounted on your windshield. It features a magnetic mounting plate that holds the camera VERY firmly. To remove it, just pull it straight out from the camera...

IMG_15852.webp


I'm REALLY liking this mounting mechanism, it is identical the one from the N4S which is also highly similar to the windshield mount for the E360 camera.
IMG_15854.webp


You can see the main power entry USB-C port below:
IMG_15853.webp


Also note the horizontal groove on each side of the mounting plate - this slots into the raised portion on the camera to help everything hold together firmly and squarely.
IMG_15855.webp


Here are some images of the N4 Pro S with the windshield mount moved as far up and down as it can go:
IMG_15879.webp


and as far down as it can go:
IMG_15878.webp


And below is the left to right tilt of the swivel mount. Overall, this should be enough movement to mount the N4 Pro S to your windshield and still adjust the camera for a level view of the road.
IMG_15898.webp


IMG_15897.webp


One small detail that I also appreciate is that the N4 Pro S camera comes with larger static cling sheets for mounting the cameras to the windshield. Here is a comparison of the static sheets that came with the N4S camera (top) and the N4 Pro S (bottom):
IMG_15875.webp


The new on measures 10cm by 8cm. If you're like me, I cut these up so they are a little smaller and this gives me a few more mounting options before I need to try to find some extras.
 
Last edited:
Here is the rear window camera. It is the same design as the N4S rear camera that allows mounting either inside the rear window or, due to its IP67 water resistance, it can be mounted on an external surface of your vehicle. The built in cord for the rear camera is ~50cm/20in long and features a USB-C female connector.

IMG_15862.webp


There is a great deal of flexibility with this rear camera mount. This "accordion" style mount is meant for mounting on the inside of the rear window and will allow just about any orientation of mounting and still have a great view out the back of the car.
IMG_14913.webp


Although my rear camera is stamped with F1.6 (which I thought was WAAAAY cool), Jeff has confirmed that the lens is indeed an F1.8 aperture (I have a pre-production model). Effectively, this makes the rear cameras identical between the N4S and the N4 Pro S cameras. Like the N4S, the rear panel of the rear camera gets quite warm while operating.

IMG_15863.webp


And here is a view of the rear camera lens.
IMG_15895.webp


Should you choose to mount the rear camera on the outside of your car, it is IP67 rated, so the weather won't cause any problems at all. There is some additional hardware included in the kit to allow external mounting:
IMG_15856.webp


Just swap out the mounting plate for the one shown above by removing the two small Phillips head screws and you can attach the camera to the trunk overhang above your license plate, or on top of your bumper and then invert the image with one of the menu settings in the camera. The two black rectangles on the right side of the image above are heat shrink tubing to better seal the connection between the two USB-C cables to keep water out. Just use your hairdryer on its high setting or, better yet, use your heat gun on low setting for a few seconds.
 
Last edited:
Here are a few side by side size comparison of the smaller N4S and the larger N4 Pro S. The N4 Pro S is wider by about 15mm (overall width is about 133mm). It also weighs about 25% more than its "little brother." With all of these changes (larger form factor, heavier weight, larger aperture rear camera, and higher bitrate for the 4K front camera, I'm VERY eager to get this installed in my car and make some images. The larger size and heavier weight make me think there are some serious upgrades to image processing going on inside, so I have high hopes already for some stellar image quality. Originally, I was thinking I'd just swap the N4S in my car for the N4 Pro S, but now I'm thinking I want to see both of them side by side so make some comparisons.

IMG_15881.webp


IMG_15887.webp


IMG_15889.webp


The body of the N4 Pro S is also a bit larger in diameter as well.
IMG_15888.webp


IMG_15890.webp
 
The utility plug adapter that comes with N4 Pro S is the same updated "tapered" version that came with the N4S and the S1 Pro Max. It has a higher current rating, but the barrel is somewhat tapered toward the point which makes it fit less securely into the utility outlet in my car. When I plug it in, it pushes itself back out of the outlet again. This happens on three different brands of car (Volvo, Toyota, Ford). Last week, the plug worked itself loose while I was driving and my N4S camera shut down. The older version features a non-tapered barrel and fits VERY securely into the utility port, but it has a lower rated power output.

As cameras grow more sophisticated and the ability of the power supply to deliver sufficient voltage and current to the dashcam, it is becoming increasingly critical that you use the specific power supply that comes from the manufacturer. There have been many reports of strange dashcam behaviors (across all brands) here on DashCamTalk that when investigated further have been the result of using an off-brand power supply that does not meet the power supply demands for the newer cameras.

It is ALWAYS best to stick with the provided power cables and not to modify them in any way.

IMG_14909.webp


IMG_14910.webp
 
Last edited:
Thank you,EricSan! I am very interested in knowing the difference between the n4pro and n4s, whether the n4pro is just an upgrade to the rear and interior cameras, and whether the front camera has been improved compared to the n4pro
 
It will take me another day or two to make and compare some videos. The data rates, however, indicate that the N4 Pro S is a VERY substantial update over the N4S. Here is a quick summary:

1) Front camera on N4 Pro S is 4k, N4S front camera is 2.5k. Both use H.265 codec
2) The N4 Pro S has a much higher data rate than the S1 Pro Max, both of which use a 4k front camera with the same resolution. The S1 Pro Max has notably better image detail than the N4S, see link below.
3) While the front camera is higher quality on the N4 Pro S, the cabin camera on the N4S is higher resolution at 2.5k. The N4 Pro S uses a 1k cabin camera. This choice was likely made to conserve space on the SD card and allow more data bandwidth for the front camera. This is an acceptable tradeoff for me. There is only so much image processing horsepower that can be contained in a "small package" and still keep power consumption/heat generation within acceptable limits.

 
Last edited:
Just an update here. I initially reported the the N4 Pro S camera comes with an F1.6 aperture lens. As it turns out, the markings on the rear camera are incorrect and it is actually an F1.8 lens. Jeff confirmed this in the thread created by @Hack_man.

But, since @Jeff_Vantrue is on the lookout for new ideas and suggestions, I would recommend looking for a way to make this a faster lens than F1.8 - It is my understanding from poking around online that there are a wide variety of lenses out there with varying fields of view/zoom factors and varying apertures. 🙂
 
@EricSan @jsmith are you able to set the time zone to the correct value to get the correct time? My time zone is -5 New York and the ST/WT Auto Switch has no impact on my displayed time (OFF or United States).
For both the N4S and N4 Pro S I have to set the Time Zone to -4 Caracas, LaPaz to get the correct time.
 
I'm not remembering the sequence in which I made the settings, but I think I set the timezone to NYC and then turned on the ST/WT setting and my camera is currently displaying the correct time. I've also set the "synch to phone time" setting, so I'm not sure which one is responsible, but my camera is displaying the correct time.
 
@EricSan @jsmith are you able to set the time zone to the correct value to get the correct time? My time zone is -5 New York and the ST/WT Auto Switch has no impact on my displayed time (OFF or United States).
For both the N4S and N4 Pro S I have to set the Time Zone to -4 Caracas, LaPaz to get the correct time.

I have the LTE Modem and my time is fine. I believe the LTE forces a sync for proper time zone. I don't know without the internet connectivity whether it works or not. I can check the other cameras and get back to you if they have an issue on keeping proper time zone.
 
Here are some comparison images from the N4 Pro S camera with various settings of HDR and PlatePix. All images use a circular polarizer.

One visual element that stands out overall is the linearity of the lens. Look at the extreme left and right edges of the image. The sign post on the right is not distorted or curved at all. Also, on the left side of the image, the brick work on the building is also vertical and not curved. Nice work on the image processing!

There are clearly some differences between just HDR mode and just PlatePix mode. These functions are definitely functioning independent of one another.

HDR off, PP off: this is clearly the brightest of the four images. Top line of the strip mall straight and level - excellent distortion free image!
N4PS HDR off PP off.webp


HDR on PP off:
N4PS HDR on PP off.webp


HDR off PP on:
N4PS HDR off PP on.webp


HDR on PP on: this is clearly the darkest of the four images.
N4PS HDR on PP on.webp


S1 Pro Max: HDR on PlatePix on: I think exposure is set to EV +0.3, top line of the mall is straight, but sloped downward.
S1PM HDR on PP on.webp


Viofo A139 Pro, HDR on: the top line on the mall in right side of the image is clearly sloped and curved here, showing the distortion of the lens.
A139 HDR on.webp


I also posted some images from the rear camera for each of these. You can find them here in Post #58
 
Last edited:
Here are some comparison images from the N4 Pro S camera with various settings of HDR and PlatePix. All images use a circular polarizer.

HDR off, PP off:
View attachment 82968

HDR on PP off:
View attachment 82969

HDR off PP on:
View attachment 82970

HDR on PP on:
View attachment 82971


@Hack_man @EricSan @Jeff_Vantrue

When driving with HD (Need to test without to see if same issue), no CPL,the picture is quite bright but also does have motion blur. Do you notice when hitting a bump at night with HDR enabled, the image gets blurry for a second? I wonder if this is HDR processing taking place (trying to capture multiple stills of images), and the vibration disrupts its algorithm.

Again, I'm not sure if this happens with HDR disabled. I'll need to test that one.


Blurry.webp
 
Here are four 250% zooms from each of the video files above. I've focused on the lettering on the rear of the trailer across the parking lot.

These images are a bit harder to distinguish from one another. The logo on the back of the trailer appears to have a bit more contrast in the second image than it does in the first image (which isn't a surprise). The logo seems to be a bit more readable overall with HDR off and PlatePix on (3rd image). The 4th image seems to contain the greatest amount of processing artifacts overall (again, not a surprise, both HDR and PlatePix are enabled).

N4PS 250% zoom, HDR off, PlatePix off:
250zoom HDR off PP off.webp


N4PS 250% zoom HDR on PlatePix off:
250zoom HDR on PP off.webp


N4PS 250% zoom, HDR off PlatePix on:
250zoom HDR off PP on.webp


N4PS 250% zoom HDR on PlatePix On:
250zoom HDR on PP on.webp


S1 Pro Max: HDR on, PlatePix on: EV = +0.3
250zoom HDR on PP on S1PM.webp


A139 Pro: HDR on
250zoom HDR on A139.webp
 
Last edited:
@Hack_man @EricSan @Jeff_Vantrue

When driving with HD (Need to test without to see if same issue), no CPL,the picture is quite bright but also does have motion blur. Do you notice when hitting a bump at night with HDR enabled, the image gets blurry for a second? I wonder if this is HDR processing taking place (trying to capture multiple stills of images), and the vibration disrupts its algorithm.

Again, I'm not sure if this happens with HDR disabled. I'll need to test that one.


I'll try to look for this condition, I don't have much night footage yet.
 
Here are some comparison images from the N4 Pro S camera with various settings of HDR and PlatePix. All images use a circular polarizer.

One visual element that stands out overall is the linearity of the lens. Look at the extreme left and right edges of the image. The sign post on the right is not distorted or curved at all. Also, on the left side of the image, the brick work on the building is also vertical and not curved. Nice work on the image processing!

There are clearly some differences between just HDR mode and just PlatePix mode. These functions are definitely functioning independent of one another.

HDR off, PP off: this is clearly the brightest of the four images.
View attachment 82972

HDR on PP off:
View attachment 82973

HDR off PP on:
View attachment 82974

HDR on PP on: this is clearly the darkest of the four images.
View attachment 82975
"HDR OFF, PlatePix ON" is not consistent with how PlatePix purportedly functions. My understanding is the PlatePix algorithm requires HDR be enabled, which is why Vantrue states the HDR and PlatePix timers should always be synchronized.
However, your image for HDR OFF PlatePix ON does show a difference in image quality.
@Jeff_Vantrue can you please comment on the image HDR OFF PlatePix ON? Is PlatePix actually OFF and if so why is the image darker than the baseline HDR OFF PlatePix OFF?
 
Last edited:
It seems that HDR and Platepix are relatively independent units, and the official statement is not valid. During the day, when both HDR and Platepix are turned off, the screen appears brighter. At night, it is necessary to test which one is clearer when turned on separately
 
Do you notice when hitting a bump at night with HDR enabled, the image gets blurry for a second?

This makes sense since the camera is attempting to align multiple exposures, so the overlap won't be anywhere near precise until the car settles after the bump in the road. I suspect the video will be more clear (or at least settle more quickly) with HDR off.
 
Back
Top